Applies to: Dental machines
Troubleshooting – fix problems yourself
General troubleshooting
The actual sound emission of the machine varies heavily depending on the manufacturing material and the machining conditions.
- If the machine is exceptionally loud, check the following operating conditions:
- Cleanliness of the blank holder
- Condition of the tools
- Quality of the blank
- If loud noise cannot be avoided, wear ear protection during machining.
This can be caused by the following:
- The .stl file is corrupt.
- Re-export the .stl file from the CAD application after correcting CAD settings.
- Multiple construction.info files exist in the folder path (DentalCAM currently supports only 1 construction.info file per path).
- Remove all unrelated construction.info files from the directory where the .stl file exists.
The Windows® system memory (RAM) or the available amount is insufficient.
- Check the size of the Archive folder. If it is unusually large (more than 15–20 GB), delete blanks that have been completely utilized.
- Reboot the computer to free up memory resources.
- Close all unnecessary applications.
- In the Task Manager (Windows® 10), check if there are enough memory resources available:
- Press CTRL + Shift + Esc.
- The Task manager window opens.
- Select the Performance tab.
- In the left column below the Working memory label, the currently used and maximum working memory displays.
The .stl has been saved in ASCII format rather than binary format.
- Open the folder containing the corresponding STL file in Windows® Explorer.
- Right click on the STL file and select Open with from the list.
-
Select a text editor (e.g. Notepad, Wordpad etc.).
-
If it appears as a text document it is ASCII format.
- Re-export this file from your CAD application in binary format to convert this file from ASCII to binary format.
This error is caused by damaged STL files whose thumbnails cannot be deleted by DentalCAM.
-
Delete the contents of the STLImp folder in the DentalCAM & DentalCNC installation directory.
The .stl has been saved in ASCII format rather than binary format.
- Open the folder containing the corresponding STL file in Windows® Explorer.
- Right click on the STL file and select Open with from the list.
- Select a text editor (e.g. Notepad, Wordpad etc.).
- Re-export this file from your CAD application in binary format to convert this file from ASCII to binary format.
The selected .stl file has read only or limited file permissions for the current user.
- Verify that the .stl file does not have read-only access rights.
- Verify that the DentalCAM installation directory does not have read-only access rights.
- Copy the .stl file to a local drive, restart DentalCAM and try to nest the .stl file.
After DentalCAM 7/8 installation or Windows® update, enable .Net Framework 3.5 and 4.7 from the Windows Features menu in Windows®.
-
Navigate to Control Panel > Programs & Features.
-
Select Turn Windows Features on or off.
-
Activate .NET Framework 3.5 and .NET Framework 4.7.
-
Select OK.
-
Update DentalCAM & DentalCNC again to the latest version with an installation package.
If you need an installation package, contact customer service.
Null is a variant subtype used to indicate that a data item contains no valid data.
- Backup user data and reinstall DentalCAM.
There are also error messages other than DentalCAM errors and Run time errors that are shown by Windows®. Following you find the error messages and possible solutions for the elimination of the errors.
Conflicting drillings have been detected.
- Use the editing function for specifying the drilling range to remove the duplicate drilling (you can find the corresponding instructions here).
After DentalCAM 7/8 installation or Windows® update, enable .Net Framework 3.5 and 4.7 from the Windows Features menu in Windows®.
-
Navigate to Control Panel > Programs & Features.
-
Select Turn Windows Features on or off.
-
Activate .NET Framework 3.5 and .NET Framework 4.7.
-
Select OK.
-
Update DentalCAM & DentalCNC again to the latest version with an installation package.
If you need an installation package, contact customer service.
The Windows® library is required for opening the residual material display in DentalCAM.
- Install Microsoft Visual C++ 2013 Redistributable (x64) (or use the provided download link)
This error may occur after a Windows® update.
- Ensure that you are opening DentalCNC as administrator or with administrator rights.
-
Reinstall the DentalCAM software using administrator rights.
Other problems can occur during the operation of DentalCAM. Following you find the most common problems that occur and solutions for the elimination of the problems.
This can be caused by the following:
- An incorrect prefabricated abutment blank was inserted into the blank holder.
- Ensure that the correct prefabricated abutment blank is used.
- Replace an incorrect prefabricated abutment blank with a correct one.
The correct prefabricated abutment blank is defined by the CAD application in which the STL file was created. - Measuring problem due to a mechanical problem with the collet chuck.
- Perform a collet chuck maintenance (see the operating instructions for your machine).
- Make sure that the collet chuck is fully tightened.
- Software conflict
- Update DentalCAM to the latest version.
Windows font size has been increased to more than 100%.
- Go to Control Panel > Appearance and Personalization > Change the appearance of your display > Make text and other elements larger or smaller.
- Set the size of texts to Smaller – 100 % (default).
The following issues require you to change Windows® settings. You may need administrator privileges for this.
The machine should always maintain a connection to the CAM computer![]() The computer that is connected to your machine and which runs DentalCAM and DentalCNC.. Ensure that the CAM computer
The computer that is connected to your machine and which runs DentalCAM and DentalCNC.. Ensure that the CAM computer![]() The computer that is connected to your machine and which runs DentalCAM and DentalCNC. does not go into “Sleep” or “Hibernate” modes during the milling process.
The computer that is connected to your machine and which runs DentalCAM and DentalCNC. does not go into “Sleep” or “Hibernate” modes during the milling process.
One common setting that can effect milling is the USB selective suspend setting. We recommend that you disable this to avoid any connection interruptions.
- Open Windows Settings.
- Select System.
- Select Power & sleep.
- Select Additional power settings.
- Select Change when the computer sleeps.
- Select Never from the Energy-saving mode after drop-down list.
- Select Change advanced power settings.
- Select USB settings [1].
- Select USB selective suspend setting and select Deactivated [2].
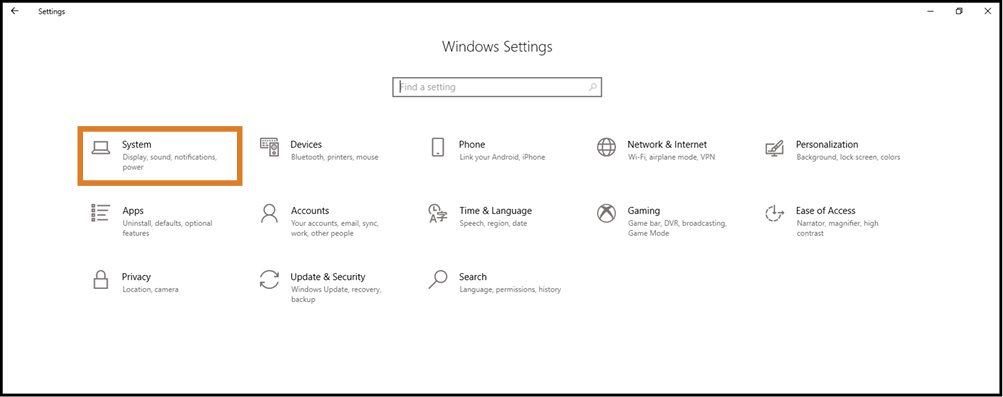
System selecting in the Windows Settings

Selecting Power & sleep
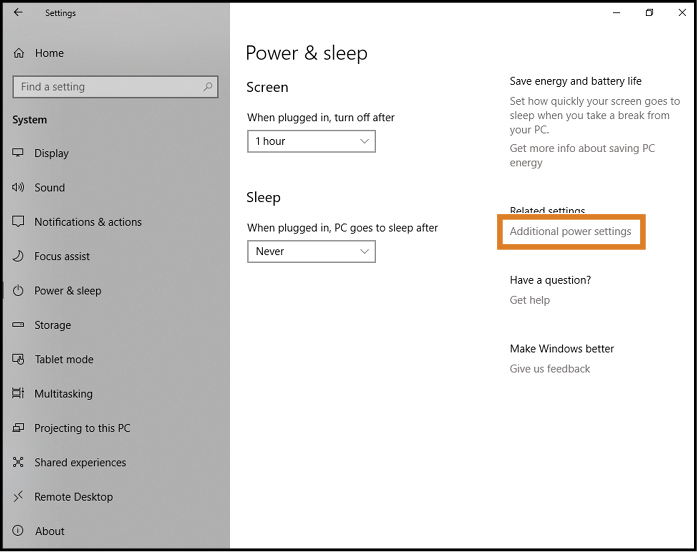
Selecting Additional power settings

Selecting Change when the computer sleeps
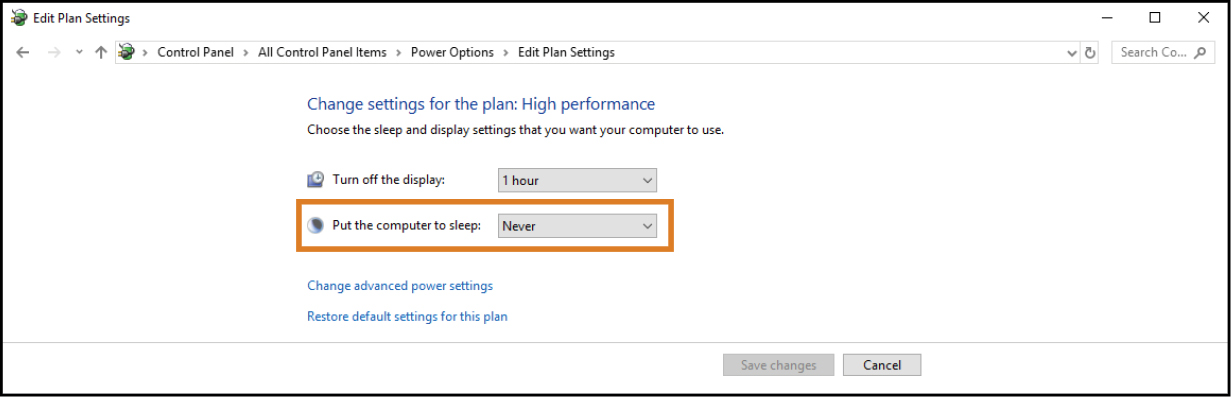
Never Selecting Energy-saving mode after from the drop-down list
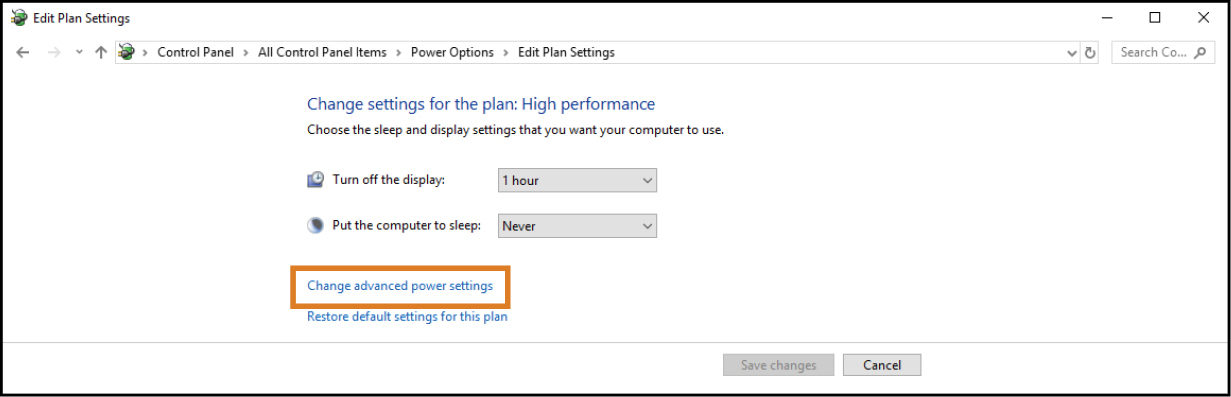
Selecting Change advanced power settings
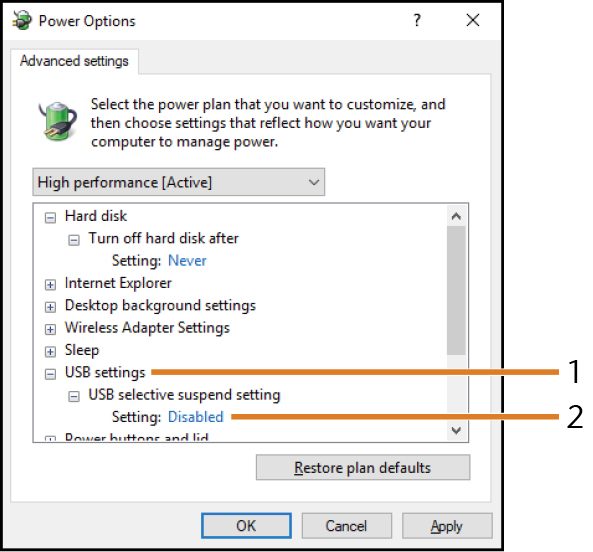
USB settings Selecting [1] and changing USB selective suspend setting to Deactivated [2]
Windows® 10:
- Open Windows Settings.
- Select Time & Language.
- Select Additional date, time, & regional settings.
- Select Change date, time, or number formats.
- Select English (United States) from the Format drop-down list.
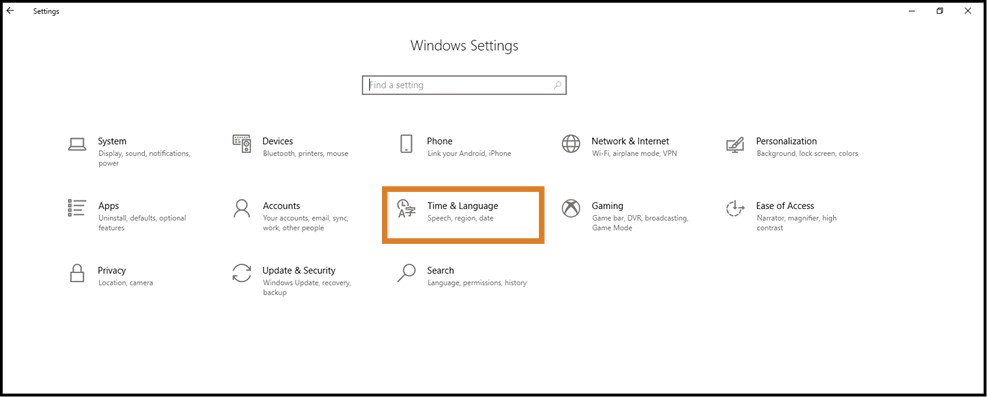
Time & Language selecting in the Windows Settings
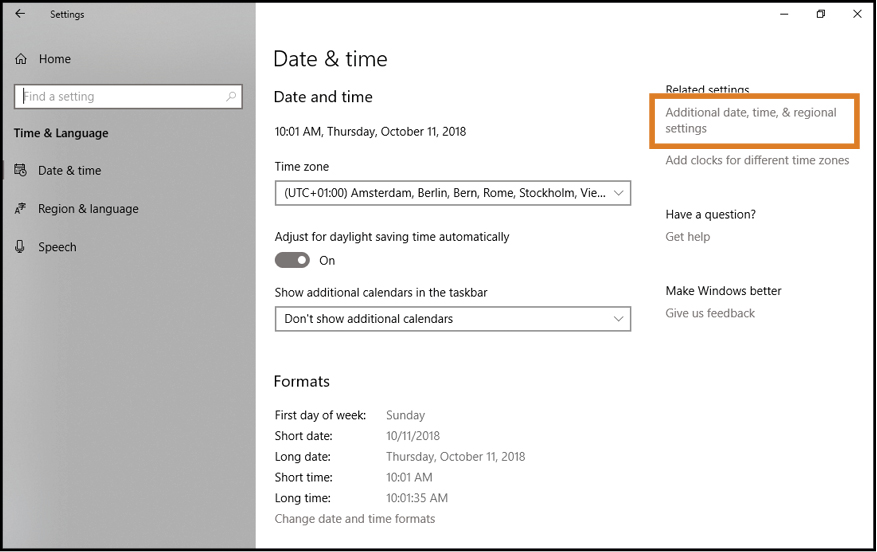
Selecting Additional date, time, & regional settings
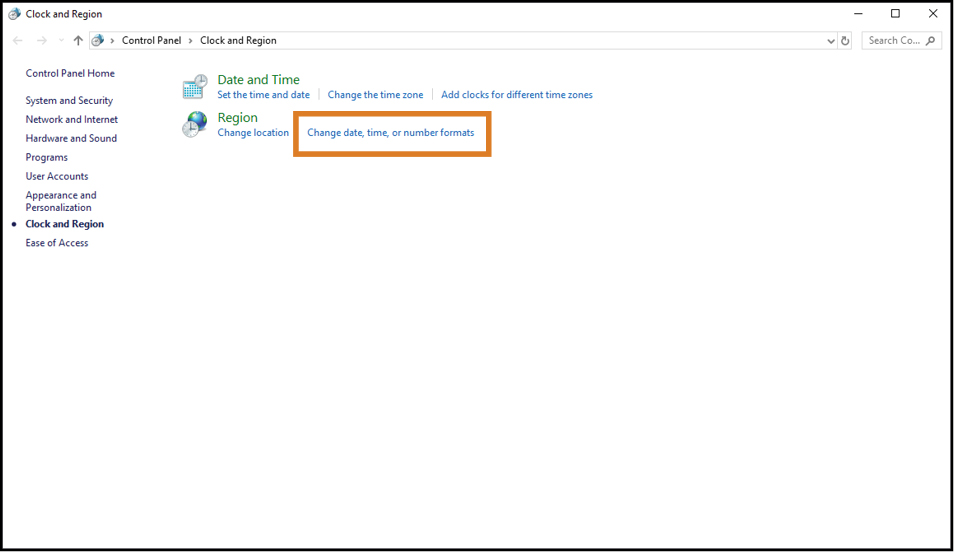
Selecting Change date, time, or number formats
English (United States) Choosing Format from the drop-down list
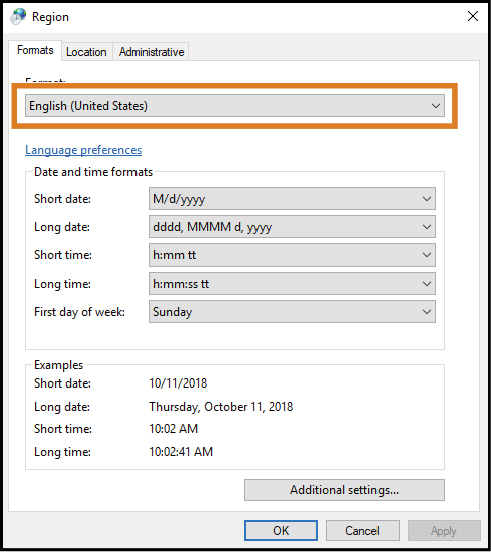
Older Windows® versions:
- Open the Control Panel.
- Select Region.
- Select Change date, time, or number formats.
- Select English (United States) from the Format drop-down list.
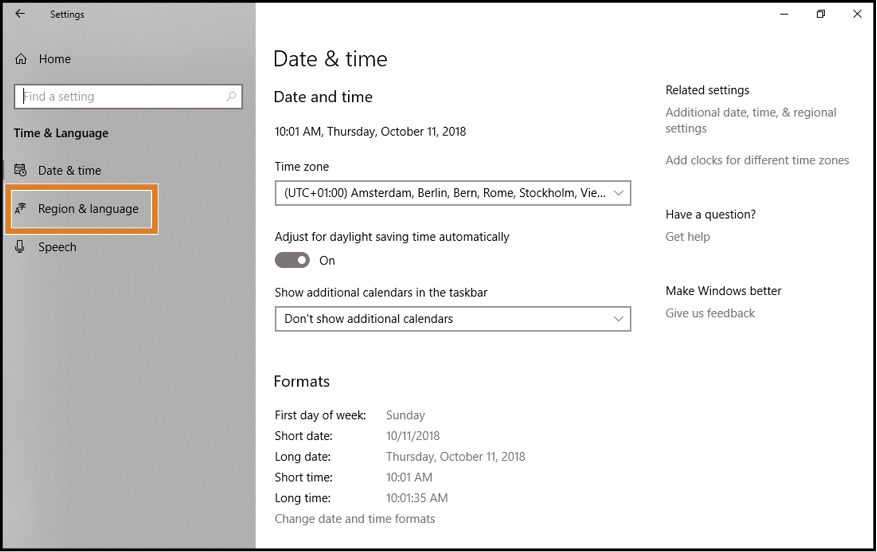
Windows® 10:
- Open Windows Settings.
- Select Time & Language.
- Select Additional date, time, & regional settings.
- Select Change date, time, or number formats.
- Select Administrative.
- Select Change system locale.
- Select English (United States).
Time & Language selecting in the Windows Settings
Selecting Additional date, time, & regional settings
Selecting Change date, time, or number formats

Selecting Administrative
Selecting Change system locale
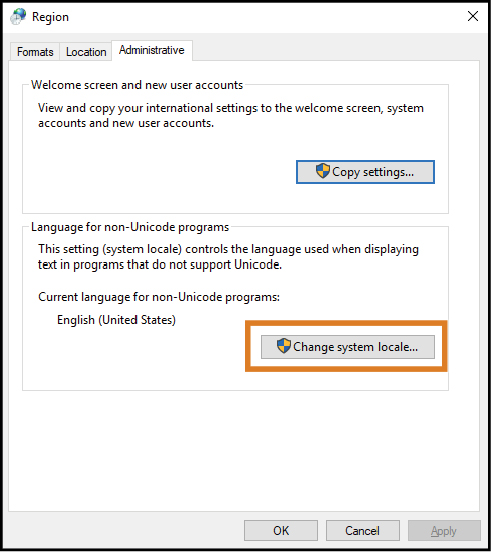
Older Windows® versions:
- Open Control Panel.
- Select Region.
- Select Change date, time, or number formats.
- Select Administrative.
- Select Change system locale.
- Select English (United States).
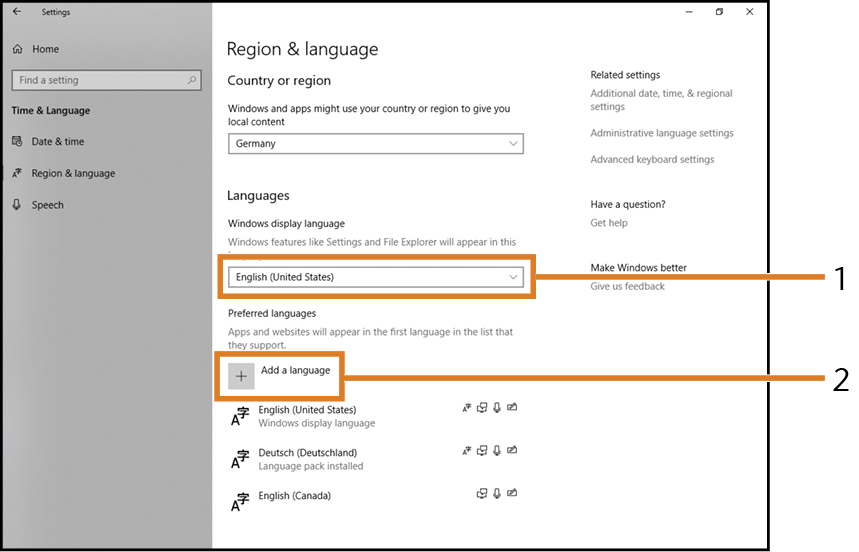
Windows® 10:
- Open Windows Settings.
- Select Time & Language.
- Select Region & language.
- Select English (United States) from the drop-down list [1].
- If this is not possible, select Add a language [2].
- Enter English (United States) in the input field or scroll down the list and select English (United States).
- Install the language package.
- Select English (United States) from the drop-down list [1] (see figure above).
Time & Language selecting in the Windows Settings
Selecting Region & language
English (United States) Selecting [1] or Add a language [2]
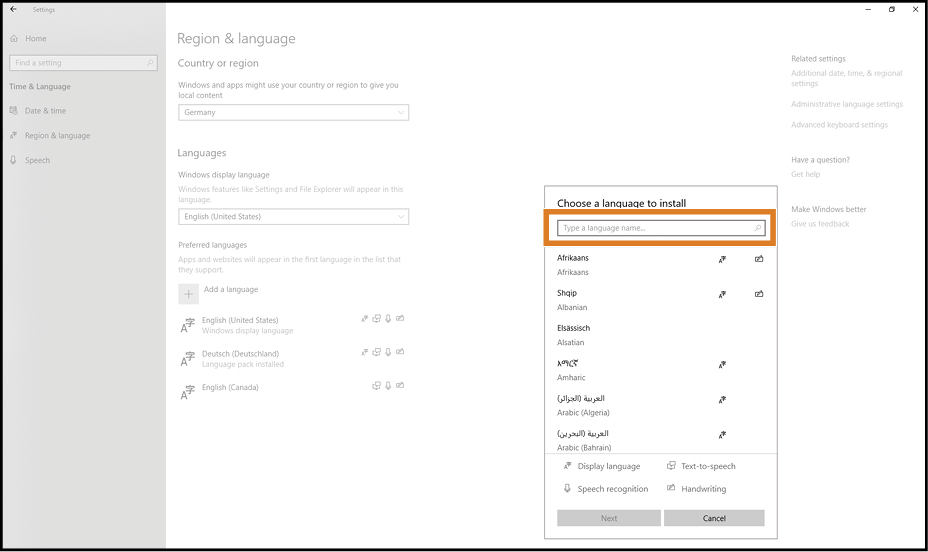
Selecting English (United States)
DentalCNC error codes
| Code | Description |
|---|---|
|
-3101 / -1101 |
|
|
-3100 / -1100 |
|
|
-3001 / -1001 |
|
|
-3000 / -1000 |
|
|
-2101 / -1101 |
|
|
-2100 / -1100 |
|
|
-2001 / -1001 |
|
|
-2000 / -1000 |
|
|
-17 |
Suction unit switched on during wet machining (R5) |
|
-16 |
No block mounted |
|
-15 |
Block dimension exceeded |
|
-14 |
Invalid tool change |
|
0 |
OK |
|
1 |
Unsupported command |
|
2 |
Invalid command |
|
3 |
Command currently not available |
|
5 |
License needed |
|
6 |
Stopped by user |
|
7 |
Out of memory |
|
10 |
Unknown parameter |
|
12 |
Missing parameter |
|
13 |
Parameter out of range |
|
14 |
No costumer profile found |
|
20 |
Axis motor not defined |
|
21 |
Axis cannot be used as parallel axis |
|
25 |
Coordinate out of axis range |
|
30 |
No spindle defined, P9000=0 |
|
31 |
No response of spindle controller |
|
32 |
Spindle input active |
|
40 |
Cannot record macro |
|
41 |
Macro too long |
|
42 |
Error in last macro |
|
43 |
Macro not found |
|
50 |
Emergency stop after booting |
|
53 |
Stopped by spindle interface |
|
55 |
Stopped by hbox interface |
|
57 |
Error while booting |
|
61 |
Stopped by overload error of spindle |
|
63 |
|
|
70 |
Level offset too high |
|
71 |
Internal software error |
|
72 |
Error opening / reading file |
|
73 |
No answer from IIC device |
|
74 |
Error while loading fpgas driver |
|
77 |
Error when updating spindle or hbox |
|
78 |
No input signal |
|
79 |