Nesting objects in the nesting views
Nesting overview
After importing your object files into DentalCAM, you have to nest them in your blank. Nesting your objects means to position them in the blank, add bars, sinter bars and drops if required. Your goal is to use your blanks as efficiently as possible while at the same time achieve a high machining quality.
While you can use almost all features of DentalCAM and DentalCNC with a touchscreen, nesting objects without a mouse would be quite cumbersome. We therefore assume that you are using a mouse for nesting.
There are 2 nesting views:
- In the first nesting view you can adjust objects (e. g. move and rotate them), set drops, create sinter bars etc.
- In the second nesting view you can set bars for each object.
- To open the Nesting view for adjusting objects, select the following icon in the main icon bar:

- In order to open the Nesting view for setting bars, select the following icon in the main icon bar:

You can quickly switch between both nesting views by right-clicking onto the blank when viewing it from the top. This is a very efficient way to quickly get to the view you need for your next editing step.
Getting started with nesting
Nesting can be very fast, or it may take a bit of time depending on the complexity of the job. Let's take a look at the simplest nesting workflow and the complete one:
The following workflow should be sufficient for many jobs.
- Position your objects horizontally and vertically in the top view.
- Rotate your objects about the Z-axis in the top view.
- Check if all cavities and drillings are correct.
- Specify the drilling range for objects with unrecognized drillings.
- Mark the cavities for objects with unrecognized cavities.
- Set bars for all objects.
- Done
We recommend performing the steps in the given order, but if you prefer to do them in a different order, that's fine as well. Note that as soon as you have set bars for an object (last step), you can only move it in X-/Y-direction and rotate it about the Z-axis.
The following workflow covers all aspects of nesting. Note that even when dealing with complex jobs, you won't need to perform every step listed below.
- Delete any incorrect machined areas.
- Change any incorrect object statuses and delete non-required objects.
- Position your objects horizontally and vertically in the top view.
- Rotate your objects about the Z-axis in the top view.
- Adjust the height position of your objects and/or rotate them about the X/Y-axis (multilayered blanks).
- Check if all cavities and drillings are correct.
- Specify the drilling range for objects with unrecognized drillings.
- Mark the cavities for objects with unrecognized cavities.
- Mark the attachment for objects with an attachment.
- Create a sinter bar for objects that require a sinter bar.
- Set drops for objects that require drops.
- Set bars for all objects.
- Done
We recommend performing the steps in the given order, but if you prefer to do them in a different order, that's fine as well. Note that as soon as you have set bars for an object (last step), you can only move it in X-/Y-direction and rotate it about the Z-axis.
The following slide show should give you a first impression of how nesting works in DentalCAM. We'll get into the details in the course of this Help Article.
Positioning objects
Moving an object in X- and Y-direction
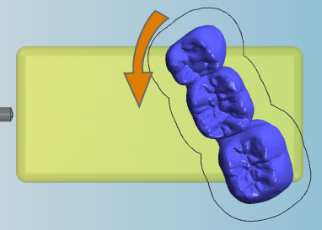
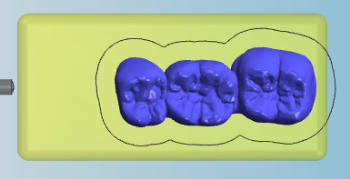
Rotating objects
Rotating an object around the Z-axis (here to make better use of the blank)
Positioning/rotating objects in 3D
Moving and rotating objects (all axes)
Checking/marking cavities
Marking cavities if they were not correctly recognized
Checking/specifying drilling ranges
Specifying the drilling range if it was not recognized for a drilling
Creating sinter bars
Setting drops
Setting drops in 2D and how they look in the 3D view
Setting bars
Bars in the CAM application and after manufacturing
Watch the video

YouTube video – When viewing this video, personal data is sent to YouTube, LLC, USA. Privacy statement
Blank display: Hide elements and customize view
The blank display on the right hand side is identical in both nesting views. It shows you what your blank is going to look like after machining (to a certain degree at least) and it is the place where you will do the bulk of your nesting work. Knowing how to handle the blank display is key to efficiently working with DentalCAM.
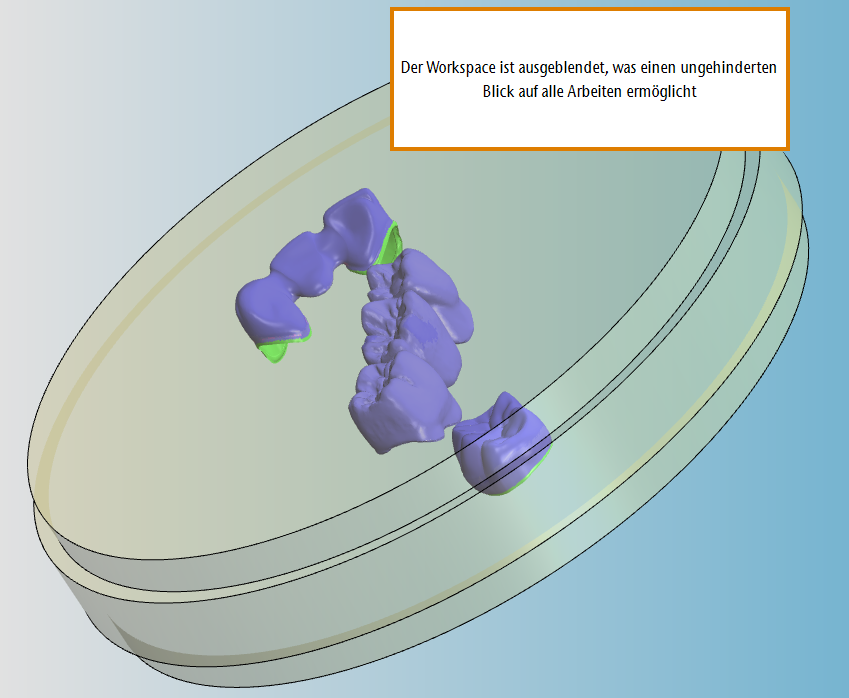
The blank display gives you a good visual representation of your blank, however, sometimes you need to hide certain elements in order to get a clearer view of the nested objects. In the top right corner of the blank display are 4 icons which you can use to hide or show certain elements of the blank display.
The icons for hiding/showing certain elements in the blank display
- To hide or show the blank holder, select the following icon:

Upper part: The blank holder is hidden. Lower part: The blank holder is displayed.
For some editing steps, you may want to hide the blank. In addition, DentalCAM automatically hides the blank for certain editing steps. In these cases you may want to manually show the blank if it helps you edit the objects.
- To hide or show the blank, select the following icon:


Upper part: The blank is hidden. Lower part: The blank is hidden
When you nest objects in multilayered blanks, it is important to precisely position your objects within the different color layers.
Since DentalCAM has to draw the layers "within" the blank, they are hidden by default to allow a clearer visual representation of the blank. If you need them for editing, you must activate them.
- To hide or show the layers, select the following icon:

When positioning objects within layers, you may want to hide the blank itself (the material) for a better view of the objects.
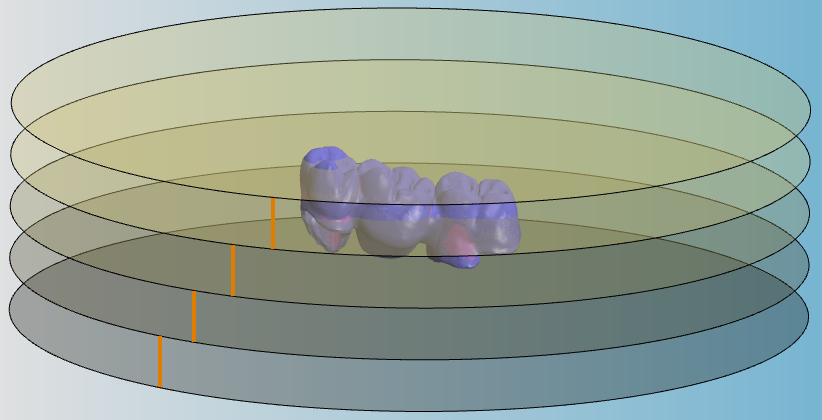
Blank with 4 layers (marked with orange lines). The material, blank holder, and workspace are hidden
The workspace is a milled out or ground out area around an object which separates the object from the surrounding material. The object is connected to the surrounding material or other objects with bars which hold the object in place.
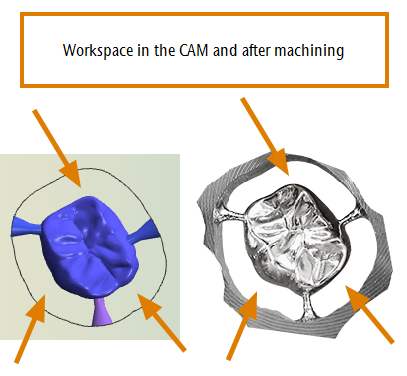
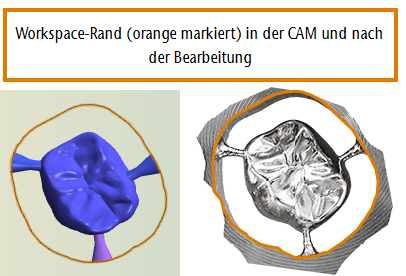
Workspaces and bars in the CAM application and after manufacturing
When positioning objects, you have to take the workspace into consideration because they may only overlap in some cases.
You can only hide the visual representation of workspace in the blank display, but you cannot remove the workspace from objects. The workspace will always be milled or ground out.
- To hide or show the workspace of objects, select the following icon:


(a) Workspaces are displayed; (b) Workspaces are hidden
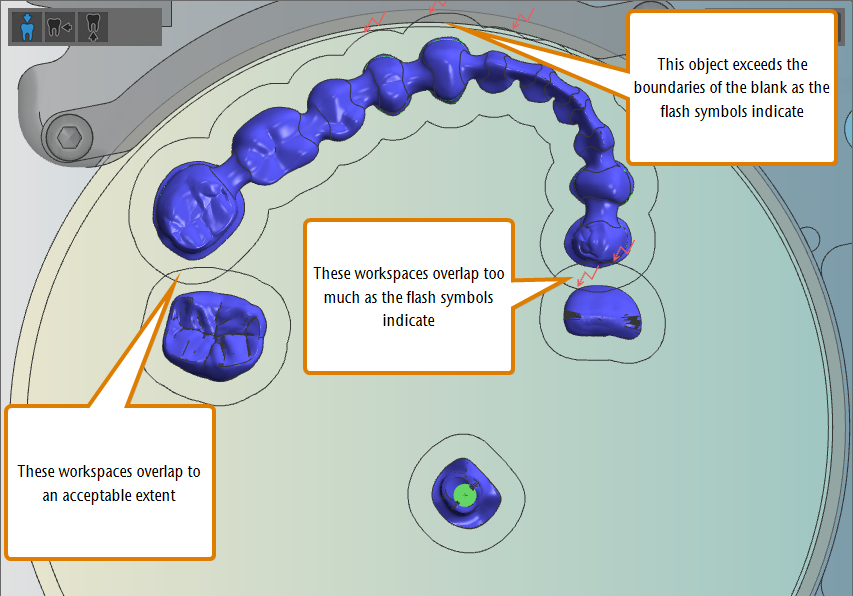
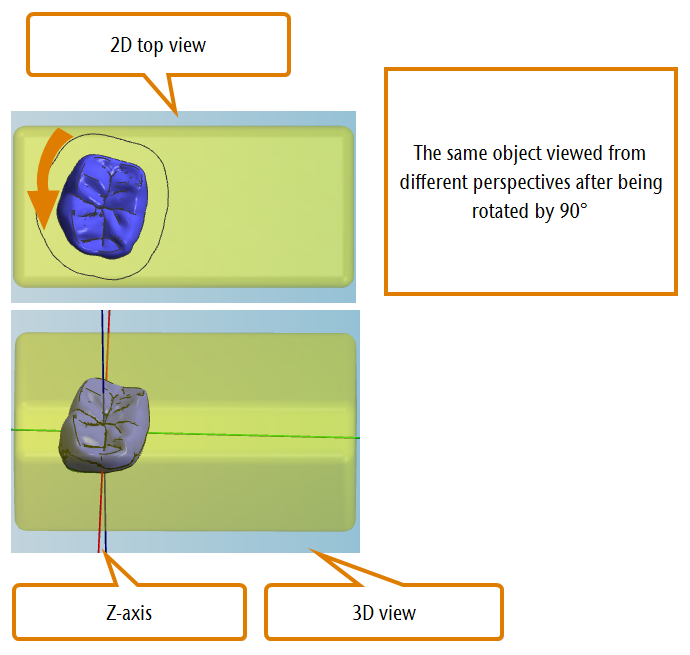
With the 3 icons in the top left corner of the 3D display, you can quickly switch between 3 standard views that you can find in almost any 3D design application.
The icons for selecting the view of 3D objects
- To view objects in a fixed 2D top view, select the following icon:

- To view objects in an adjustable 3D view, select the following icon:

- To view objects in an adjustable 3D view from below, select the following icon:

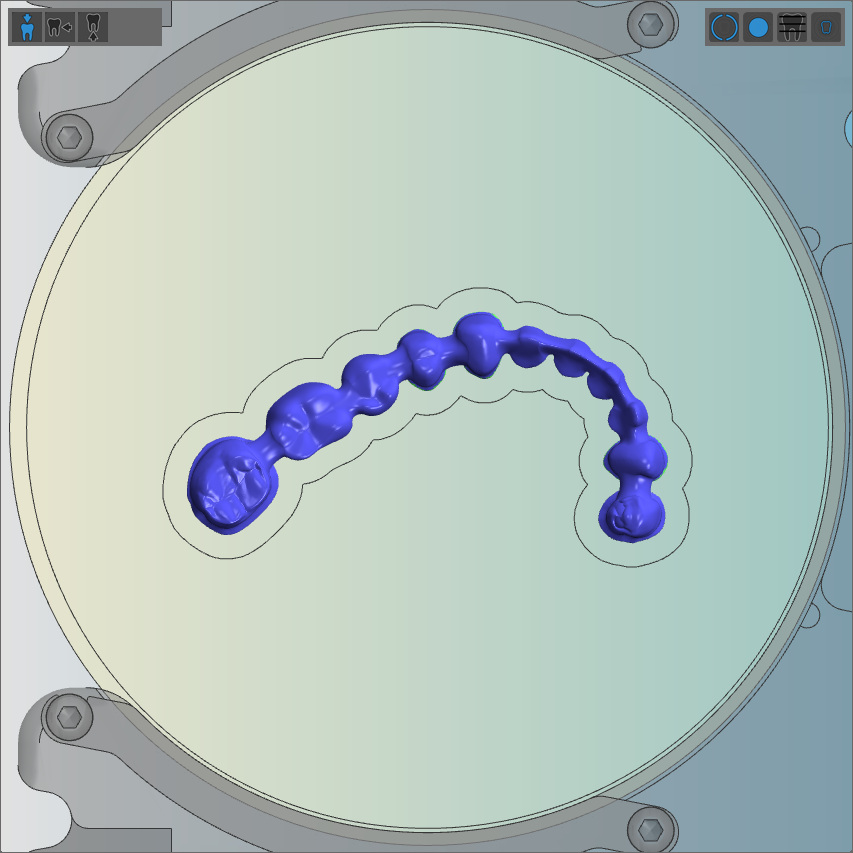

The top view, side view, bottom view (from left to right)
Howto use the different views during nesting
The 3 views allow you to perform certain tasks during nesting very efficiently:
- The top view is well suited for positioning objects horizontally and vertically (in X- and Y-direction) and for setting bars/drops.
- The side view is well suited for verifying and adjusting the position of objects “within” the blank (in Z-direction) by viewing them from all angles.
- The bottom view is well suited for inspecting cavities and drillings. Keep in mind that this view allows you to zoom in as the view is adjustable.
When working with the 3D viewer, you can use the mouse to rotate the view and zoom in and zoom out.
Moving the view in the X- and Y-direction (2D plane)

- Right-click and hold on the 3D view.
- Move the mouse into the desired direction.
- The view moves into the corresponding direction.
- Release the mouse button.
Rotating the view about a point in all 3 dimensions

- Click and hold on the desired point in the 3D view.
- Move the mouse into the desired direction.
- The view rotates about the selected point in all 3 dimensions.
- Release the mouse button.
Rotating the view about a point in 2 dimensions
While this view adjustment may not appear too useful at first glance, it can be very helpful to precisely position the view. Therefore, we really recommend trying out whether this view adjustment works for you.

|
|
Zooming in and out

- To zoom in or out, use the mouse wheel:
- Zoom in: Turn the mouse wheel away from you
- Zoom out: Turn the mouse wheel towards you
Cleaning up blanks
Cleaning up your blank is typically only necessary if you loaded a blank from the blank archive that has already been edited. If you want to edit a new blank, you very likely want to continue with adjusting your objects.
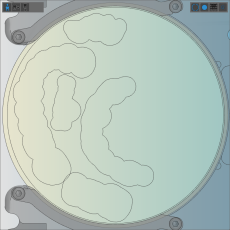
Machined areas in DentalCAM represent the parts of a used blank that have already been milled or ground out (the ‘holes’ that are left after the objects were separated from the blank). They display both for discs as well as blocks, but as blocks are hardly ever re-used, they are almost only important for discs.
You cannot position objects in machined areas.
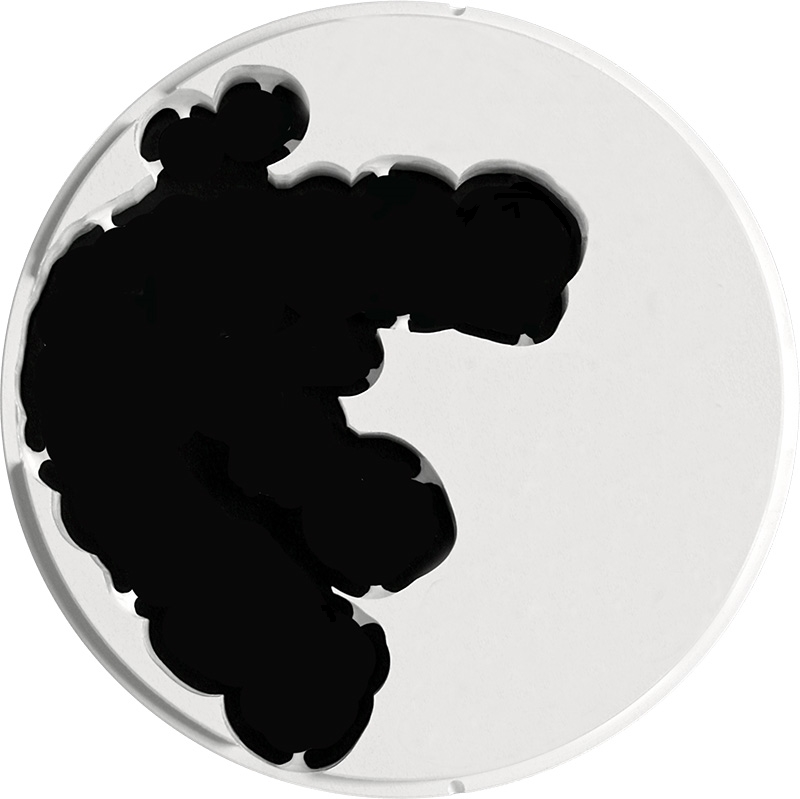
A disc made of Zirconia with machined areas
You may need to remove machined areas from the blank in DentalCAM for the following reasons:
- You want to use a new blank instead of the original one to machine objects which you added to the job.
- In case you never machined the job and therefore the blank has no milled or ground out areas.
In these cases, the blank in DentalCAM with its machined areas does not represent the fully intact blank that you want to use.
As DentalCAM does not communicate with your machine (only DentalCNC does), the application does not know if a calculated job has actually been machined. Therefore, it assigns the same preset status to all calculated objects. The default status for calculated objects is Already machined and therefore, calculated objects display as machined areas.
You delete machined areas as follows:
- In any of the 2 nesting views, selecting the following icon:

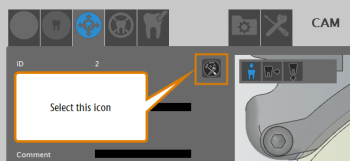
The icon for editing machined areas
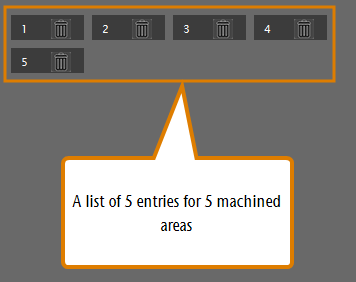
- DentalCAM lists all machined areas in the left column. Every machined area has a unique number.
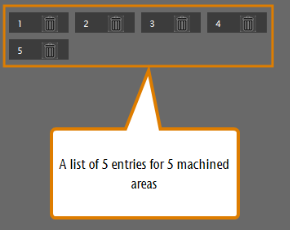
(a) A list of 5 machined areas; (b) A disc with 5 machined areas
- To delete a machined area, select the following icon in the list for the corresponding machined area:

- DentalCAM removes the machined area from blank display. In the list, the icon for the deleted machined area changes to
 .
. - If you want to undo the deletion of a machined area, select the following icon in the list for the corresponding machined area:
- DentalCAM displays the machined area in the blank display. In the list, the icon for the deleted machined area changes to .
As long as you do not leave the nesting view, you can undo a deletion of machined areas.
- To finish editing the machined areas, select the following icon:


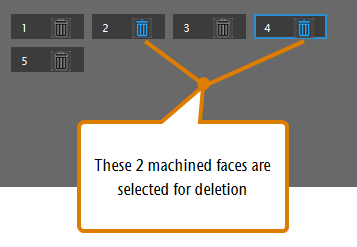
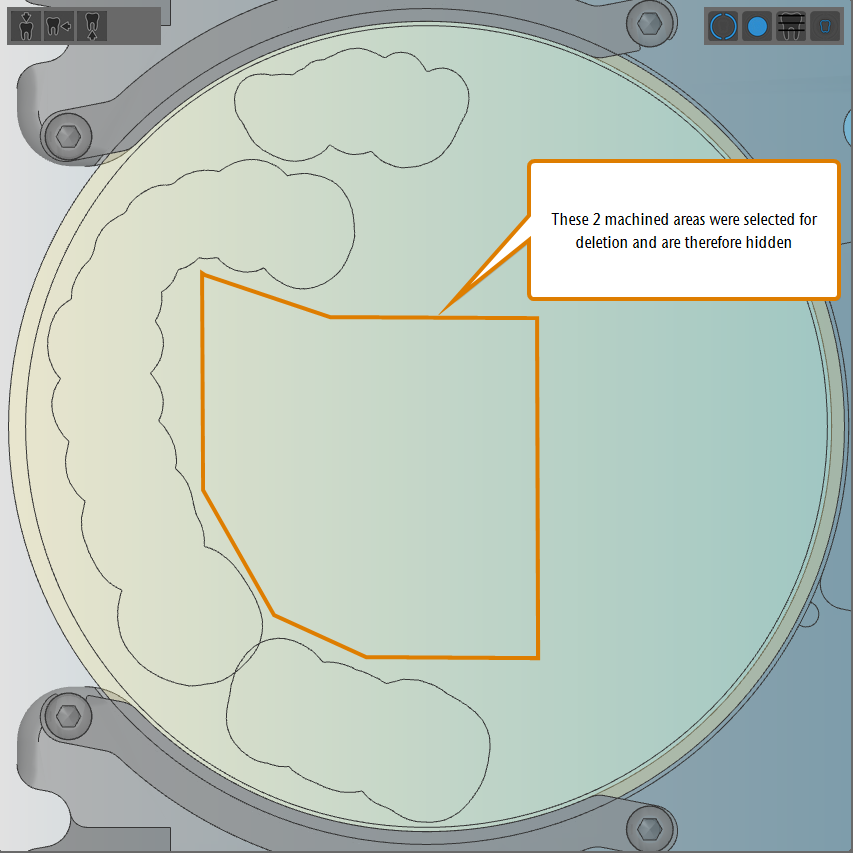
(a) 2 machined areas have been marked for deletion on the list; (b) The 2 machined areas have been removed from the disc
Every object in a job has a machining status. This status determines how the objects behave in the nesting view and whether they will be machined when you send the job to DentalCNC. In the nesting view, you can easily distinguish the different status by color .
You can change the status of objects in the object list.
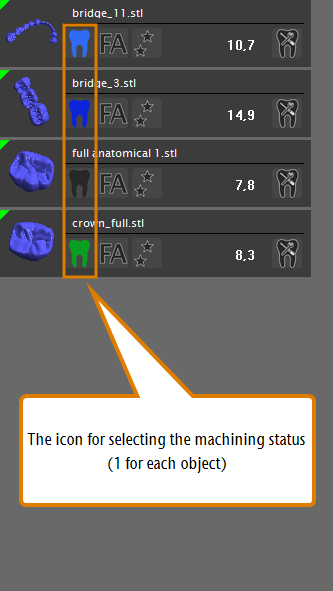
The icons for selecting the machining status in the object list
The following machining status for objects exist:
| Symbol | Machining status | Example |
|---|---|---|
|
|
|
|
|
|
|
|
|
|
|

|
|
|
After you load the blank again, the machined areas display as follow (same object as above):
|
|
You select the desired machining status as follows:
- To cycle through the status in the order shown in the table above, left-click on the machining status icon for the desired object.
- To cycle through the status in reverse order, right-click on the machining status icon for the desired object.
- DentalCAM immediately updates the icon and the object in the blank display. The application also shows the selected machining status in the info area.
Adjusting objects
Before you can send your job to the machine, you have to prepare the objects for manufacturing. You need to position them, mark unrecognized cavities and drilling ranges, set sinter bars, set supporting bars, etc. These steps are at the core of your nesting work.
Let's take a look at the nesting view for adjusting objects.
- To open the Nesting view for adjusting objects, select the following icon in the main icon bar:
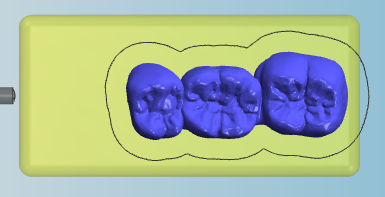
The following figure shows the nesting view for adjusting objects with a new blank and 4 objects that have just been imported.
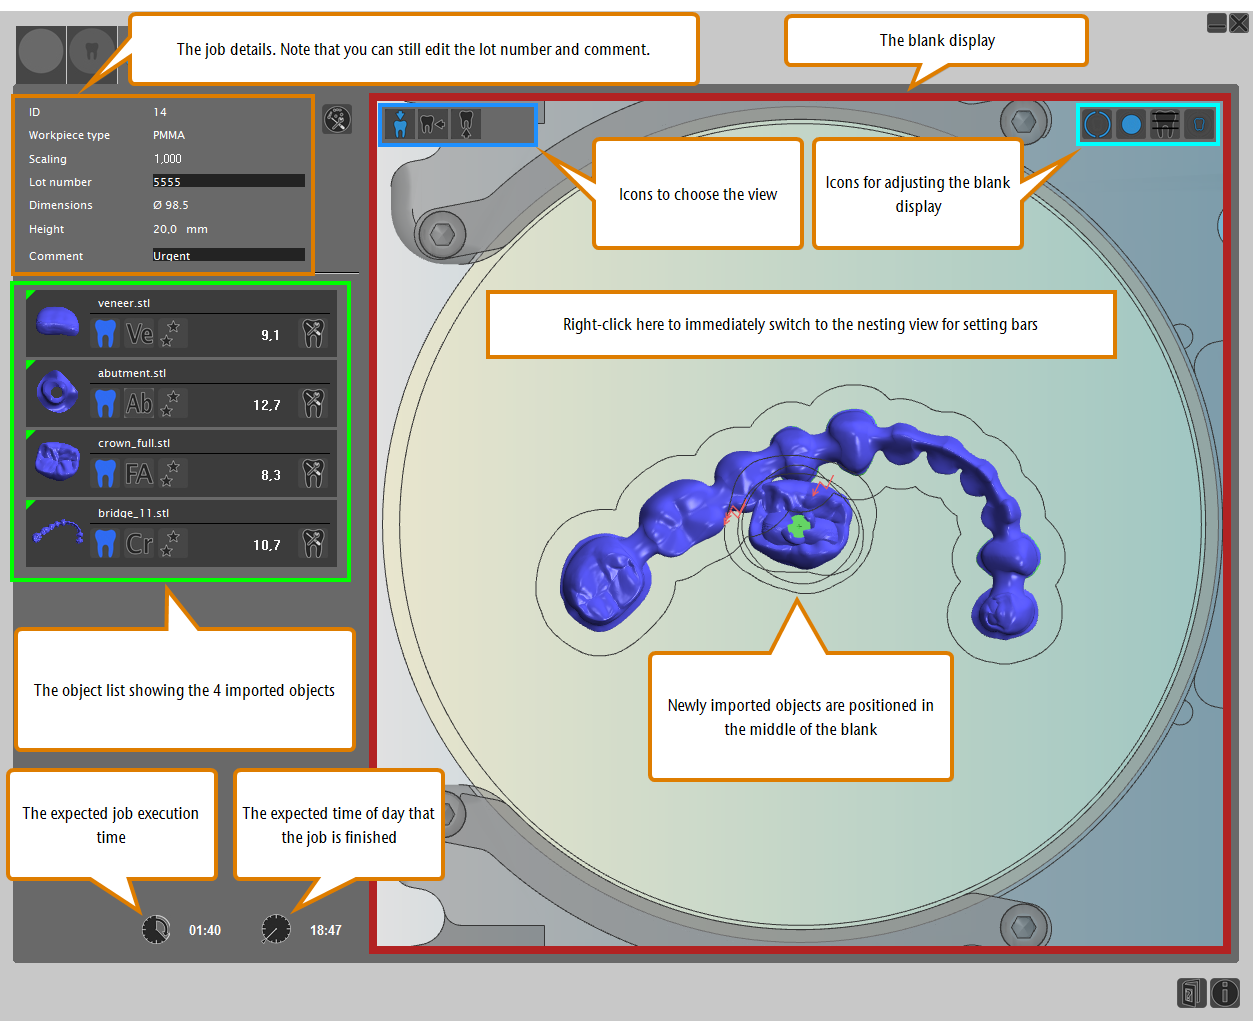
The nesting view for adjusting blanks with 4 new objects
As you can see, there are many elements, but don't worry, we will explain them one after another in the course of this Help Article.
The job details in the nesting view
The job details in the top left corner of both nesting views show the blank parameters that you specified when you created the job. Most of them cannot be changed any more at this point, but the following still can:
- In order to change the lot number, enter the new number into the Lot number input field.
- In order to change the comment, enter the new comment into the Comment input field.
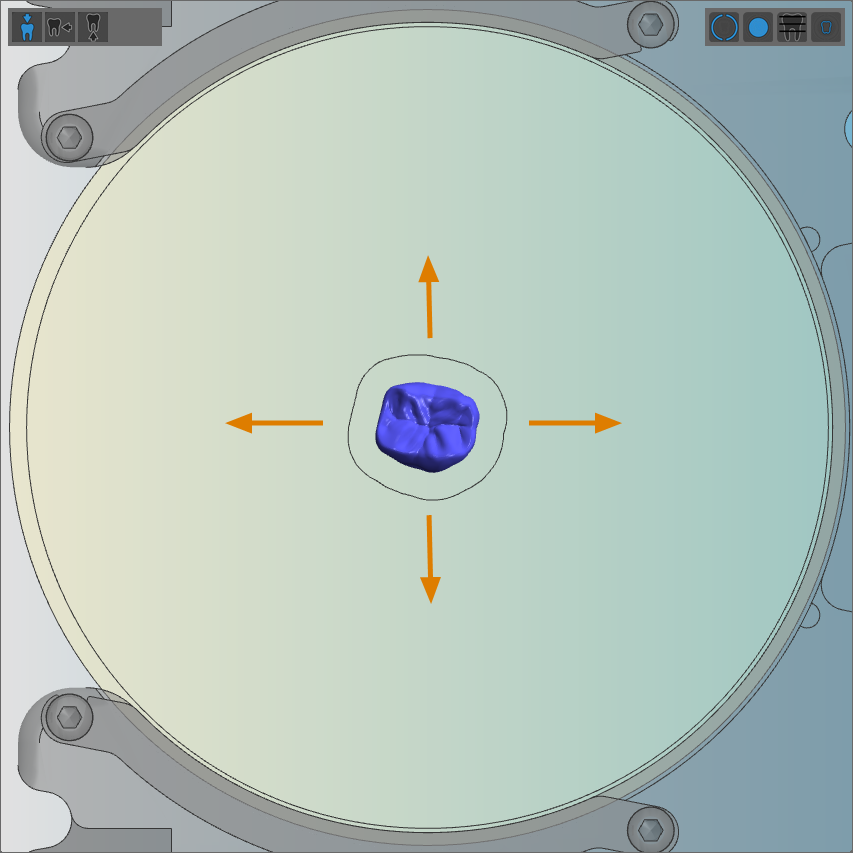
Moving objects in the X- and Y-direction via the top view means looking onto the blank from above and moving the objects in a 2D plane along the X- and Y-axis.
The editing function for rotating and moving objects also allows you to move objects in X- and Y-direction and rotate them about the Z-axis, but the following way is faster.
To quickly move objects horizontally and vertically, do the following:
- Select the top view.
- Select and hold an object that you want to move.
- Move the object to the desired position by dragging the mouse.
- Release the mouse button.
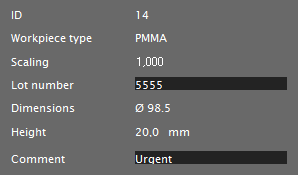
- Verify that the object lies within the boundaries of the blank. An incorrect position is indicated by red flash symbols.
- Verify that the workspace of all objects do not overlap too much. An incorrect position is indicated by red flash symbols.
When working with cobalt-chromium (CoCr) or titanium, workspace shouldn't overlap at all for good machining results.
Examples of objects that were positioned incorrectly
The editing function for rotating and moving objects also allows you to move objects in X- and Y-direction and rotate them about the Z-axis, but the following way is faster.
You rotate objects about the Z-axis as follows:
- Select and hold an object that you want to rotate.
- If you want to rotate the object by 90°:
- Hold down either the Shift key or the Ctrl key.
- Press the left arrow key to rotate the object counterclockwise or the right arrow key to rotate the object clockwise.
- If you want to rote the object by 5°, press the Left arrow key to rotate the object counterclockwise or the Right arrow key to rotate the object clockwise.
- If you want to rotate the object in steps of 1°, use the mouse wheel:
- To rotate the object clockwise, turn the mouse wheel away from you.
- To rotate the object counterclockwise, turn the mouse wheel towards you.
- Release the mouse button..
Rotating an object – before and after
- If you add objects to discs that have already been used, leave enough space between newly imported objects and machined areas. This is especially important, if you removed the disc from the machine and re-inserted it again. If the new objects lie too close to the machined areas, the slightest deviation from the original orientation of the disc (we're talking here about deviations of 0.5°) can result in the object not being machined correctly.
We understand that you want to use your discs as economically as possible, but leaving more space between objects and machined areas can be the safer and, in the end, more cost effective choice.

A good and a bad example for overlapping objects with machined areas
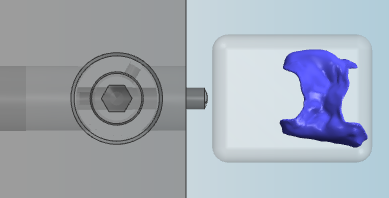
When you work with blocks, you follow the standard procedures for positioning and rotating objects. Let’s take a look at how to use blocks in DentalCAM.
- Create a job and select a blank type for blocks.
- Import a suitable object into the job.
- DentalCAM displays the block holder and the maximum number of blocks that the current machine can process in 1 job. Some blank types also limit the number of blocks available.
- Activate or deactivate the placement aid by selecting the corresponding icon in the top left corner of the blank display:
- Placement aid is activated (recommended):

- Placement aid is deactivated:

Icon bar with the icon that indicates that the placement aid is activated
- Placement aid is activated (recommended):
- When you drag an object onto a block with the placement aid activated, the object automatically snaps into a proper position on the X- and Y-axis.
- Drag all objects that you want to manufacture onto the blocks. If you don’t want to use a block, leave it empty.
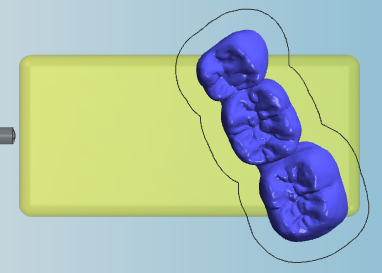
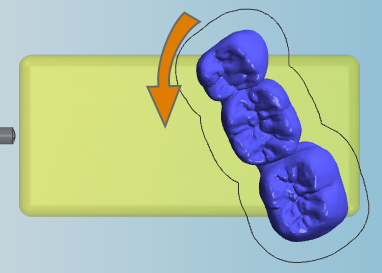
- If required, rotate the objects about the Z-axis so that they completely lie within the block. You can also rotate them about the X- and Y-axis.
(a) Object nested in a block before rotation; (b) Object nested in a block after rotation
- Set bars for the object.
- Your object will look similar to this:
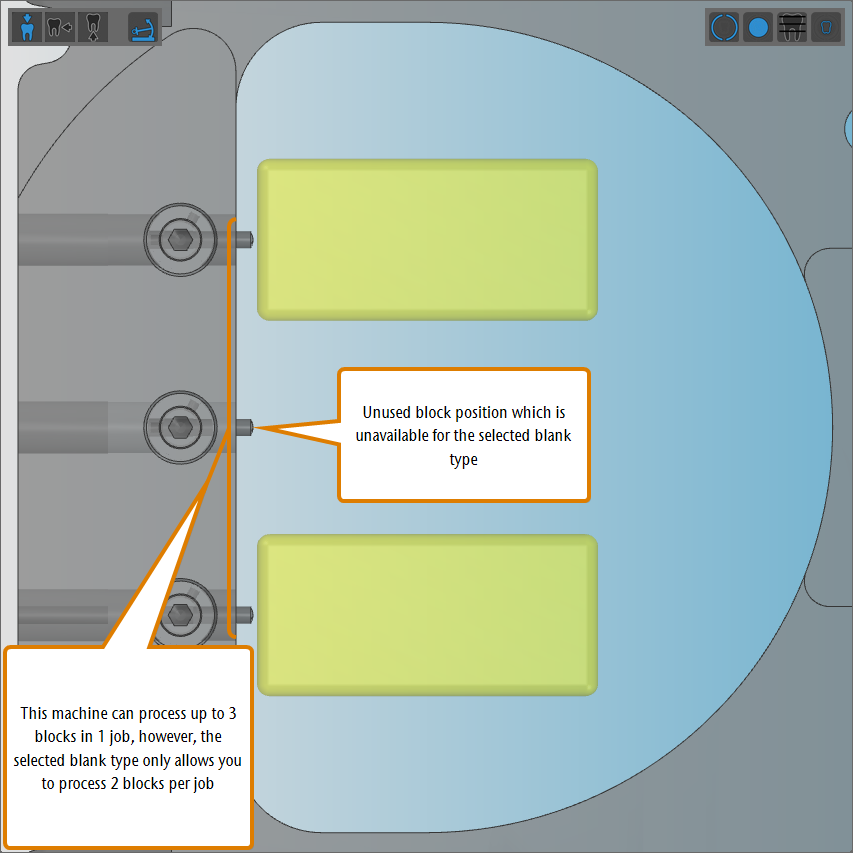
Different machines can process different numbers of blocks per job. Sometimes the number of blocks is limited by the selected blank type
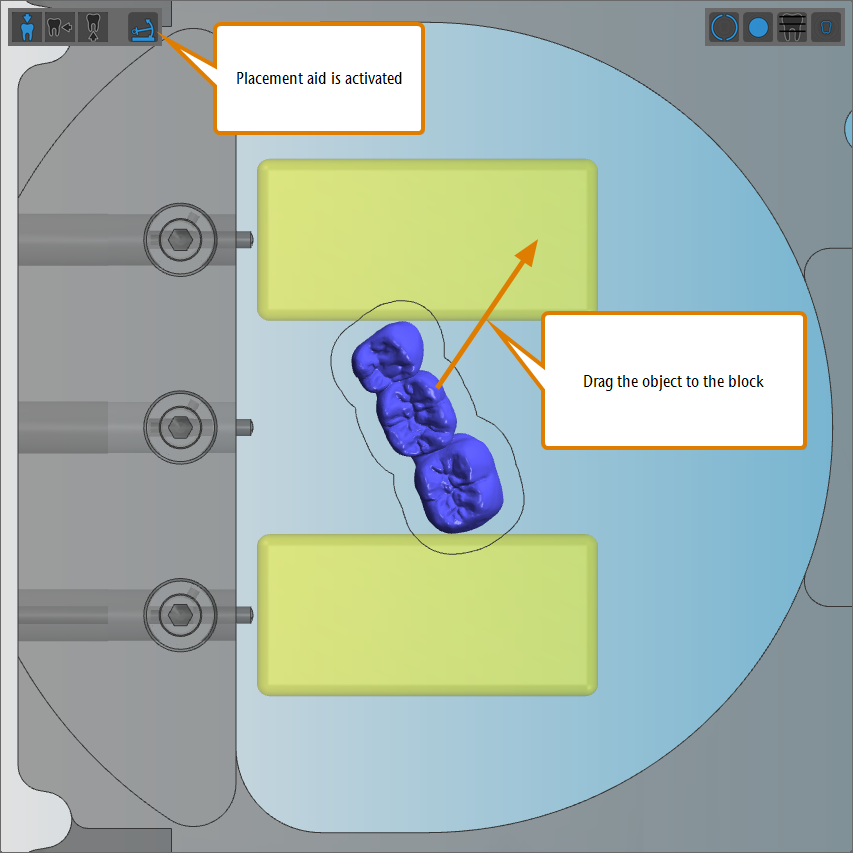
When dragging the object onto a block, the placement aid can automatically position the object
When dragging the object onto a block, the placement aid can automatically position the object
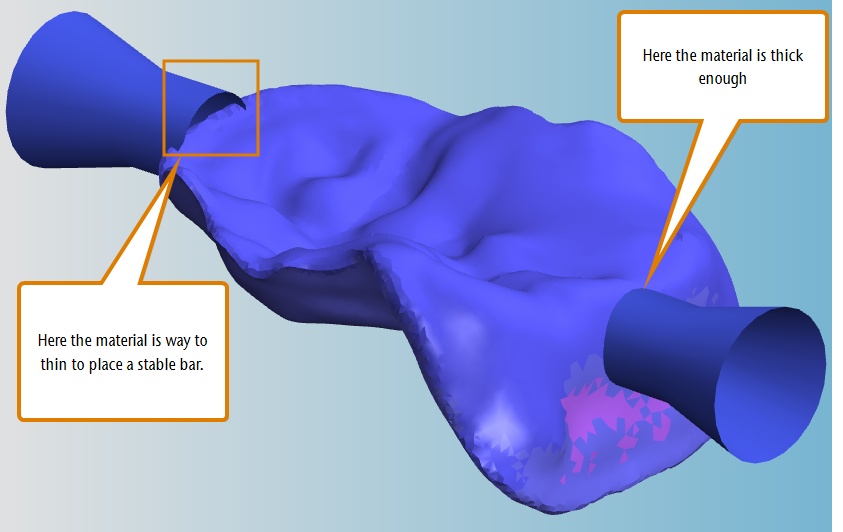
How to position large multi-unit objects in blocks without the placement aid
Some multi-unit-objects are so large that it is difficult to properly position them in a block because there is too little material left outside of the workspace to set stable bars. In these cases you can try positioning the objects manually.
If the size of the object, possibly increased by the scaling factor of the blank type, exceeds the size of the blank, you cannot manufacture the object with the current blank. Manually positioning the object won’t help you. Instead, create a different blank.
The left side of the following object is too large to be positioned in the center of the selected block type; the workspace border around the unit would lie so close to the border of the block that bars would hardly be stable. Here you need to manually position the object without the placement aid:
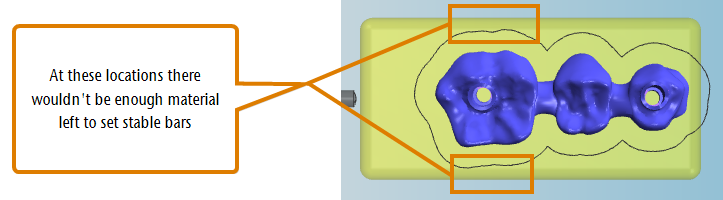
The material thickness is too low in some locations to place stable bars
- Drag the object onto the desired block.
- Deactivate the placement aid.
- Rotate the object so that it lies as horizontally as possible in the block.
- Move the object into the opposite direction of the mandril and into the lower half of the block. Move the object very close to the lower border of the blank.
- Set bars for the object. Place them at the left and upper side of the object.
- After machining, the object will be kept in place by the stable bars at the left and upper side of the object.
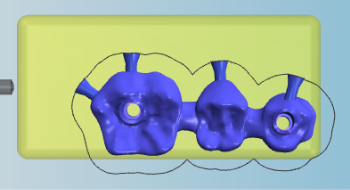
The object with bars

Moving the object into proper position
If you activated the automatic search function for cavities or drillings in the STL import view, you need to check for all objects if DentalCAM has correctly recognized drillings and cavities.
There are 2 reasons why DentalCAM didn’t correctly recognize a cavity or drilling:
- You deactivated the automatic search function for cavities/drillings when importing the object.
- The automatic search function for cavities/drillings failed for the object due to an unusual geometry.
The following bridge was almost entirely marked as a cavity on import:
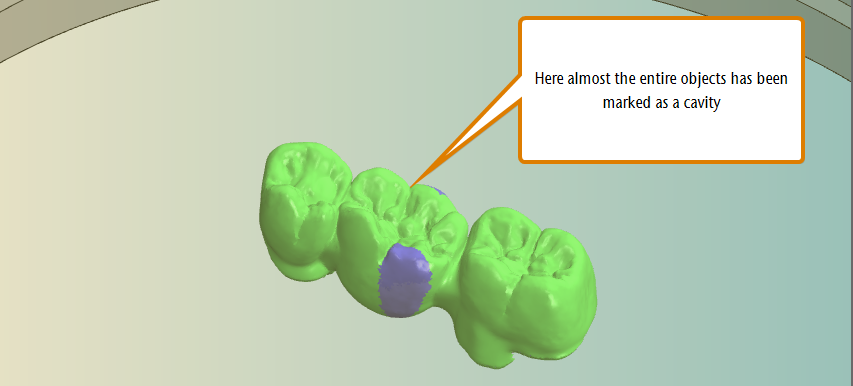
A bridge that was almost entirely marked as a cavity
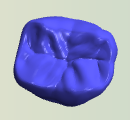
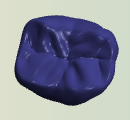
Some implant-borne crowns have a drilling inside their cavity.
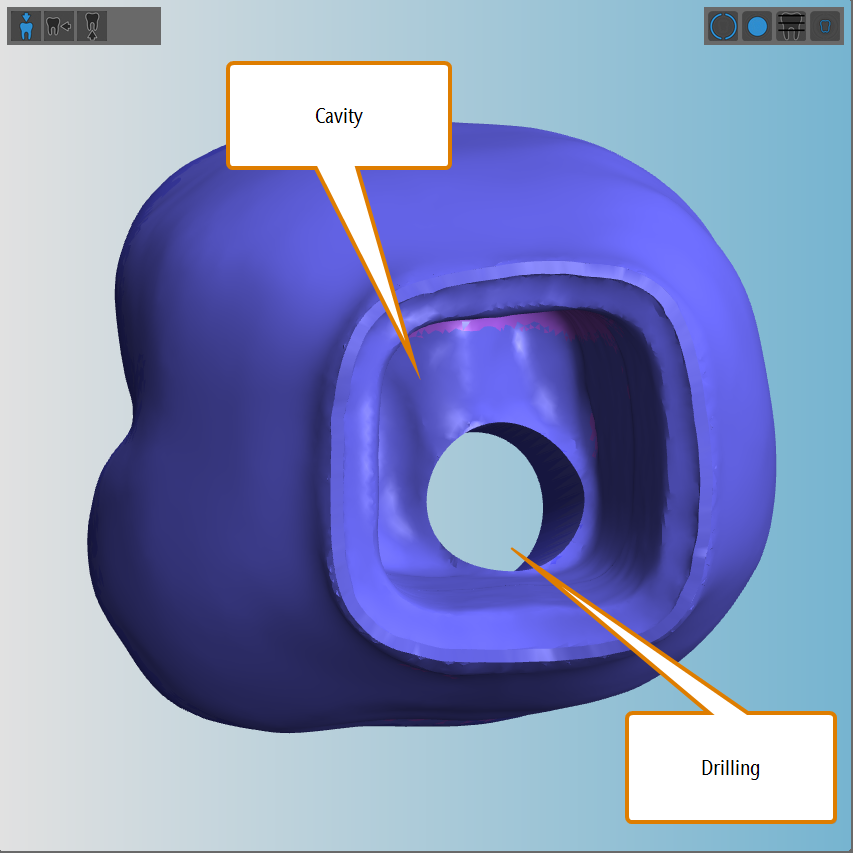
A crown with a drilling in the cavity (basal and occlusal side)
If you want to know how to nest this type of objects, read our Help Article on special cases.
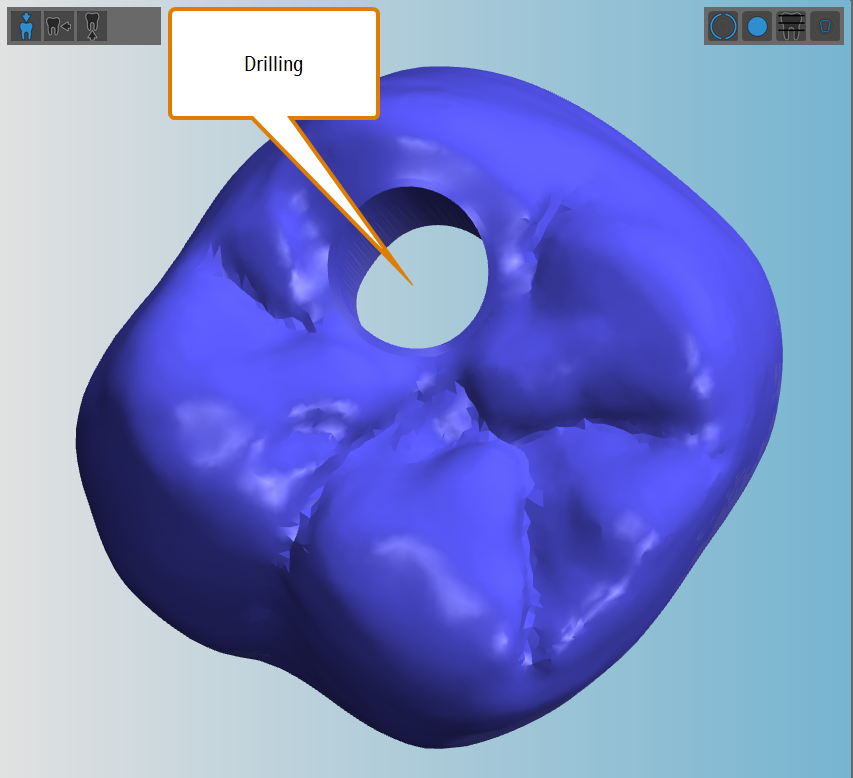
The automatic search function for cavities/drillings will not correctly recognize the drilling and cavity:
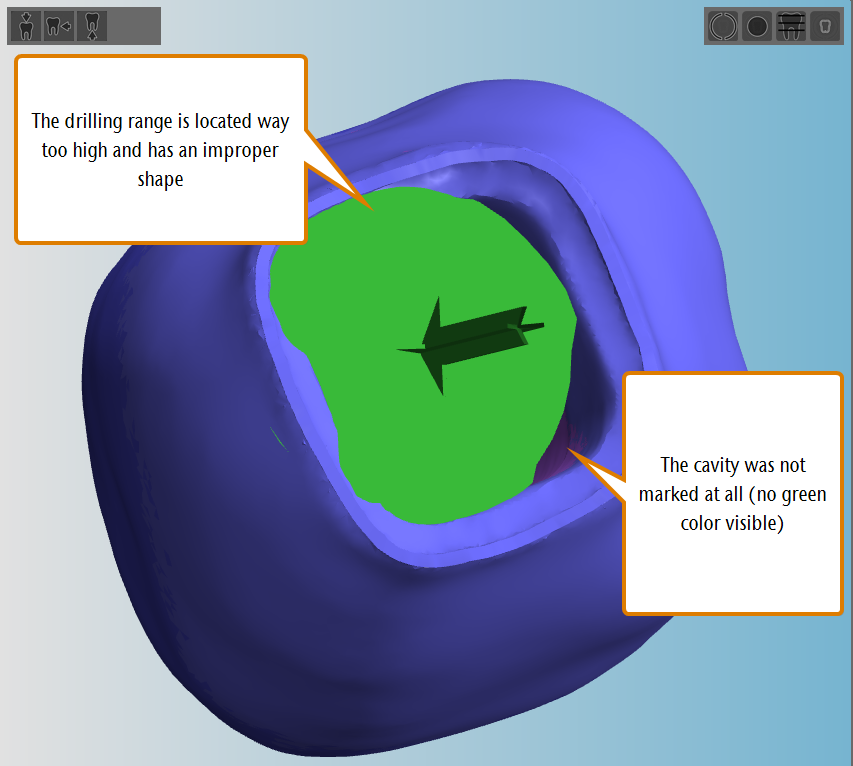
Neither the drilling range nor the cavity was recognized correctly
If you want to know how to manually mark the cavity and specify the drilling range for this object, see here.
Checking cavities
To check cavities proceed as follows:
- Switch to the bottom view. Alternatively, switch to the side view and adjust the view point so that you can see the cavities.
- Verify that all cavities – but not more than the cavities – are marked green.
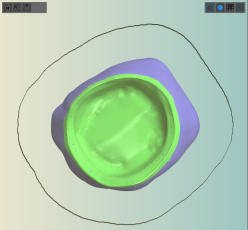
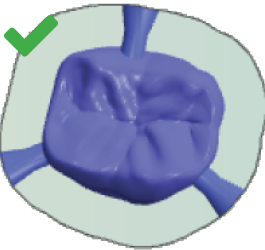
The automatic search function correctly recognized a cavity
- If a cavity hasn’t been recognized correctly, mark it manually via the editing function for marking cavities

Checking drillings
To check drillings proceed as follows:
- Switch to the side view.
- Adjust the view point so that you can look onto one end of the first drilling that you want to inspect.
- Check if the following applies:
- The opening surface of the drilling is marked in green.
- The opening surface is even and doesn’t have any sharp bends.
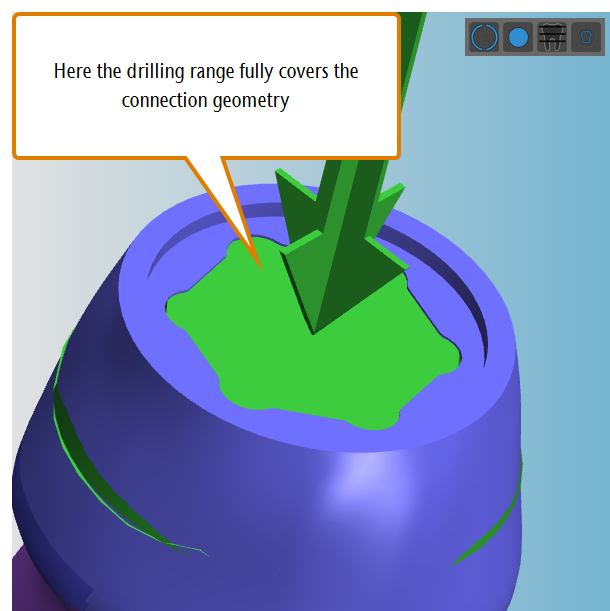
- In case of a drilling in a connection geometry of an abutment, the whole connection geometry is covered by a green body.
- An arrow indicates the correct drilling direction (pointing perpendicularly “into” the drilling).
- Repeat step 3 for all other ends of the drillings in your blank.
- If a drilling hasn’t been recognized correctly, correct it manually via the editing function for specifying the drilling range
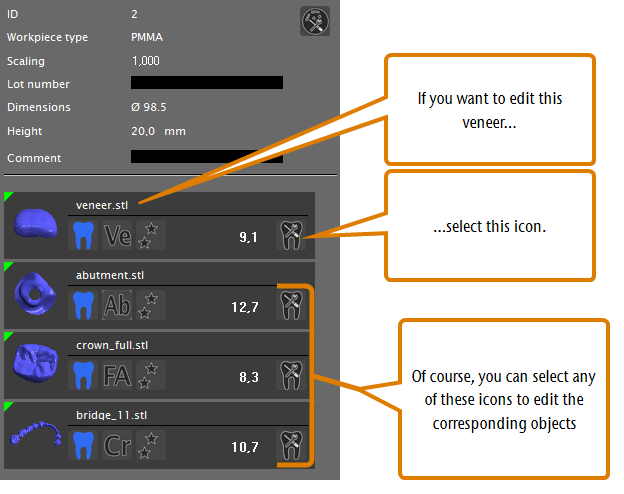
With the editing functions for individual objects, you can edit specific parameters (orientation, cavities etc.) of individual objects in your blank. You can edit 1 object at a time. You can select an object for editing via the object list.
- Find the object that you want to edit in the object list and click on the following icon:

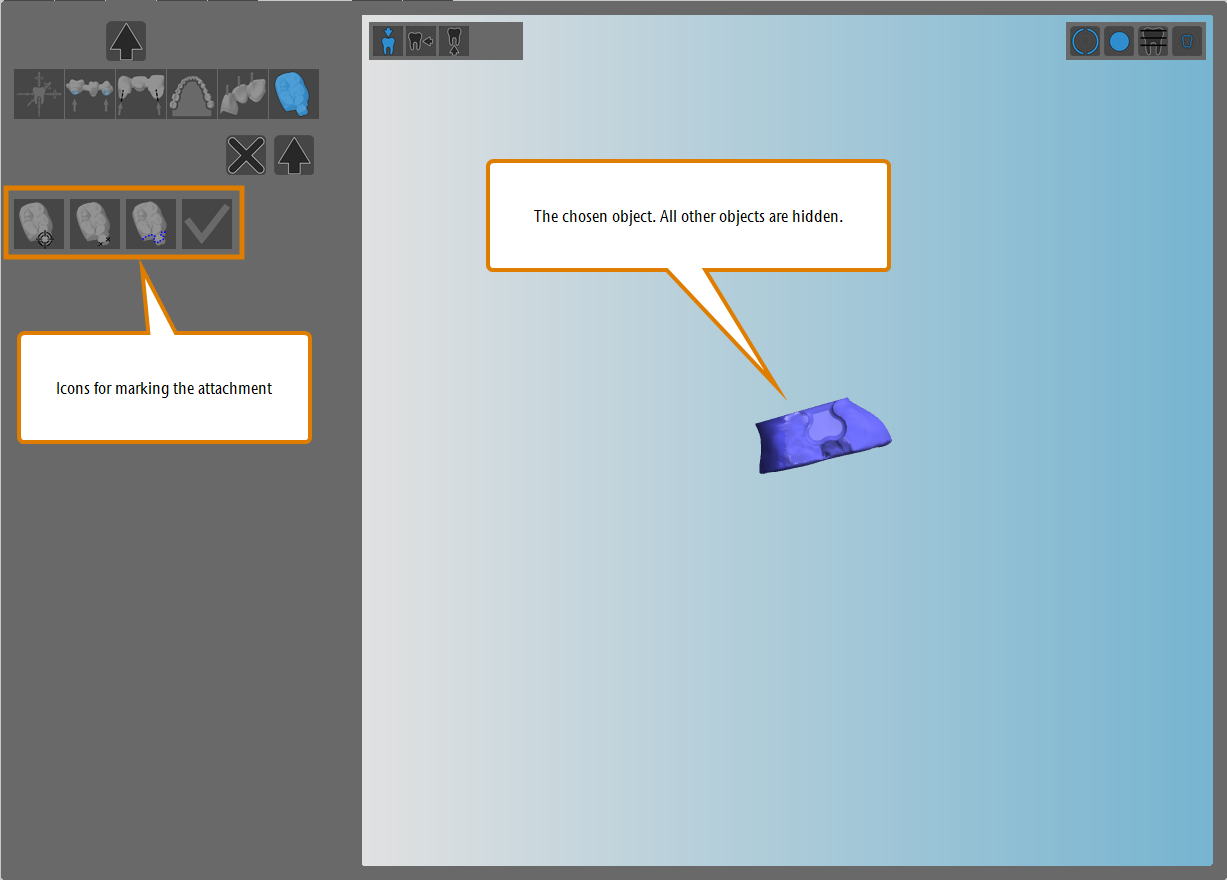
- The editing functions are displayedThe list of objects is replaced by an icon bar that opens the editing function you want to use for the selected object. In the blank display, DentalCAM hides all elements except for the selected object.
To find the desired object in the list faster, select the object in the blank display and the corresponding entry in the object list will be surrounded by a blue border.
Editing an individual object
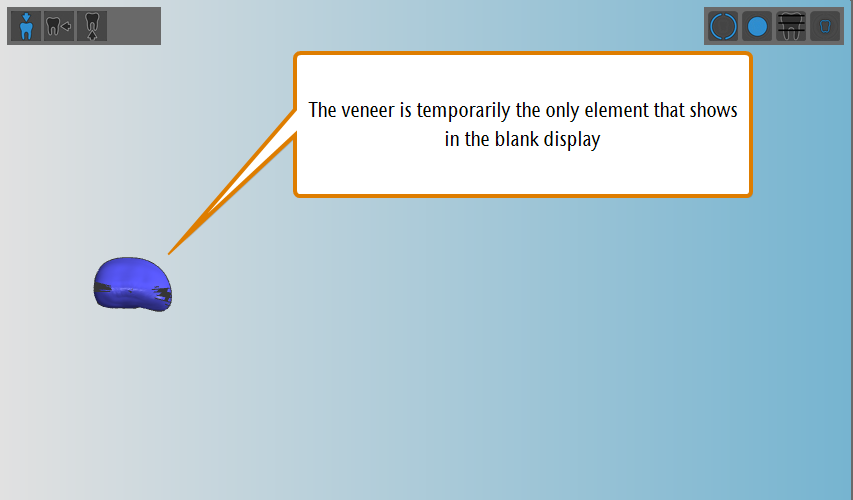
(a) The icon bar for selecting an editing function; (b) All elements in the blank except for the selected object are hidden
While an editing function is activated, you can only perform editing steps that the corresponding editing function was designed for. However, you can still change the view of the blank and show/hide elements of the blank display.
Use the icon bar to open the editing function that you want to use:
- To open the editing function for moving/rotating objects, select the following icon:

- To open the editing function for marking cavities, select the following icon:

- To open the editing function for specifying the drilling range, select the following icon:

- To open the editing function for creating sinter bars for objects, select the following icon:

- To open the editing functions for setting drops, select the following icon:

- To open the editing function for marking attachments, select the following icon:

- To close the section for the editing function and go back to the object list, select the following icon:

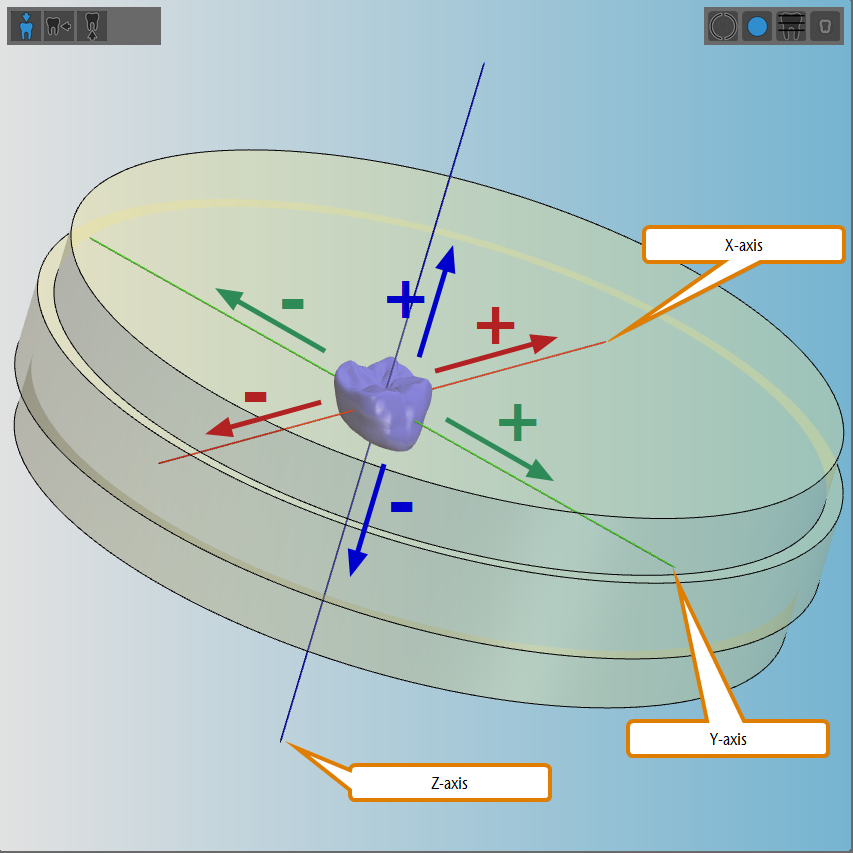
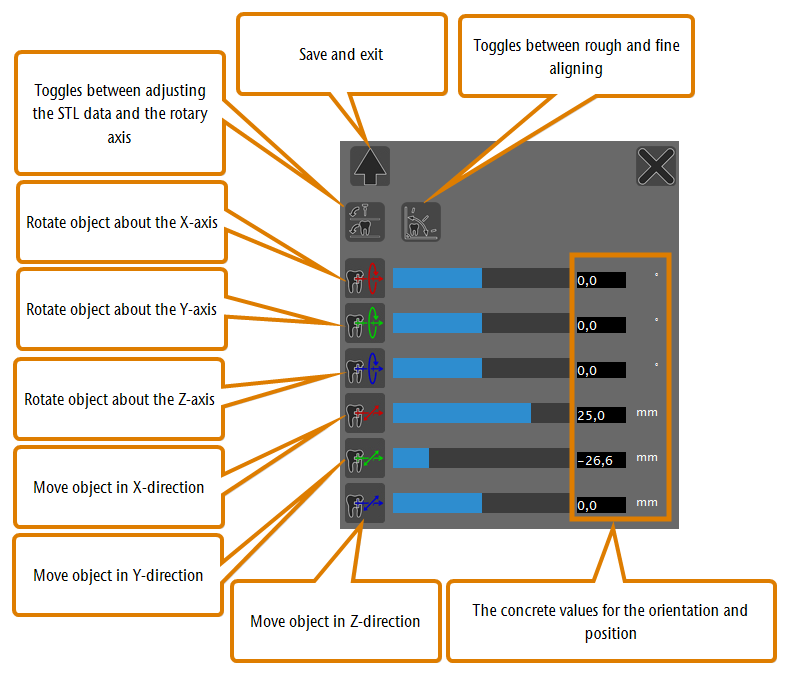
The editing function for moving and rotating objects enables you to move objects in all directions (X, Y, Z) and rotate them about all axes. While using this function, the view in the blank display is adjustable so that you can view the blank from all angles.
- Open the editing functions for the desired object by clicking on the following icon:
- To open the editing function for moving/rotating objects, select the following icon:
- In the left column, several icons and value bars for moving and rotating the object display. In the blank display, 3 colored lines indicate the 3 axes (X, Y, Z):
- X-axis: Red line
- Y-axis: Green line
- Z-axis: Blue line
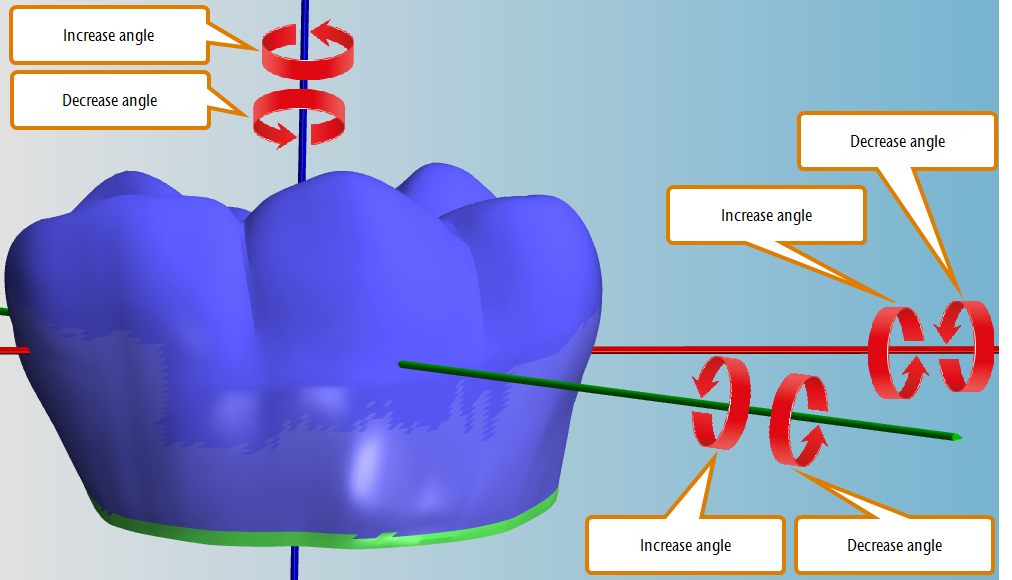
Rotate objects around the X-/Y-axis: Switch between rotating the STL files or the rotational axis
If you want to rotate an object about the X-axis or the Y-axis, there are 2 options depending on the type of machine that you use:
- If you use a 5-axis machine, DentalCNC can either rotate the second rotary axis of your machine during machining or the application can rotate the object data in the STL file.
- If you use a 4-axis machine, DentalCNC can rotate the object data in the 3D application.
Following are the differences between these options:
- If you use the second rotational axis of your machine, DentalCNC will leave the STL file untouched. However, you are limited to the mechanical rotation range of your machine (see the documentation for your machine for the exact value).
- If you adjust the STL data, you can you can rotate objects to a much larger degree. However, DentalCNC will overwrite the original STL file.
(a) Object with its original orientation; (b) Object rotated through the rotational axis; (c) Object rotated by rotating the STL data
You toggle between these options as follows:
When you toggle between the options, DentalCNC resets the position and orientation of the object so that all changes you made will be lost.
- To activate the Rotate STL data function, select the following icon:

- The following happens:
- The icon changes to

- DentalCAM resets the position and orientation of the object.
- The value bars and input fields for rotating the object about the X- and Y-axis appear display for all machines.
- To activate the Rotate rotary axis function, select the following icon:
- The following happens:
- The icon changes to
- DentalCAM resets the position and orientation of the object.
- If you use a 4-axis machine, the value bars and input fields for rotating the object about the X- and Y-axis are hidden.
Toggling between rough aligning and fine aligning of objects
DentalCNC offers 2 fineness grades for moving objects along the X-, Y- and Z-axis when using the corresponding editing function:
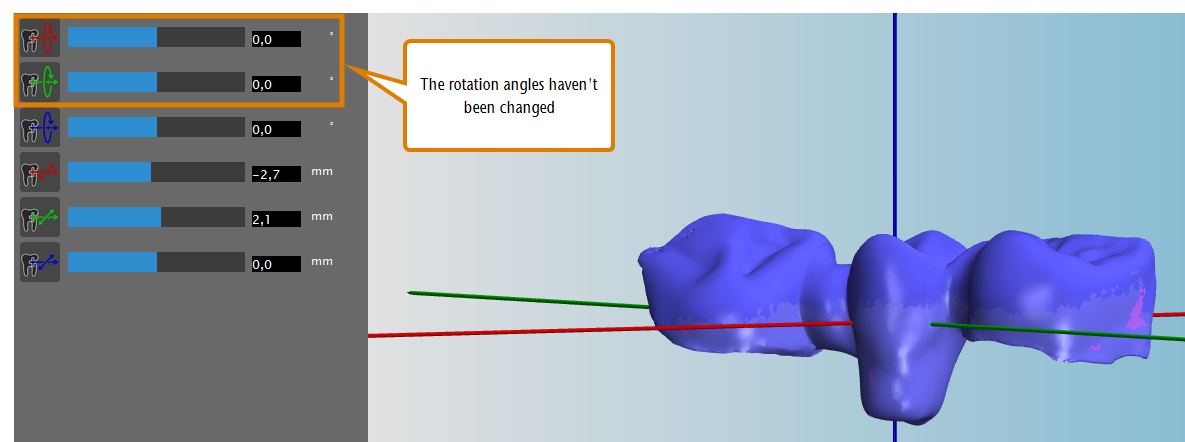
- Rough alignmentYou can move work across the entire blank. However, you can only move objects in steps of 0.5 mm when using the value bars. This is useful when moving objects across the whole blank is more important than positioning them with extra high precision.
- Fine alignmentYou can only move objects 5 mm in each direction in relation to their center. However, you can move them in steps of 0.1 mm when using the value bars. This is useful for positioning objects with extra high precision.
You toggle between these options as follows:
- To activate the Fine aligning function, select the following icon:

- The following happens:
- The icon changes to

- The value bars and the values in the input fields are set in relation to the center of the object.
- To activate the Rough aligning function, select the following icon:
- The following happens:
- The icon changes to
- The value bars and the values in the input fields are set in relation to the blank.
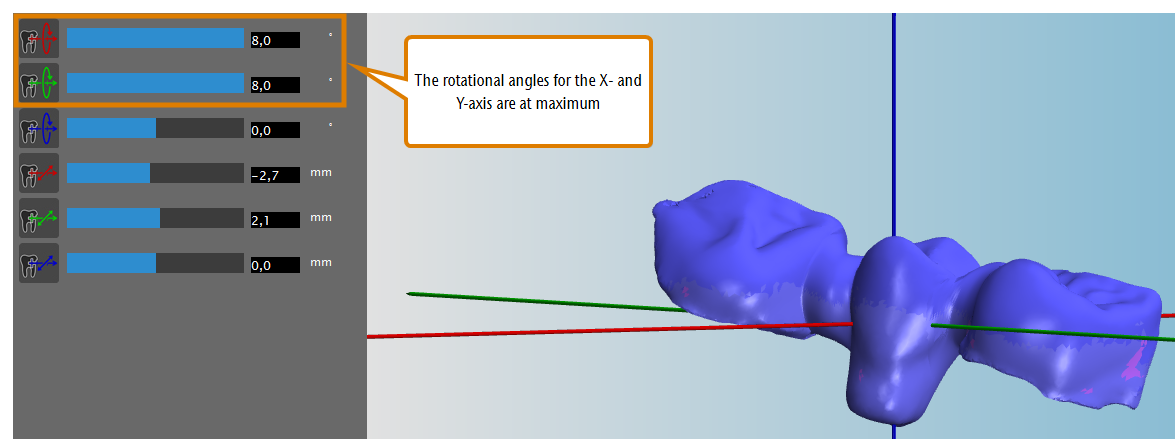
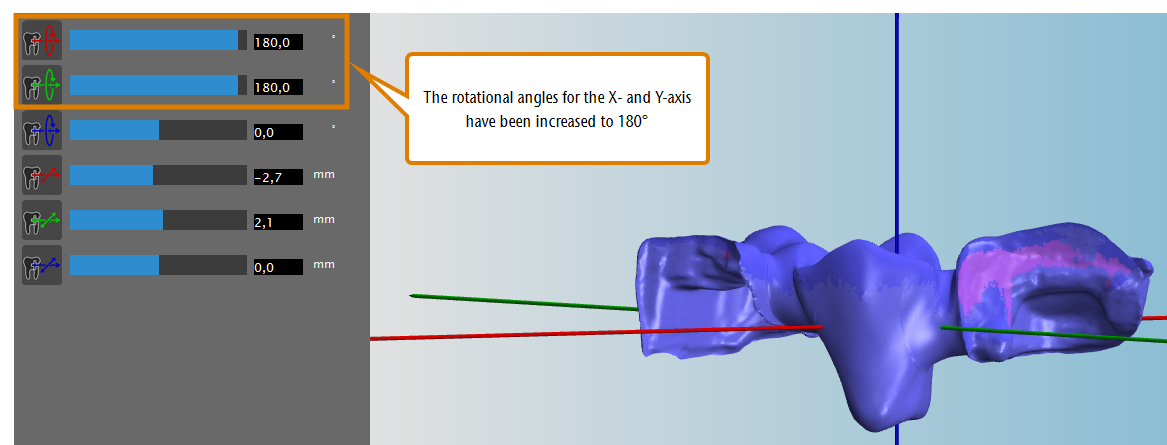
Adjusting objects via the value bars and input fields
The numbers in the input feildsbehind the value bars show the current values for the respective rotation angle or position value. You change these values as follows:
- To increase or decrease a rotation angle or position value, adjust the corresponding value bar or enter the desired value into the corresponding input field.
- DentalCAM updates the value after the value bar and the blank display.
- If you want to apply your changes, select the following icon below the icon bar for the editing functions:
- DentalCAM saves your changes, exits the current editing function and displays all existing editing functions for the current object.
- If you want to discard your changes, select the following icon:

- DentalCAM undoes your changes, exits the current editing function and displays all existing editing functions for the current object.
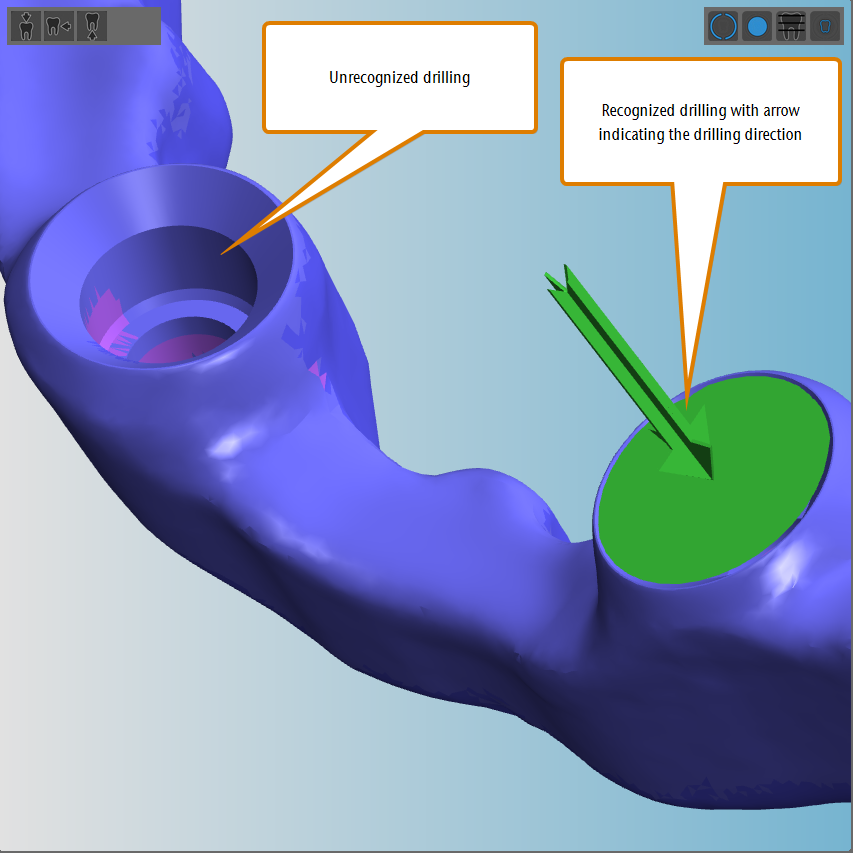
If an object contains an unrecognized or incorrectly recognized drilling, you must manually specify the drilling range via the corresponding editing function. Otherwise, the object will not be machined correctly. This function also allows you to specify angled drillings.
Object with a recognized and an unrecognized drilling
There are 2 reasons why DentalCAM didn’t correctly recognize a cavity or drilling:
- You deactivated the automatic search function for cavities/drillings when importing the object.
- The automatic search function for cavities/drillings failed for the object due to an unusual geometry.
You manually specify drilling ranges as follows:
- Open the editing functions for the desired object by clicking on the following icon:
- To open the editing function for specifying the drilling range, select the following icon:
- DentalCAM hides all elements except the object in the blank display and shows the object in top view. The view is adjustable so that you can view the object from all angles and zoom in and out.
- If the object has any incorrectly recognized drillings, delete them.
- Start the workflow by selecting the following icon in the left column:

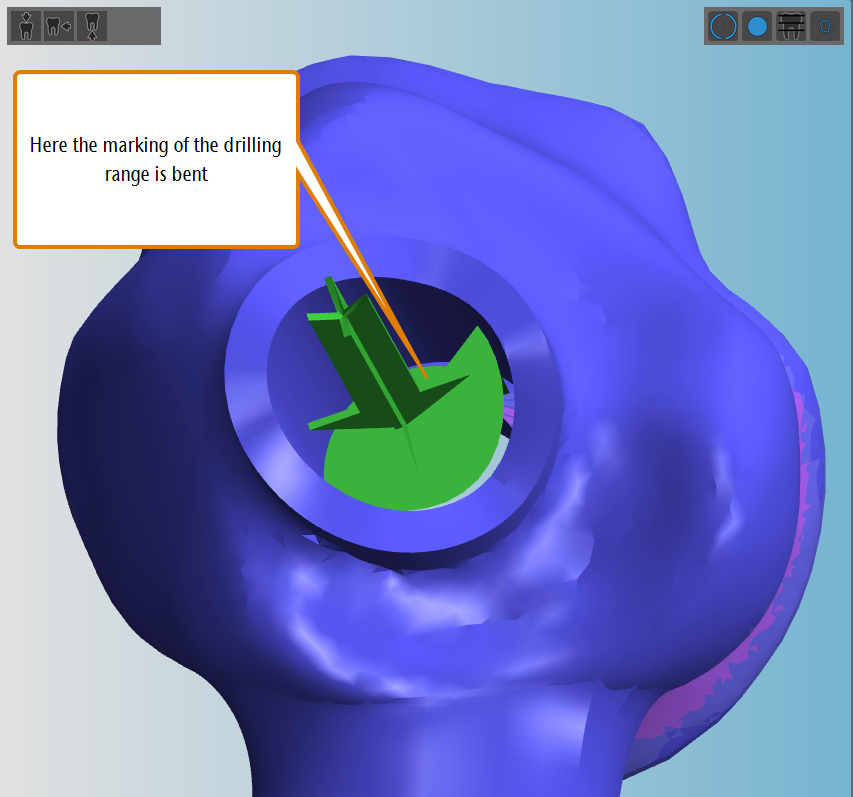
- Move the view so that you look into the drilling from above. You must be able to see a good portion of the wall of the drilling.
- Continue by selecting the following icon in the left column:

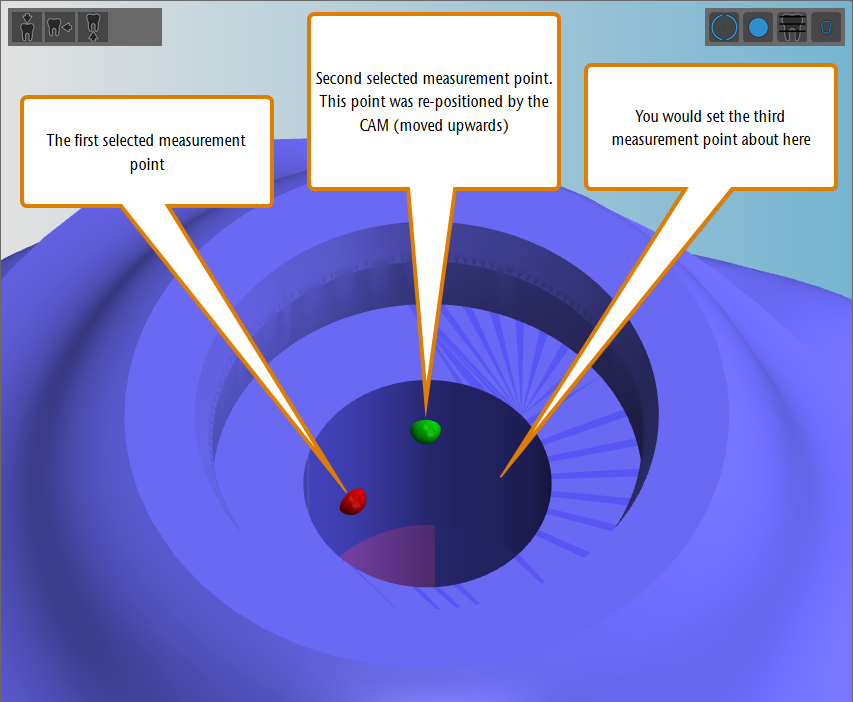
- Select 3 measuring points so that DentalCAM can detect the bore wallTo set a measuring point, click on the bore wall. The points must lie on an imaginary line which is perpendicular to the drilling direction (the line lies horizontally when you directly look into the drilling). Space out the measurement points a bit, but not so much that you have to move the view.
- As soon as you have set the 3rd measurement point, DentalCAM switches to the top view so that you can check the position of the measuring points.
- Continue by selecting the following icon in the left column:

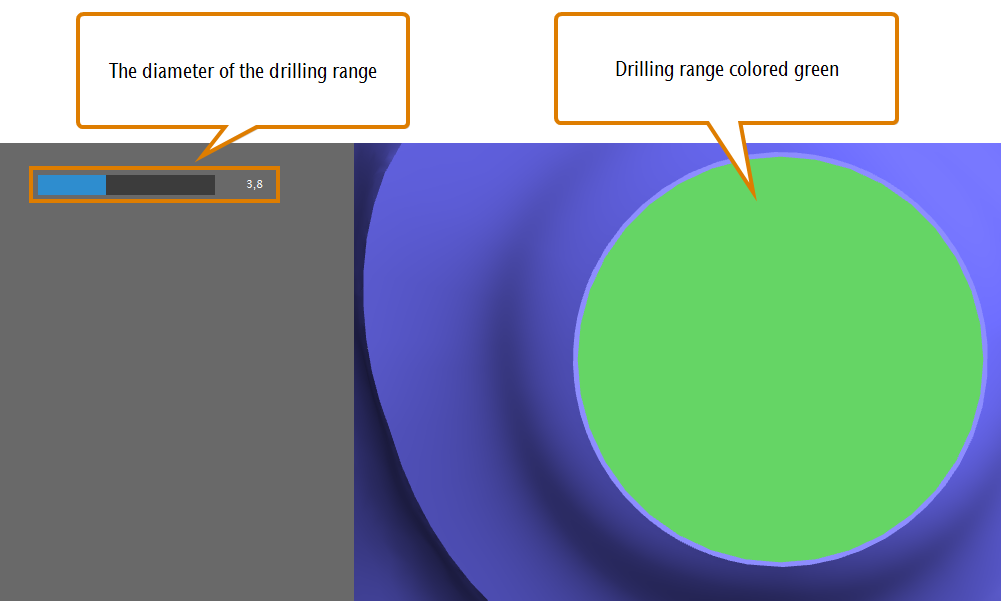
- DentalCAM displays 3 value bars in the left column.
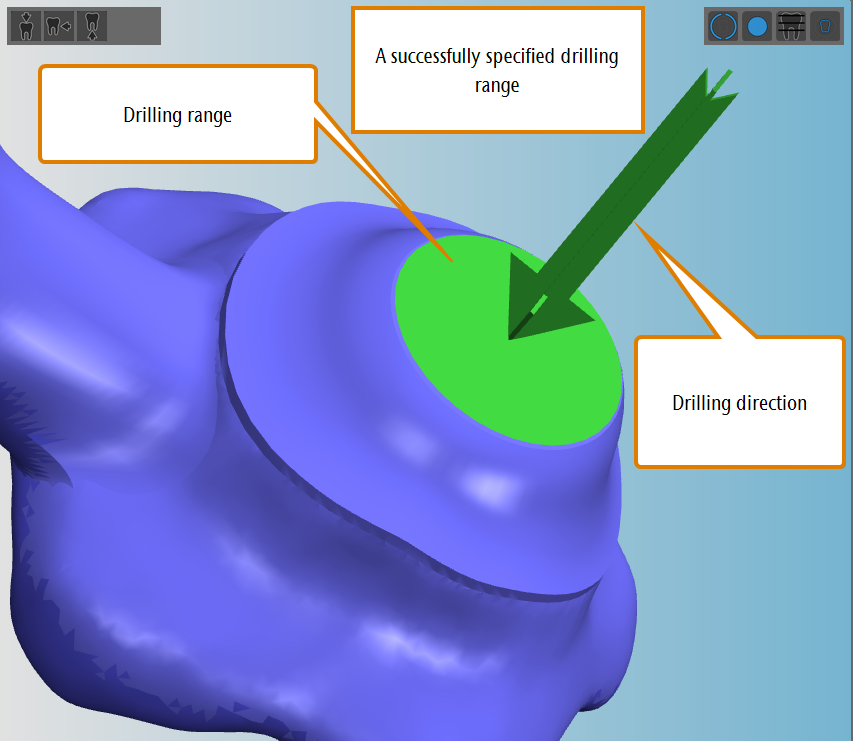
- Set the diameter and position of the drilling range The drilling range is represented by a green circle in the blank display and must cover the opening surface of the drilling. Use the value bar to increase and decrease the diameter of the drilling range. Adjust the value bar until the drilling range is slightly larger than the opening surface of the drilling.
- Finish the workflow by selecting the following icon in the left column:

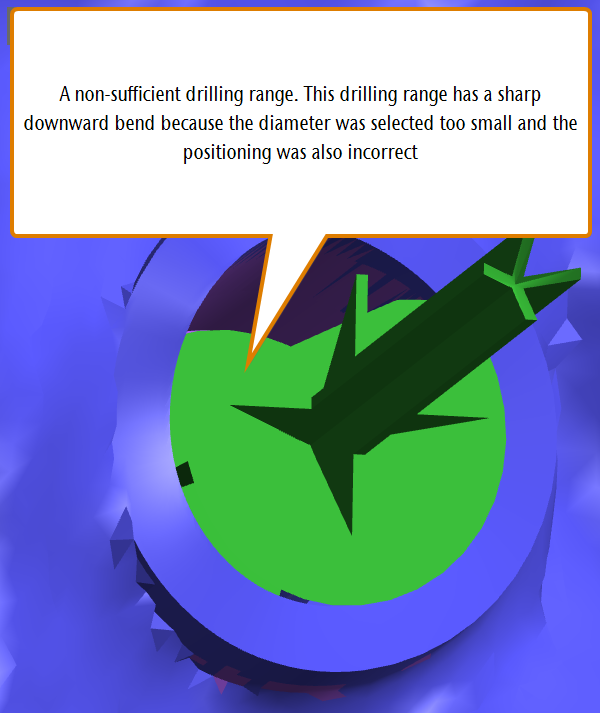
- DentalCAM draws the drilling direction as a green arrow and the drilling range as a green surface.
- Verify that the drilling range covers the opening surface of the drilling. The result will not always be as optimal as in the example above because STL files have a finite precision. However, if some parts of the opening surface or of the drilling do not lie within the drilling range, you should delete the drilling range and try again.
- Repeat steps 3 – 7 for the other end of the drilling on the other side of the object.
- If you want to apply your changes, select the following icon below the icon bar for the editing functions:
- DentalCAM saves your changes, exits the current editing function and displays all existing editing functions for the current object.
- If you want to discard your changes, select the following icon:
- DentalCAM undoes your changes, exits the current editing function and displays all existing editing functions for the current object.
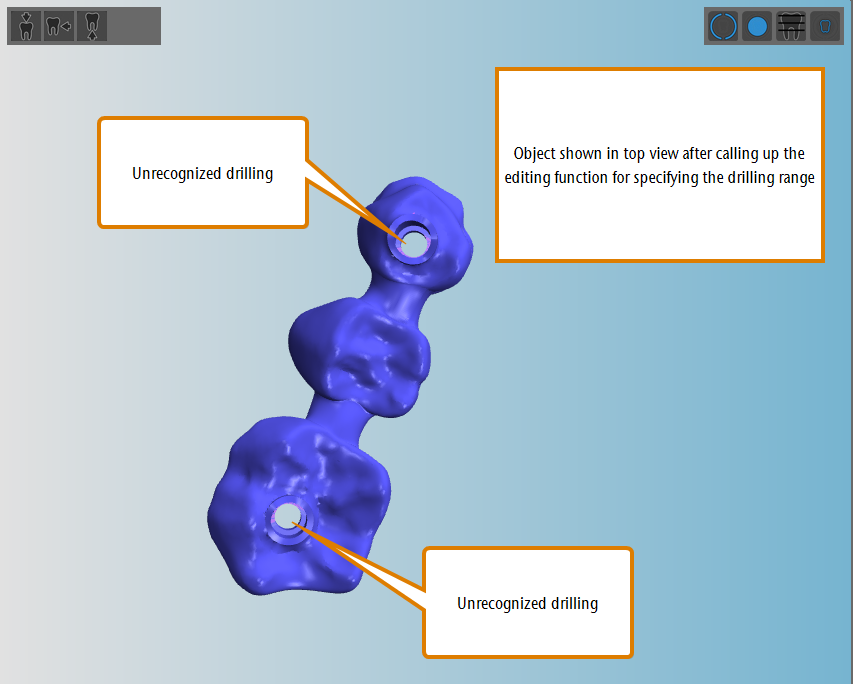
An object with 2 unrecognized drillings
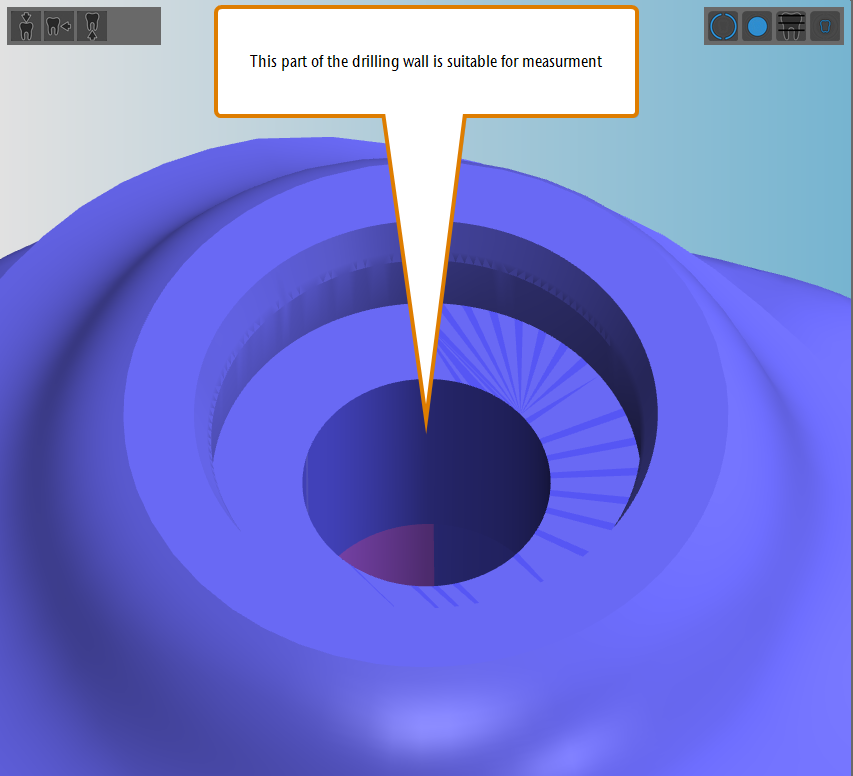
Positioning the view to view the bore wall
DentalCAM may re-position your measuring points. As long as all points still lie on the wall, everything’s fine.
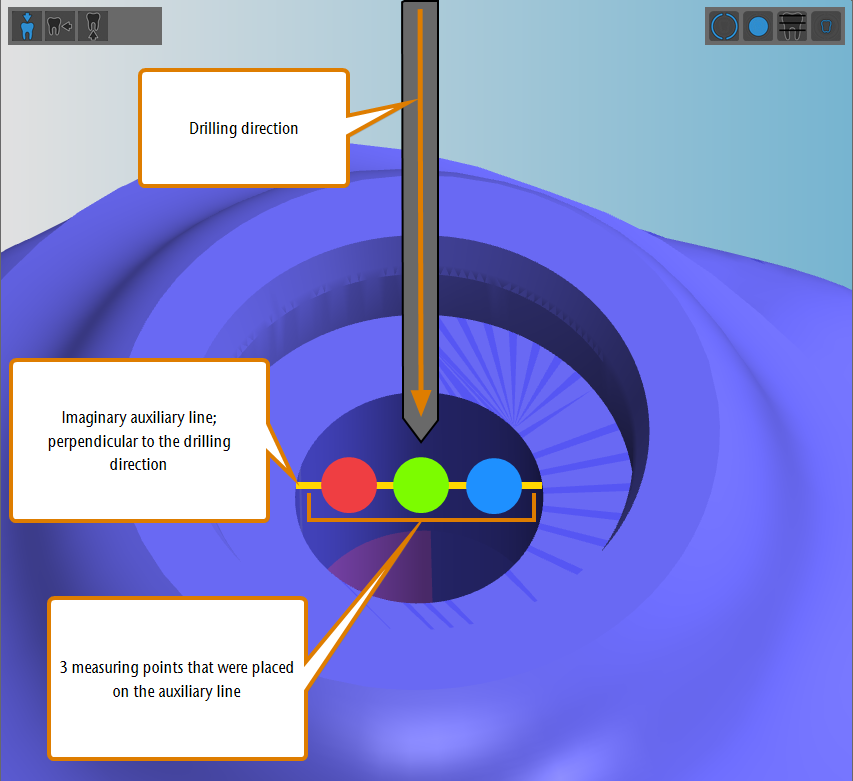
Setting measuring points: (a) Diagram: Setting measuring points; (b) Setting measuring points
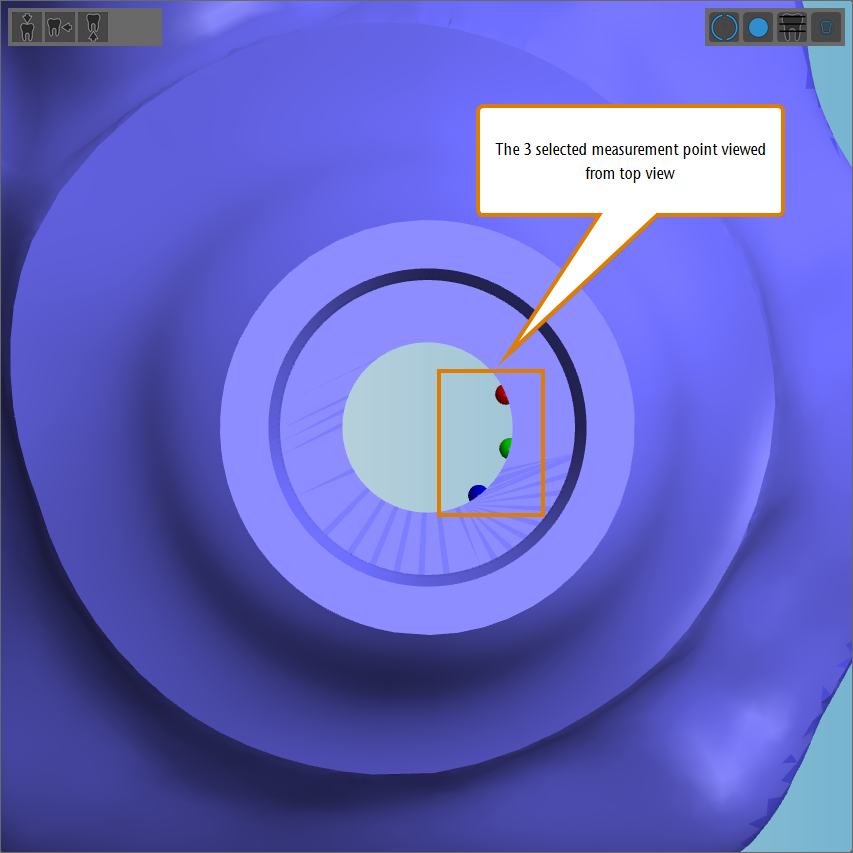
The measuring points from top view
Specifying the drilling range
A successfully specified drilling range

Deleting drilling ranges
You can delete manually specified drilling ranges and also drilling ranges which DentalCAM automatically recognized via the automatic search function for drillings.
- Open the editing functions for the desired object by clicking on the following icon:
- To open the editing function for specifying the drilling range, select the following icon:
- DentalCAM displays a list with all recognized drilling ranges in the left column.
- To find the desired drilling range in the list, select the corresponding arrow which indicates the drilling direction in the blank display.
- DentalCAM marks the selected drilling range in the list with a blue border.
- To delete the drilling range, select the following icon:
- DentalCAM removes the entry from the list and the visual representation of the drilling range in the blank display.
- Manually mark the drilling range. Otherwise, the drilling will not be machined correctly.
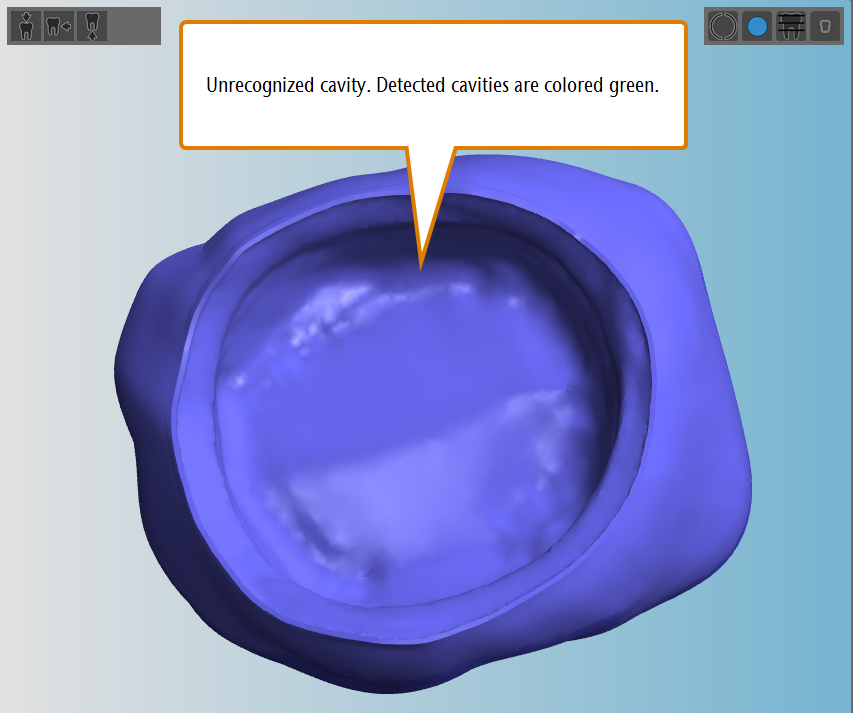
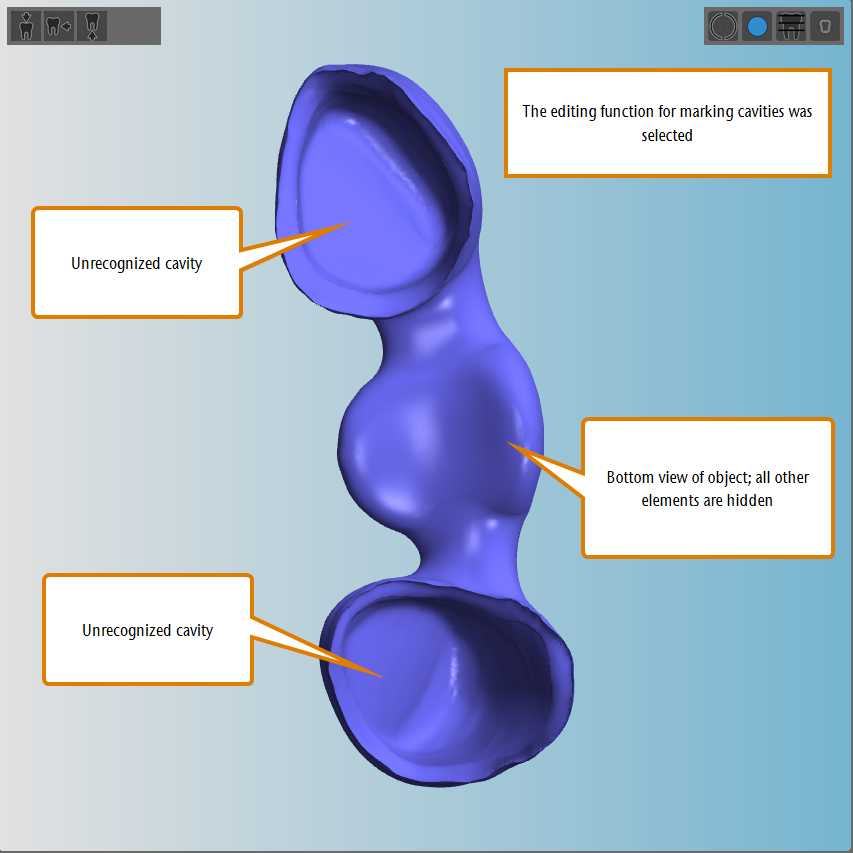
If an object contains an unrecognized or incorrectly recognized cavity, you must manually mark it via the corresponding editing function. Otherwise, the object will not be machined correctly.
An object with an unrecognized cavity
There are 2 reasons why DentalCAM didn’t correctly recognize a cavity or drilling:
- You deactivated the automatic search function for cavities/drillings when importing the object.
- The automatic search function for cavities/drillings failed for the object due to an unusual geometry.
No matter the cause, your next step will be to manually mark the cavities of the object:
- Open the editing functions for the desired object by clicking on the following icon:
- To open the editing function for marking cavities, select the following icon:
- DentalCAM hides all elements except the object in the blank display and switches to the bottom view.
- If the object has any incorrectly recognized cavities, delete them.
- Start the workflow by selecting the following icon in the left column:

- Select the cavityClick in the center of the cavity you want to mark.
- DentalCAM tries to recognize the prep-line of the cavity and marks it with black dots. Some dots may lie outside of the prep-line because DentalCAM couldn’t recognize all parts of the prep-line correctly. You will have to manually correct these errors.
- Continue by selecting the following icon in the left column:

- Activate or deactivate the placement aidWhen the placement aid is enabled, the points you move in the next step snap to the highest point of the object near the mouse pointer. As the highest point is most likely the prep-line, the placement aid will make positioning the dots a lot easier. However, if you want full control over the positioning of the dots or if the placement aid fails to correctly recognize the prep-line, you should turn it off. To toggle the placement aid on or off, select the following icon:
- Drag all outliers to the prep lineSelect and hold an outside point and drag it to the prep line of the cavity. Do this with all outliers until the prep-line is fully marked with dots.
- Continue by selecting the following icon in the left column:

- If necessary, correct the machining angle(Only possible with a 5-axis machine) If the opening surface of the cavity is not parallel to the blank surface, the machine may not be able to manufacture the cavity properly. In this case, a 5-axis machine can increase the angle of attack of the rotational axes to compensate for the incorrect object orientation in the STL file. Use the RX and RY value bars to correct the machining angle for the cavity:
- Adjust the RX value bar to virtually rotate the object about the X-axis
- Adjust the RY value bar to virtually rotate the object about the Y-axis
- Finish the workflow by selecting the following icon in the left column:
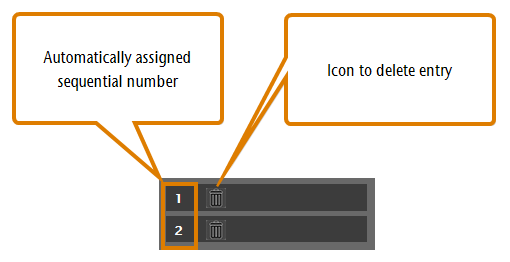
- DentalCAM colors the cavity in green and adds it to the list of cavities in the left column. The application assigns a sequential number to the cavity.
- If you want to apply your changes, select the following icon below the icon bar for the editing functions:
- DentalCAM saves your changes, exits the current editing function and displays all existing editing functions for the current object.
- If you want to discard your changes, select the following icon:
- DentalCAM undoes your changes, exits the current editing function and displays all existing editing functions for the current object.
The editing function for marking cavities showing an object with 2 unrecognized cavities
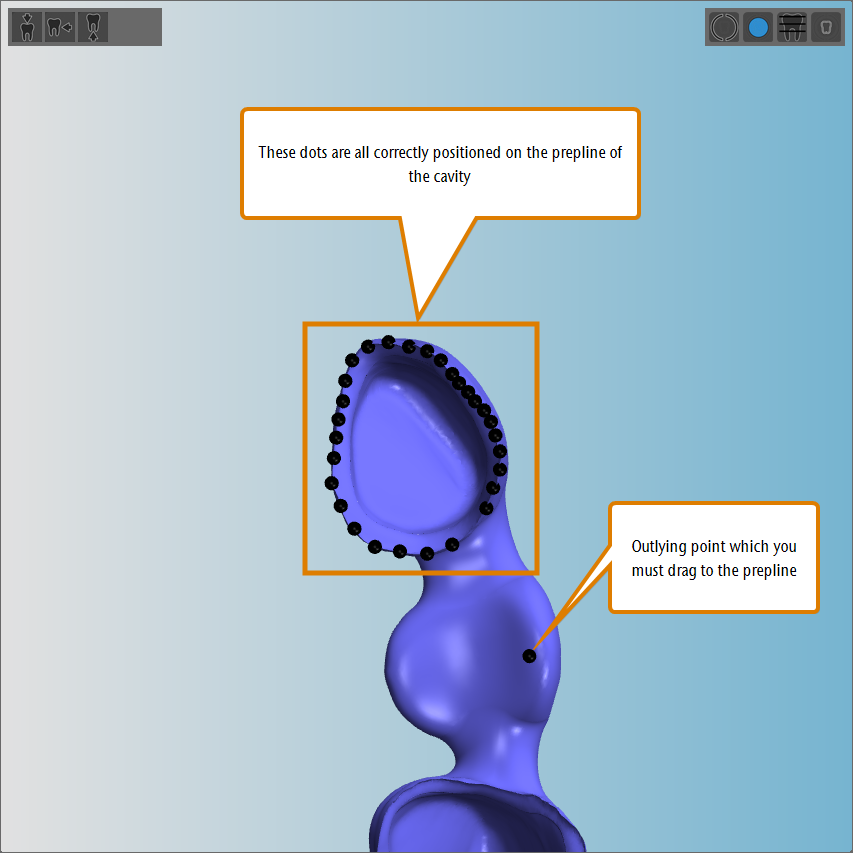
Marked prepline of a cavity with one outlying point
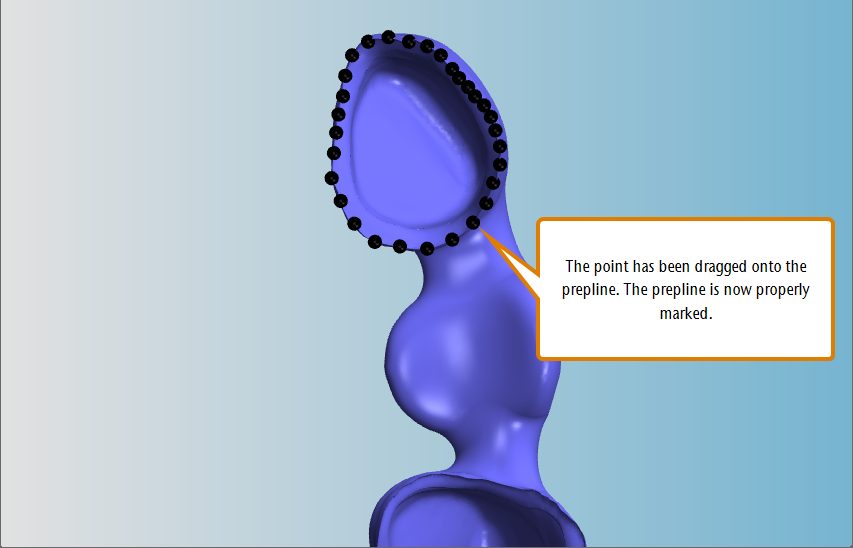
A correctly marked prepline
You do not change the orientation of the object in the blank when virtually rotating the object. Instead, the machine rotates the blank during machining so that it can mill out cavities despite the original (and unchanged) orientation of the object. This is why you must correct the machining angle for every cavity in the same object if necessary.


(a)Object with improper orientation for milling out cavities; (b)Object with corrected machining angle for milling out cavities
If you want to machine the job with a 4-axis-machine or if the maximum angle of attack of your 5-axis-machine is not sufficient to compensate for the non-optimal orientation of the object, you have to correct the orientation of the object in the STL file. To do so, you can either use the editing function for moving and rotating objects in DentalCAM or your CAD application.
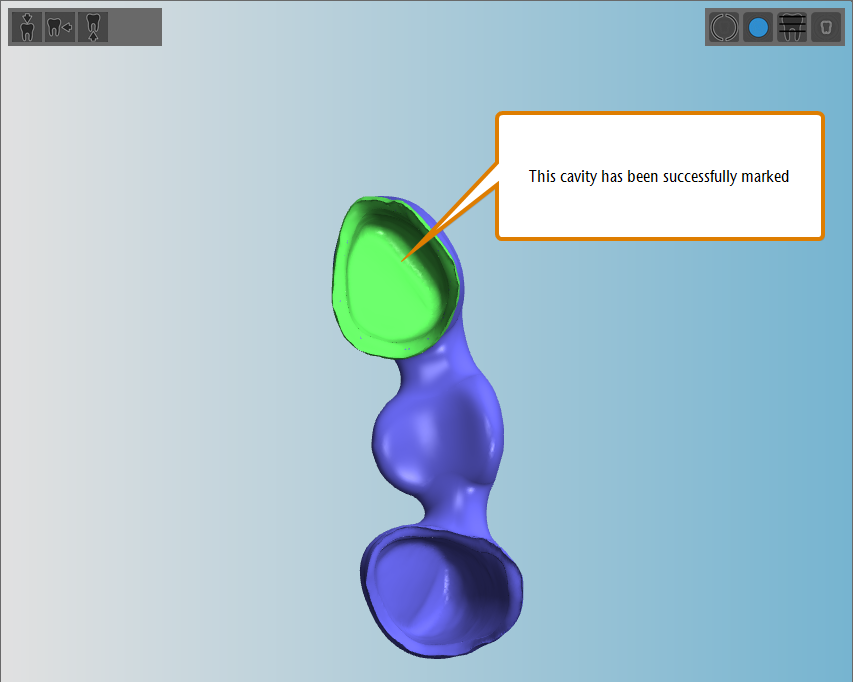
(a)A successfully marked cavity; (b)A list showing 2 cavities
Deleting cavities
You can delete manually marked cavities and also cavities which DentalCAM automatically recognized via the automatic search function for cavities.
- Open the editing functions for the desired object by clicking on the following icon:
- To open the editing function for marking cavities, select the following icon:
- DentalCAM displays a list with all recognized cavities in the left column.
- To find the desired cavity in the list, select the marking for the cavity in the blank display.
- DentalCAM marks the selected cavity in the list with a blue border.
- To delete the cavity, select the following icon:
- DentalCAM removes the entry from the list and the cavity in the blank display is no longer colored in green.
- Manually mark the cavity. Otherwise, the cavity will not be machined correctly.
A list showing 2 cavities
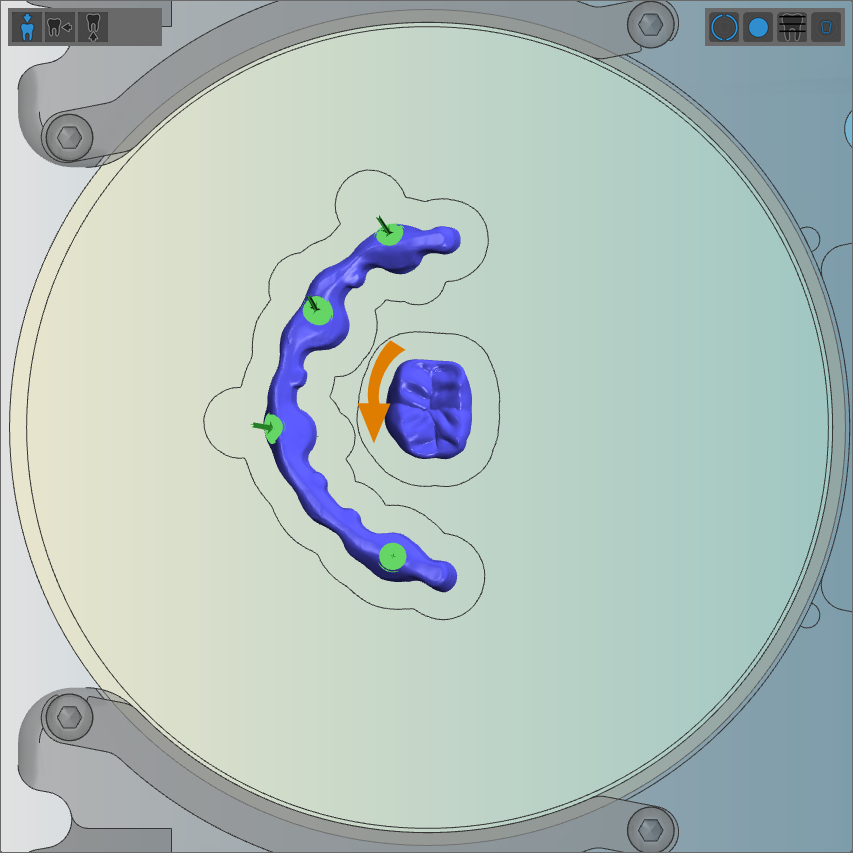
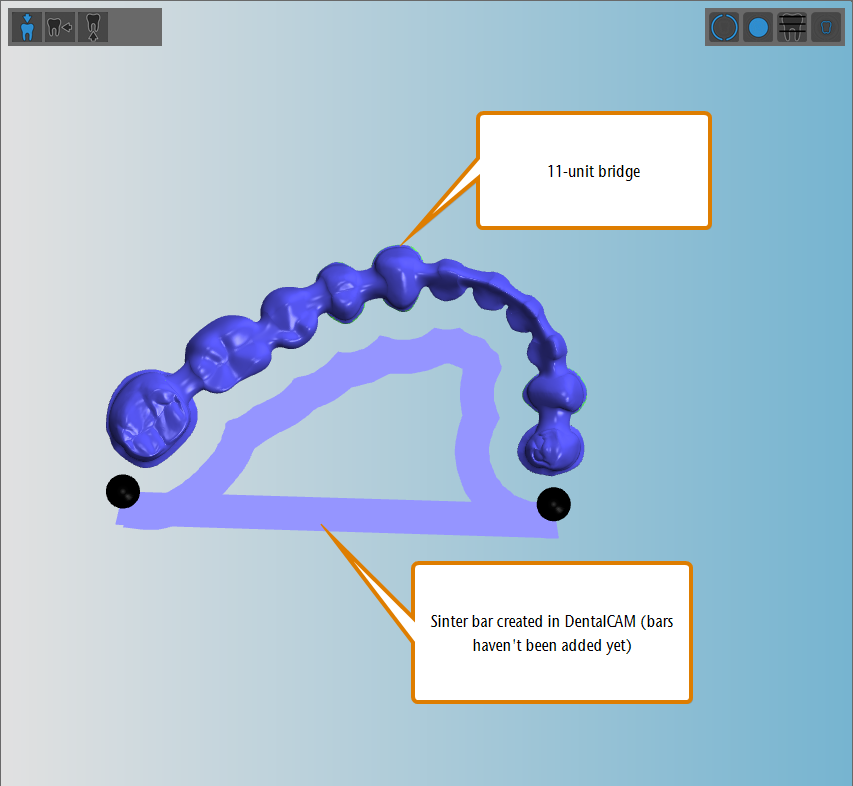
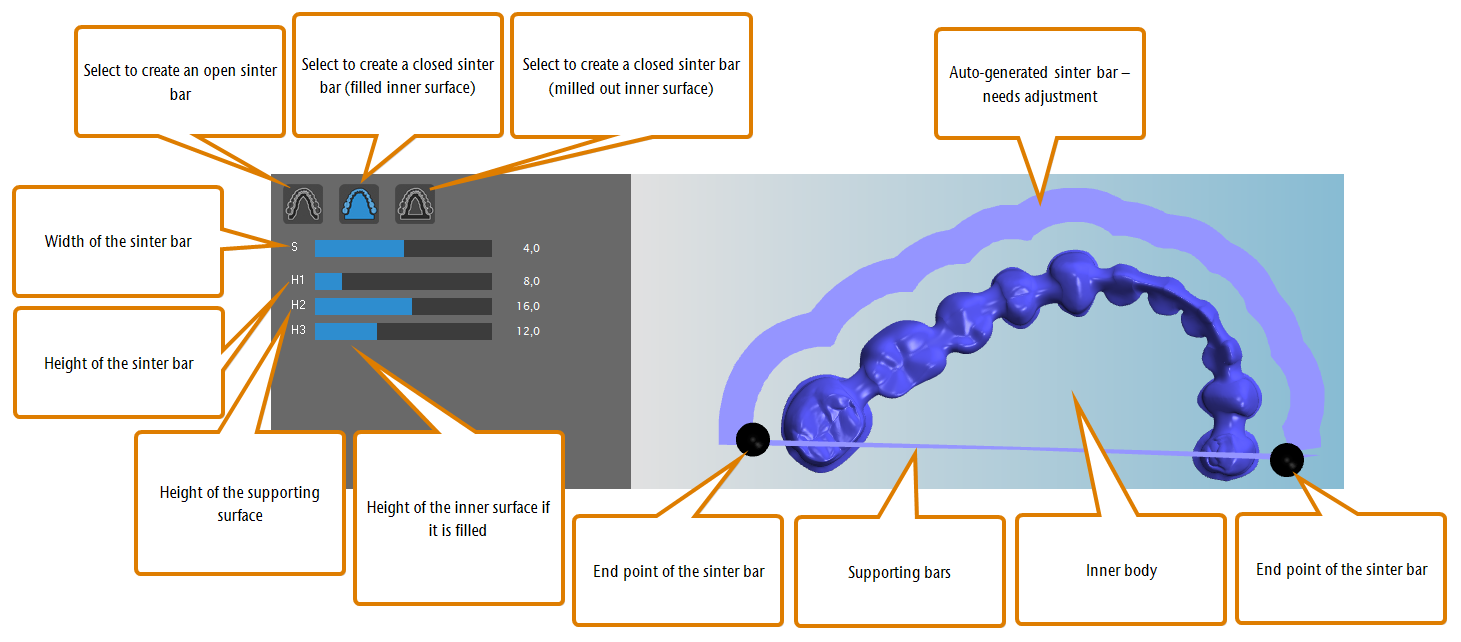
If you require a sinter bar to prevent objects from distorting, you can create one via the editing function for creating sinter bars:
- Open the editing functions for the desired object by clicking on the following icon:
- To open the editing function for creating sinter bars for objects, select the following icon:
- DentalCAM displays the following:
- In the left column: Icons for selecting the sinter bar type and value bars for adjusting the sinter bar.
- In the blank display: The object with an auto-generated sinter bar whose shape you can – and in most cases need to – adjust.
- Select the sinter bar type:
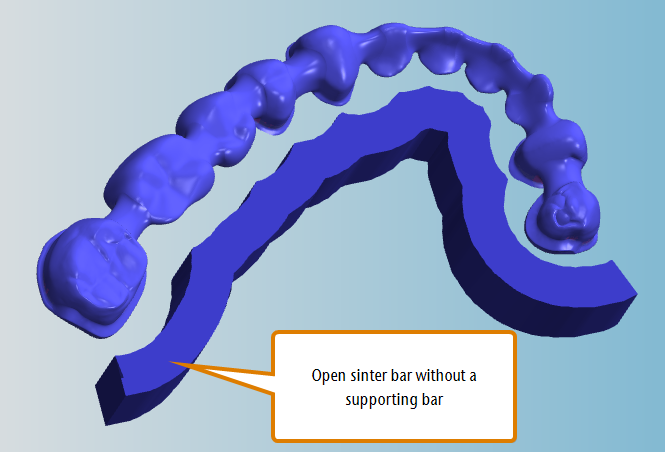
- If you require an open sinter bar without a supporting bar that the sinter bar will stand on in the sintering oven, select the following icon:
 . These kind of sinter bars are typically either sintered on sinter beads or with the aid of drops which support the object.
 - If you require a closed sinter bar with a supporting bar and with a filled inner surface, select the following icon:
 . This sinter bar type allows you to save machining time because the inner surface doesn't have to be milled out and it allows you to place an object within the inner surface to use the blank more economically. However, if you use this sinter bar type, it is harder to ensure that the volume of the sinter bar is roughly equal to the volume of the object, which is an important rule for sinter bars.
 - If you require a closed sinter bar with a supporting bar and with a milled out inner surface, select the following icon:
 . This is the most frequently used sinter bar type because you get a very solid supporting bar for your sinter bar and you can easily ensure that the volume of the sinter bar is roughly equal to the volume of the object.
 - Adjust the shape of the sinter barTo do this, drag the end points of the sinter bar to their desired location.
- DentalCAM automatically adjusts the shape of the sinter bar by connecting the endpoints. The sinter bar follows the contour of the object.
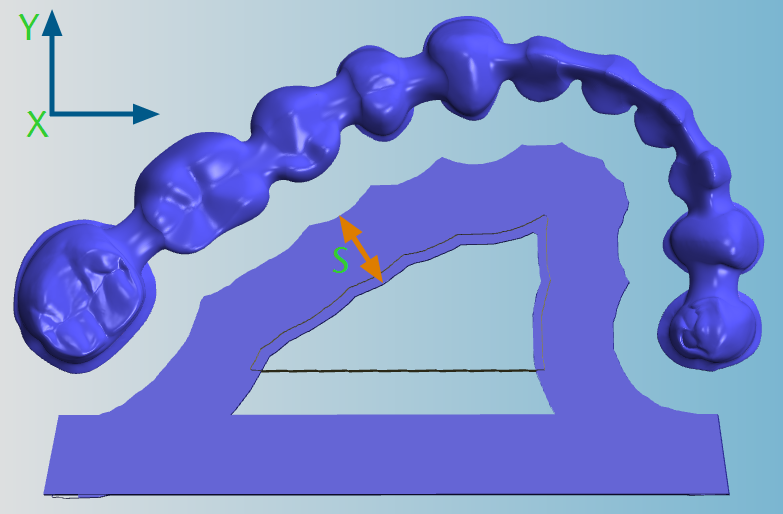
- (Optional) Increase or decrease the width of the sinter bar with the S value bar (adjusts width in X-/Y-direction). To the right of the value bar you find the current width in millimeters.
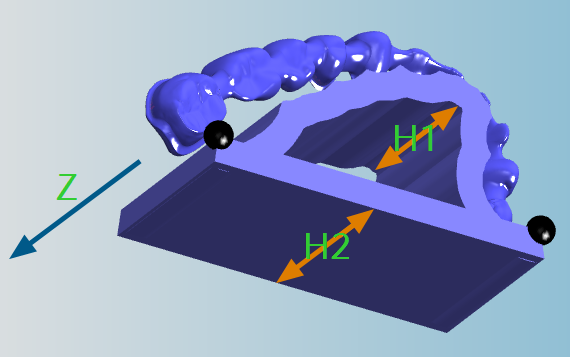
- (Optional) Increase or decrease the height of the sinter bar with the H1 value bar (adjusts height in Z-direction). To the right of the value bar you will find the current height in millimeters.
- (Optional) Increase or decrease the height of the supporting bar with the H2 value bar (only for closed sinter bars). To the right of the value bar you find the current height millimeters.
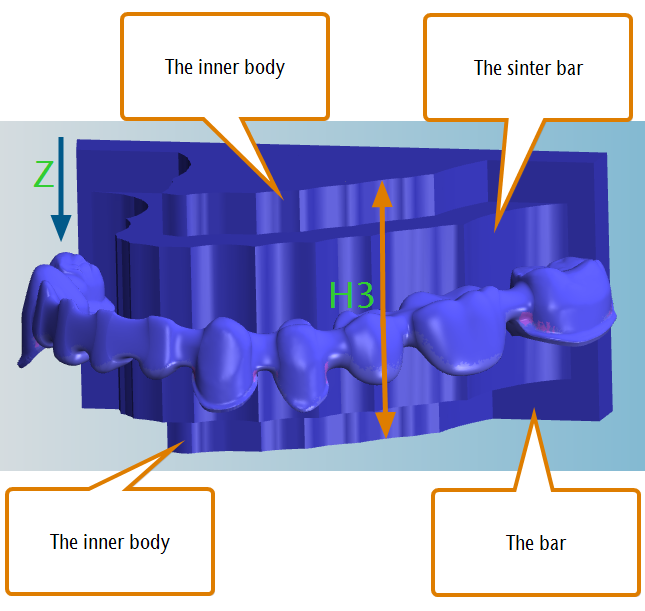
- (Optional) Increase or decrease the height of the inner body with the H3 value bar (only for closed sinter bars). To the right of the value bar you find the current height millimeters.
- As soon as you change a value bar, DentalCAM adjusts the visual representation of the corresponding element in the blank display. In addition, if you change one of the height values, DentalCAM displays the blank and sinter bar elements in 3D in the blank display.
- If you want to apply your changes, select the following icon below the icon bar for the editing functions:
- DentalCAM saves your changes, exits the current editing function and displays all existing editing functions for the current object.
- If you want to discard your changes, select the following icon:
- DentalCAM undoes your changes, exits the current editing function and displays all existing editing functions for the current object.
- If you created an open sinter bar without a supporting bar, you may want to set drops onto the object.
Create sinter bars overview
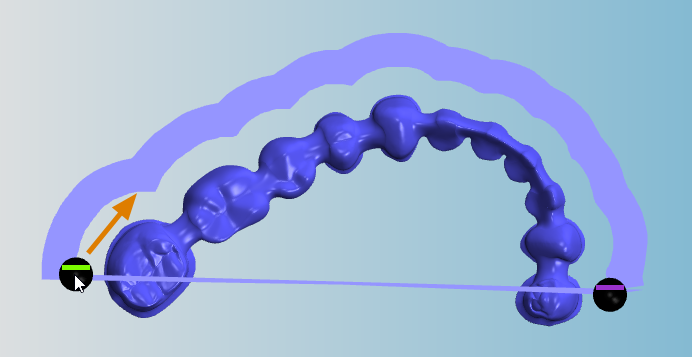
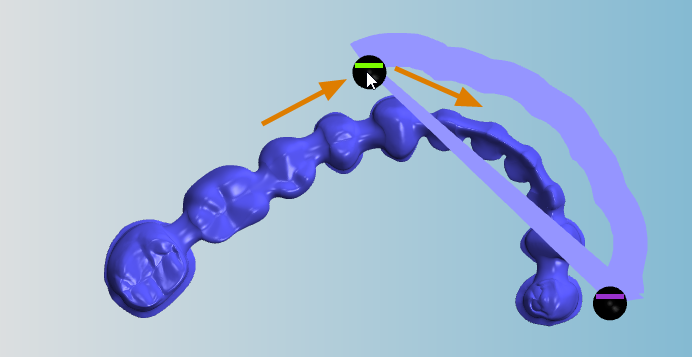
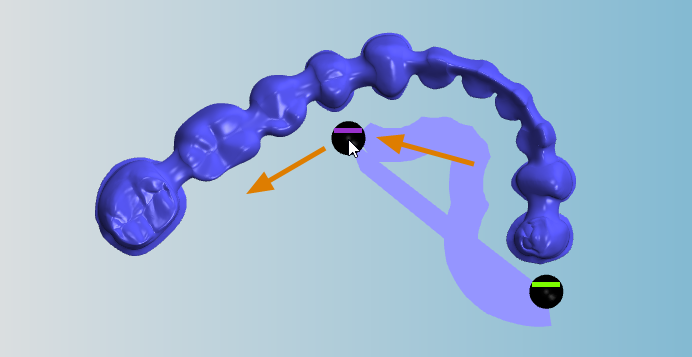
Dragging the end points (marked with colored lines for better distinguishability) of the auto-generated sinter bar
How the value bars affect the elements of the sinter bar
There is 1 golden rule when setting the height of the elements of a sinter bar: If you add a supporting bar, it must always be as high or higher than the next highest element. Or in other words: No element may be higher than the supporting bar. Because of this, DentalCAM may automatically adjust a value bar when you manually change another.
If you created a sinter bar without a supporting bar that the sinter bar could stand on in the sintering oven, you either need to use an aid like sintering pearls or set drops onto the object in DentalCAM.
Bridge with sinter bar which requires drops
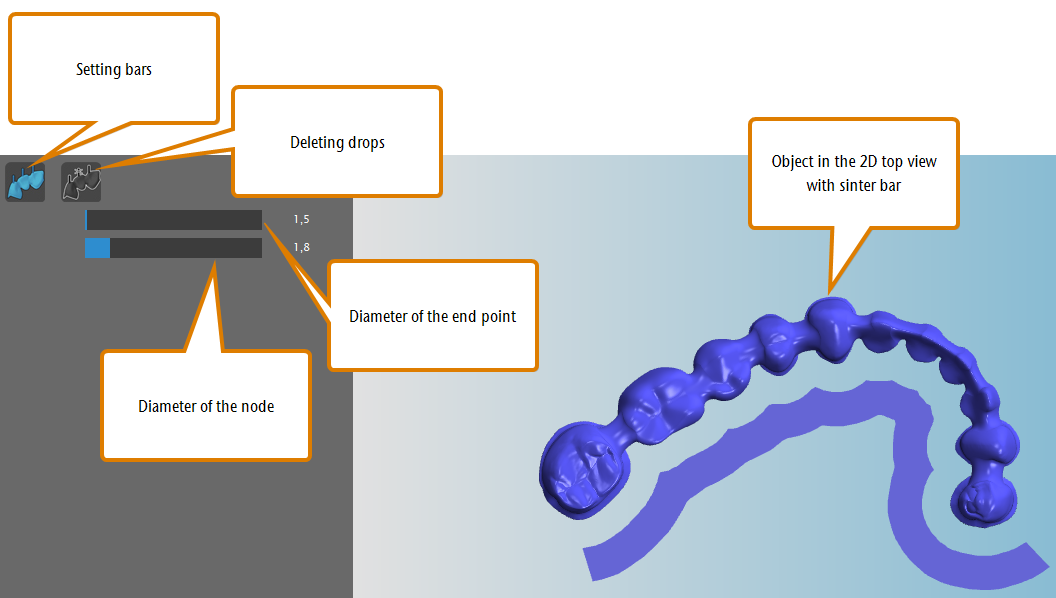
You can set drops in DentalCAM as follows:
- Open the editing functions for the desired object by clicking on the following icon:
- To open the editing functions for setting drops, select the following icon:
- In the left column, DentalCAM displays icons and value bars for adjusting drops. In the blank display, the application shows the object in the 2D top view.
- Make sure that the following icon is selected:

- (Optional) Via the lower value bar, adjust the diameter of the end point (the part of the drop that the object will stand on in the sintering oven). If the diameter of the end point is smaller than the diameter of the node (see next step), the drop will become conical instead of cylindrical. This setting only affects the next drops that you will set.
- (Optional) Via the upper value bar, adjust the diameter of the node (the starting point of the drop where it touches the object). The diameter of the node cannot be smaller than the diameter of the end point. This setting only affects the next drops that you will set.
- DentalCAM displays the current diameters in mm to the right of the value bars.
- In the blank display, select the location where you want to set a drop.
- DentalCAM sets the drop onto the selected location. The drop is represented by a blue dot.
- If you want to delete a drop, select the following icon and click on the desired drop:
 . If you want to set more drops, select the following icon: .
 - When you are finished with setting drops, your object should like this:
- If you want to apply your changes, select the following icon below the icon bar for the editing functions:
- DentalCAM saves your changes, exits the current editing function and displays all existing editing functions for the current object.
- If you want to discard your changes, select the following icon:
- DentalCAM undoes your changes, exits the current editing function and displays all existing editing functions for the current object.
Setting drops
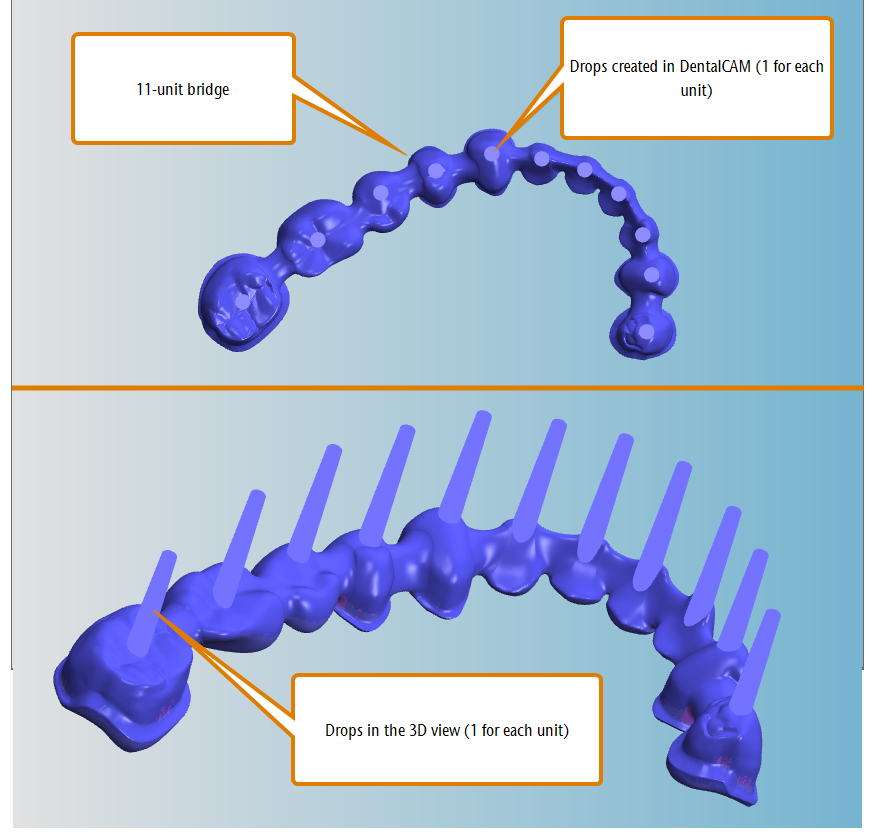
We recommend creating only conical drops because they are easier to manufacture for the machine. The standard values are 1.5 mm for the diameter of the end point and 1.8 mm for the diameter of the node.
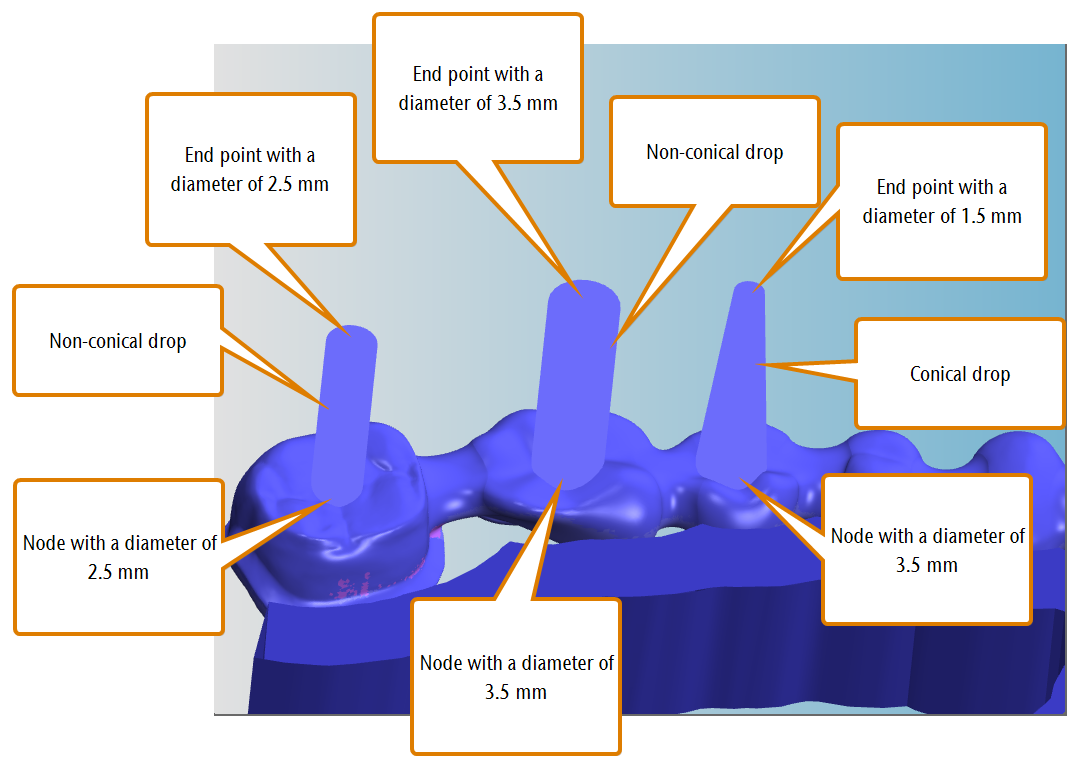
Different diameters for drops: examples of cylindrical and conical drops
It is not useful to position drops outside of objects. Therefore, any drop that is not positioned on the surface of an object will be deleted when you save the object.
The following right figure was taken from the 3D side view and not from the 2D view of the editing function for setting drops. It was used here for the purpose of illustration.
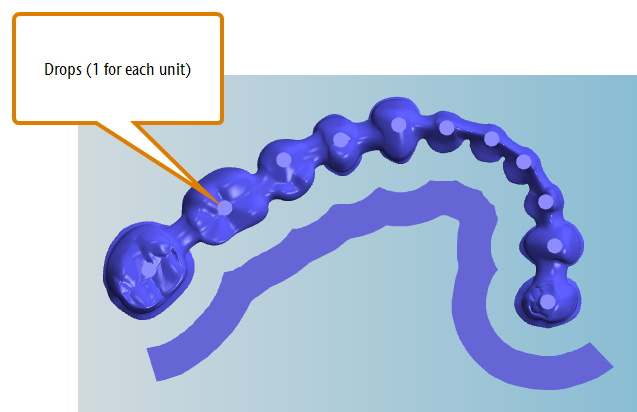
(a) A bridge with drops in the 2D top view; (b) A bridge with drops in the 3D view
If you want to manufacture an object with an attachment, you need to mark the attachment in DentalCAM. This way, the application knows which part of the object's geometry belongs to the attachment.
- Make sure that you have added all required objects (matrix and/or patrix) to the blank.
- Delete any incorrectly marked cavities or drillings via the editing functions for the corresponding object(s).
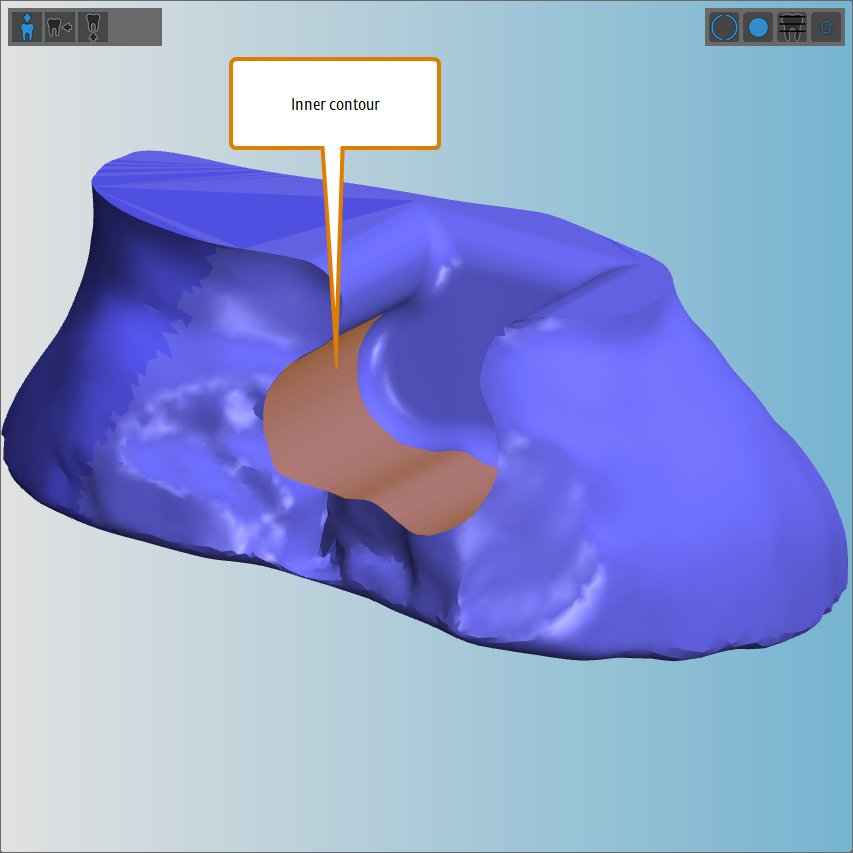
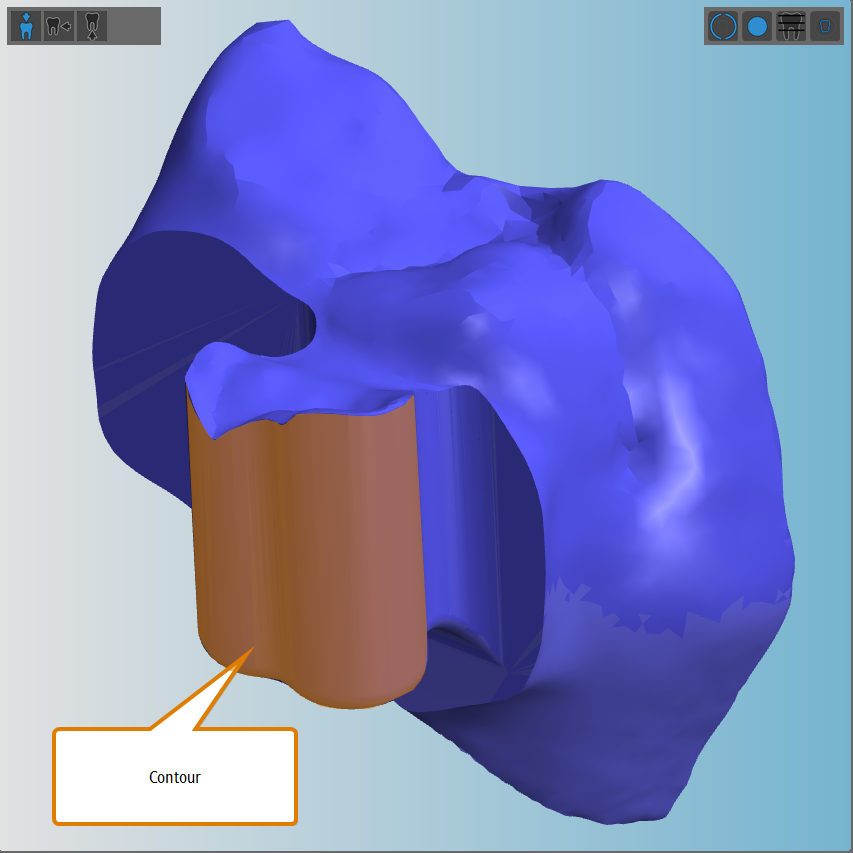
Marking the contour of the matrix
- Open the editing functions for the desired object by clicking on the following icon:
- To open the editing function for marking attachments, select the following icon:
- In the left column, icons for marking the attachments display. In the blank display, DentalCAM hides all elements except for the selected object.
- If there are any attachments that aren't properly marked, delete the incorrect marking(s).
- Start the workflow by selecting the following icon in the left column:

-
- Continue by selecting the following icon in the left column:

- Select 2 points on the wall:
-
- DentalCAM marks the selected spot with a green ball.
-
- The following happens:
- DentalCAM marks the second spot with a blue ball.
- The blank display changes to top view.
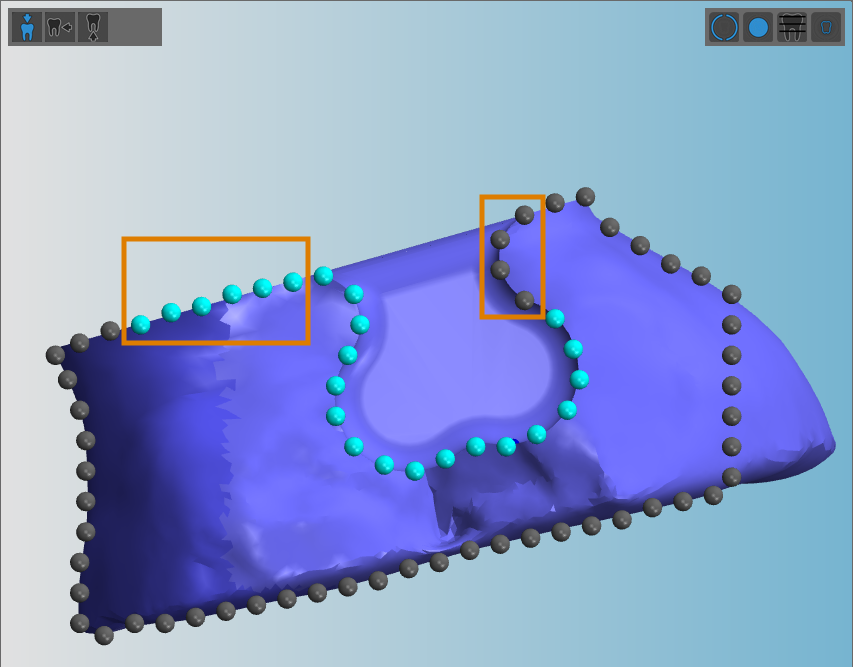
- DentalCAM marks the estimated area of the contour with turquoise balls. Black balls mark an area which DentalCAM estimated to be not part of the contour.
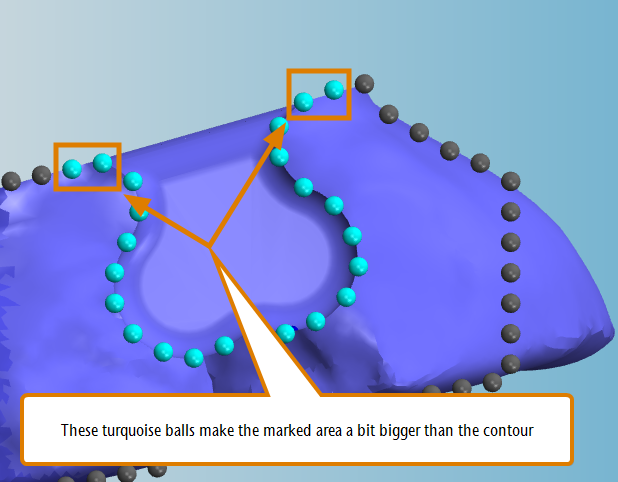
- If necessary, correct the area of the contour Select a black sphere to extend the area to that sphere. Select a turquoise ball to reduce the area to this ball.
- Finish the workflow by selecting the following icon in the left column:
- The following happens:
- DentalCAM calculates the area of the attachment based on your input.
- When the calculation is finished, the attachment is marked in yellow.
- If you want to apply your changes, select the following icon below the icon bar for the editing functions:
- DentalCAM saves your changes, exits the current editing function and displays all existing editing functions for the current object.
- If you want to discard your changes, select the following icon:
- DentalCAM undoes your changes, exits the current editing function and displays all existing editing functions for the current object.
The editing function for marking attachments
The view has been adjusted so that the relevant part of the attachment is in clear view
If you select a point that doesn't lie on the contour, DentalCAM won't be able to calculate the contour correctly. As a result, the object will not be machinable, and you will have to mark the attachment again.
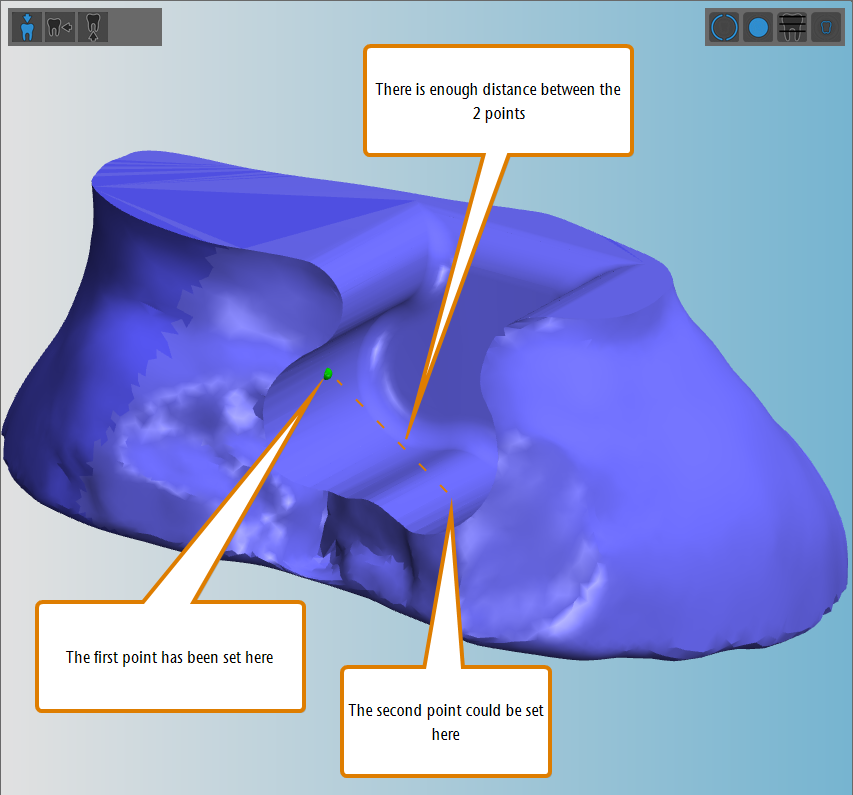
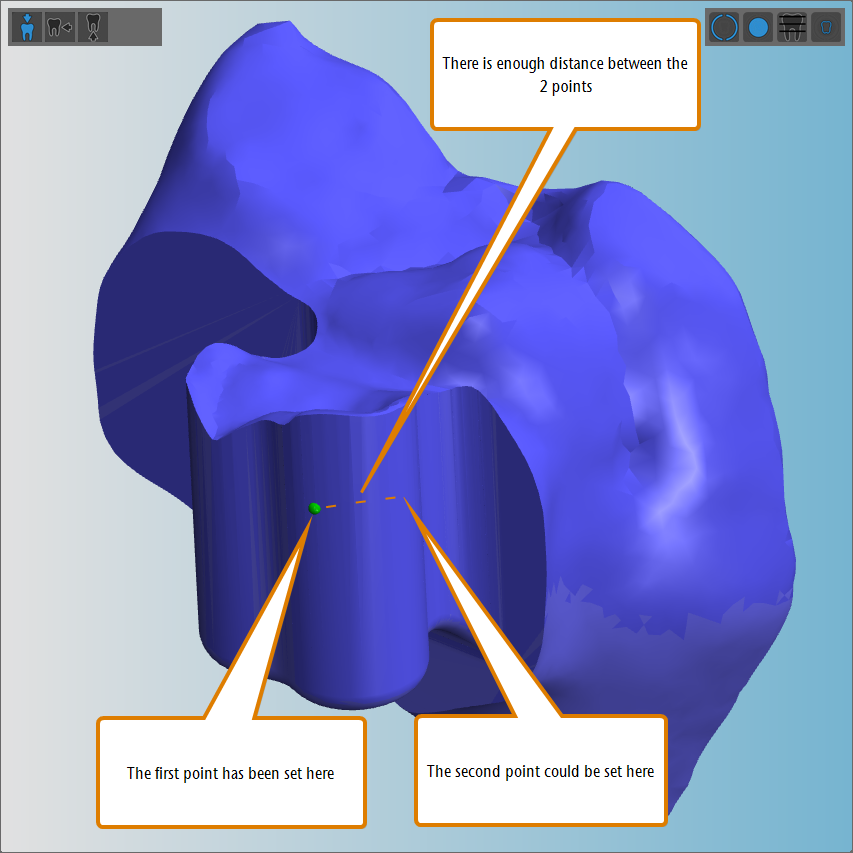
The first point has been set, the seconds point still needs to be selected
DentalCAM has calculated the area of the attachment, however, the result is not perfect (see orange markings)
The area of the contour has been corrected.
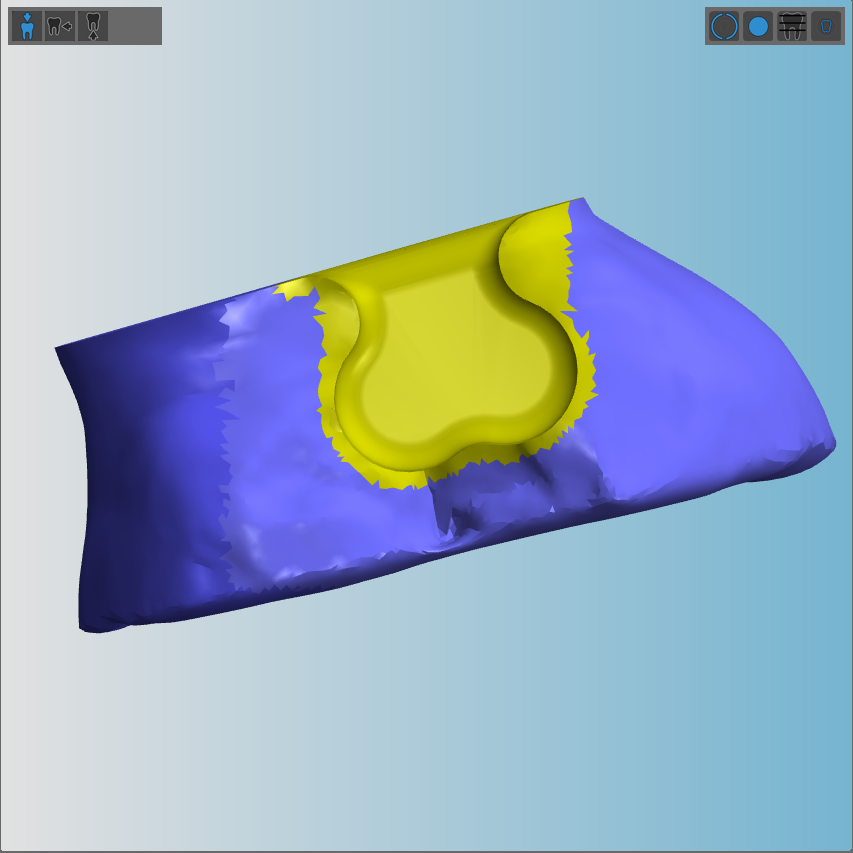
A successfully marked contour
Marking the contour of the patrix
- Open the editing functions for the desired object by clicking on the following icon:
- To open the editing function for marking attachments, select the following icon:
- In the left column, icons for marking the attachments display. In the blank display, DentalCAM hides all elements except for the selected object.
- If there are any attachments that aren't properly marked, delete the incorrect marking(s).
- Start the workflow by selecting the following icon in the left column:
-
- Continue by selecting the following icon in the left column:
- Select 2 points on the wall:
-
- DentalCAM marks the selected spot with a green ball.
-
- The following happens:
- DentalCAM marks the second spot with a blue ball.
- The blank display changes to top view.
- DentalCAM marks the estimated area of the contour with turquoise balls. Black balls mark an area which DentalCAM estimated to be not part of the contour.
- If necessary, correct the area of the contour Select a black sphere to extend the area to that sphere. Select a turquoise ball to reduce the area to this ball.
- Finish the workflow by selecting the following icon in the left column:
- The following happens:
- DentalCAM calculates the area of the attachment based on your input.
- When the calculation is finished, the attachment is marked in yellow.
- If you want to apply your changes, select the following icon below the icon bar for the editing functions:
- DentalCAM saves your changes, exits the current editing function and displays all existing editing functions for the current object.
- If you want to discard your changes, select the following icon:
- DentalCAM undoes your changes, exits the current editing function and displays all existing editing functions for the current object.
The view has been adjusted so that the relevant part of the attachment is in clear view
If you select a point that doesn't lie on the contour, DentalCAM won't be able to calculate the contour correctly. As a result, the object will not be machinable, and you will have to mark the attachment again.
The first point has been set, the seconds point still needs to be selected
DentalCAM has calculated the area of the attachment, however, the result is not perfect (see orange markings)
The area of the contour has been corrected.
A successfully marked contour
Deleting attachments
You can delete markings of attachments as follows:
- Open the editing functions for the desired object by clicking on the following icon:
- To open the editing function for marking attachments, select the following icon:
- DentalCAM displays a list with all marked attachments in the left column.
- To find the desired attachment in the list, select the corresponding yellow marking in the blank display.
- DentalCAM marks the selected attachment in the list with a blue border.
- To delete the attachment, select the following icon:
- DentalCAM removes the entry from the list and the marking of the attachment in the blank display.
- If you want to apply your changes, select the following icon below the icon bar for the editing functions:
- DentalCAM saves your changes, exits the current editing function and displays all existing editing functions for the current object.
- If you want to discard your changes, select the following icon:
- DentalCAM undoes your changes, exits the current editing function and displays all existing editing functions for the current object.
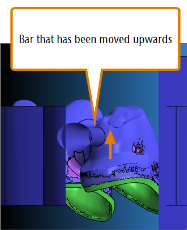
Setting bars
Setting bars is the last editing step which you perform for an object. This doesn’t mean that you have to set bars for all your objects together to finalize the whole blank. You can just as well finish editing one object including bars and then begin to work on the next object.
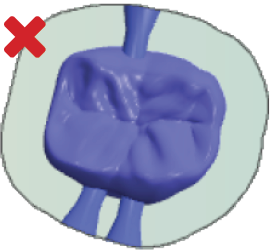
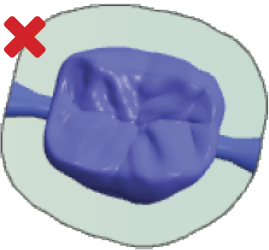
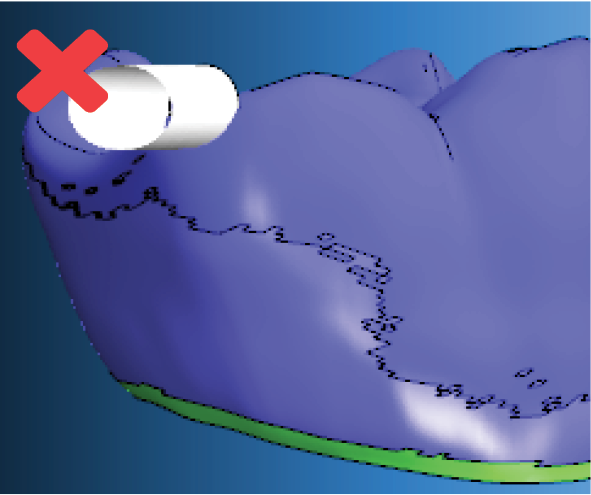
Insufficient stability due to an incorrect placement of bars
If bars are placed on non-suitable surfaces (e. g. concave surfaces and/or surfaces with too little material thickness), the bars may be not stable enough.
- When setting bars, carefully check the surface of the objects in the preview area.
- Position bars only on suitable surfaces.
- When editing objects in blocks, rotate the objects so that the bar which runs from the mandril to the objects touches the object at a suitable surface.
- Read the important information on positioning bars.
Watch the video
YouTube video – When viewing this video, personal data is sent to YouTube, LLC, USA. Privacy statement
- In order to open the Nesting view for setting bars, select the following icon in the main icon bar:
In the following figure, we have only labeled the elements which are relevant for setting bars. If you need information about other elements in the nesting view, see the figure showing the nesting view for adjusting objects.
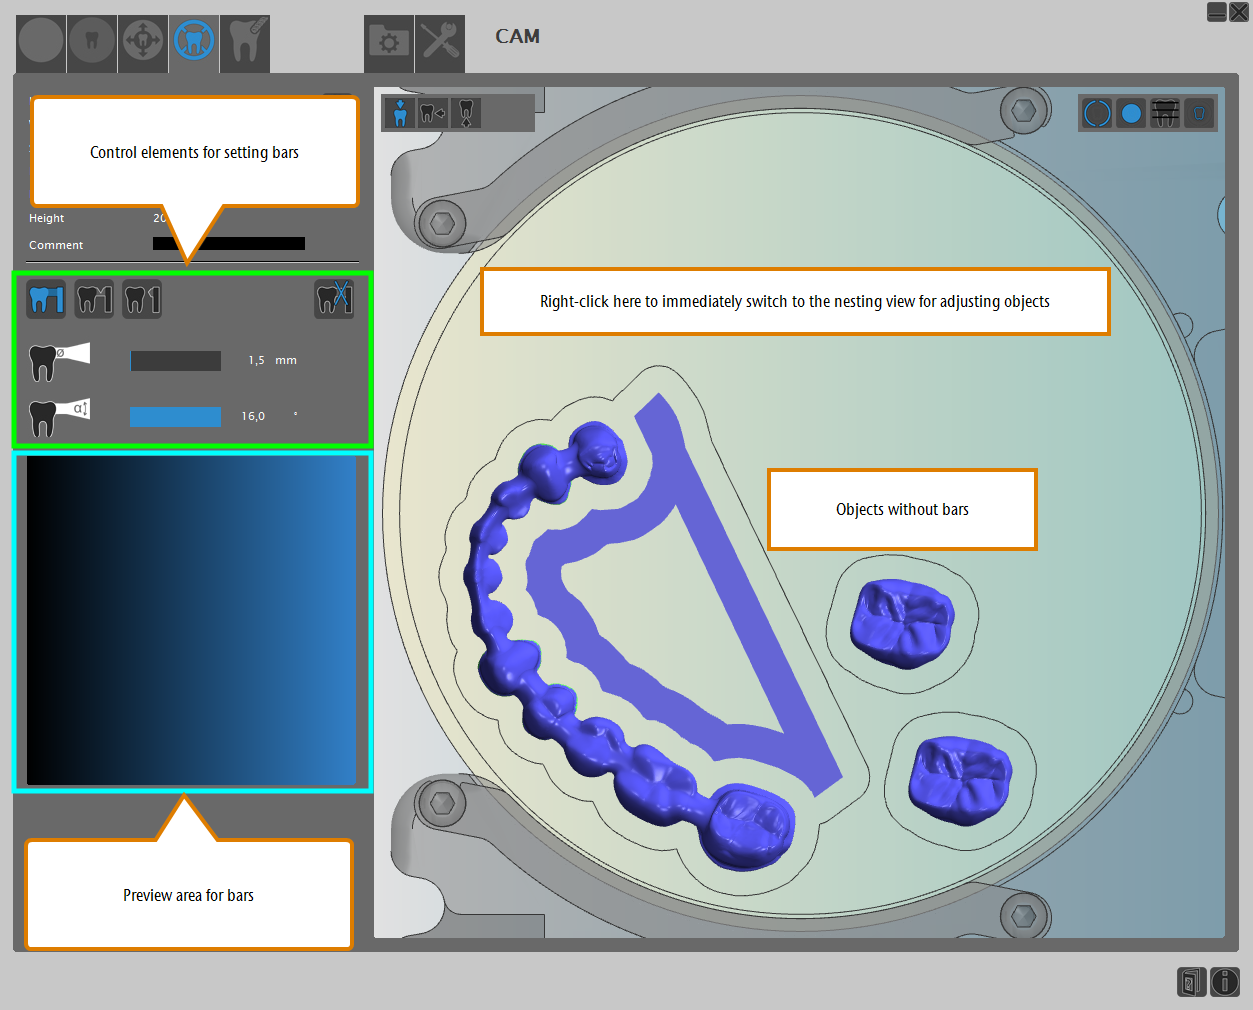
The nesting view for settings bars
You can quickly switch between both nesting views by right-clicking onto the blank when viewing it from the top. This is a very efficient way to quickly get to the view you need for your next editing step.
In the left column, there are several control elements for setting bars:
The control elements for setting bars
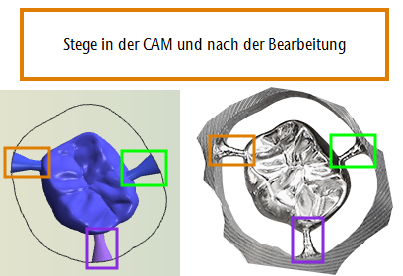
Every object has an empty workspace around it and therefore you need to set bars to hold the objects in place. DentalCAM will not calculate a job if there are objects without bars.
The workspace is a milled out or ground out area around an object which separates the object from the surrounding material. The object is connected to the surrounding material or other objects with bars which hold the object in place.
Workspaces and bars in the CAM application and after manufacturing
You set bars as follows:
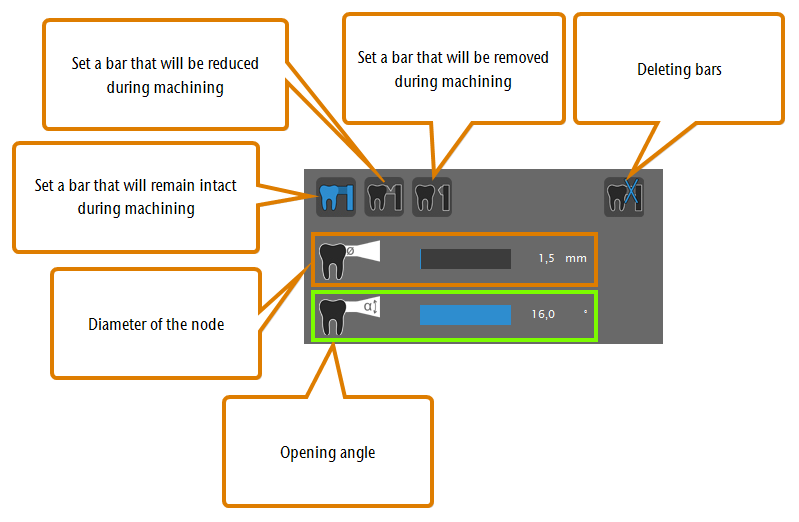
- Select the type of bar that you want to create by selecting one of the following icons:
 Bar that remains intact during machiningThese bars will remain unchanged at the end of machining. Use them if you need high stability e. g. when working with softer materials.
 Bar that is reduced during machiningThese bars are reduced at the end of machining.
 Bar that is removed during machiningThese bars will be completely removed at the end of machining. The fewer bars remain after machining, the easier it is to separate the object(s) from the blank at the cost of stability.
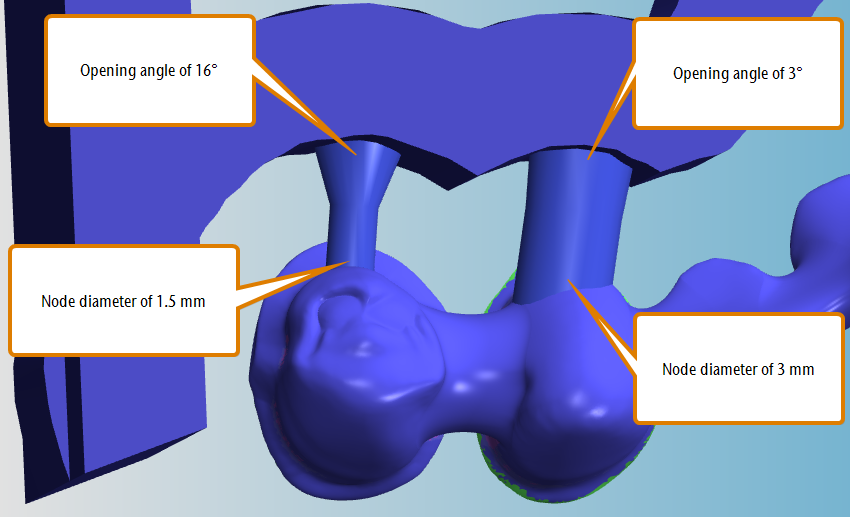
- (Optional) Adjust the diameter of the node via the value bar marked with the following icon:
 . The node is the point where the bar touches the object. This setting only affects the next bars that you will set. To the right of the value bar you find the current value.
 - (Optional) Adjust the opening angle via the value bar marked with the following icon:
 . The opening angle specifies by how much the diameter of the bar increases in direction to its end point. This setting only affects the next bars that you will set. To the right of the value bar you find the current value.
 - Select and hold on the location where you want to position the bar. Bars are positioned on the surfaces of objects.
- The bar automatically snaps to the outer surface of the object.
- To move the bar left or right, move the mouse into the corresponding direction.
- To move the bar upwards or downwards, turn the mouse wheel away or towards you. Alternatively, you can click and hold on the bar in the preview window and move the mouse up or down.
- DentalCAM immediately updates the preview area accordingly so that you can verify the correct positioning of the bar.
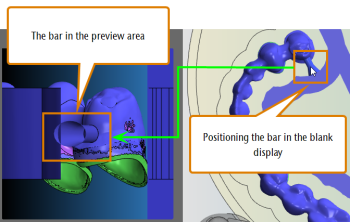
(a) Moving a bar left and right; (b) Moving a bar upwards and downwards
- If you are satisfied with the position, release the mouse button. If you need to correct the position of a bar, select and hold on the bar and repeat step 5.
- If you want to delete a bar, select the following icon:
 . Select the bar which you want to delete.
 - Repeat steps 4 – 7 until you have set enough bars for the object.
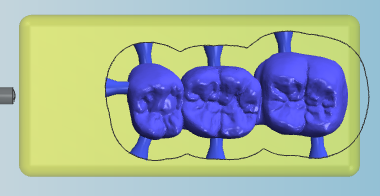
(a) A bridge with 2 bars for every unit; (b) A crown with 3 bars
If you reduce bars too much or use too many reduced bars when working with softer materials, objects may drop down to the bottom of the working chamber during machining andbe damaged.
If you remove too many bars when working with softer materials, objects may drop down to the bottom of the working chamber during machining and get damaged.
Examples of bars with different diameters and opening angles


Generally speaking, setting bars is easy, but the devil is in the details. Bars that were incorrectly set are one of the most frequent cause for bad machining results. But we also have good news for you: Many mistakes are easy to avoid. Here is how:
General rules for setting bars
The following rules mostly apply to objects nested in discs, but they are also relevant when nesting multi-unit objects in blocks.
Positioning bars in X- and Y-direction
| Correct | Incorrect | Description |
|---|---|---|
|
|
Place bars evenly on all sides If you place bars on only one side, vibration during machining may occur. This can lead to the blank or tool getting damaged. Correct (left): Bars on all sides of the object Incorrect (right): Bars on only one side of the object |
|
|
Place bars with sufficient distance from each other If there isn't enough space between bars, the air nozzle of the spindle may not be able to blow off machining debris as required, which can damage the tool. Correct (left): Bars with suitable distances between them Incorrect (right): Bars without suitable distances between them |
|
|
|
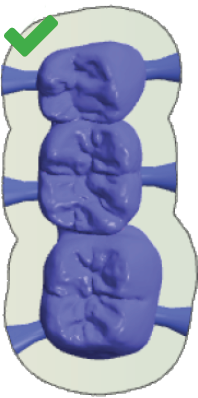
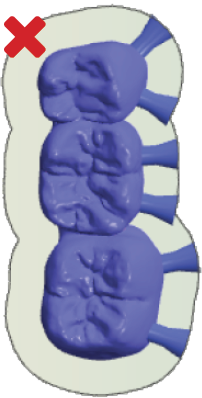
Set enough bars You should at least set 3 bars for each object. Multi-unit-objects generally require 2 bars per unit. Otherwise, vibrations may occur during machining, which can lead to the blank or tool getting damaged. Correct (left): Enough bars have been set Incorrect (right): Too few bars have been set |
Positioning bars in Z-direction
- Position all bars on the equator. If the equator is on the prepline, position the bar approx. 1 mm above the equator.
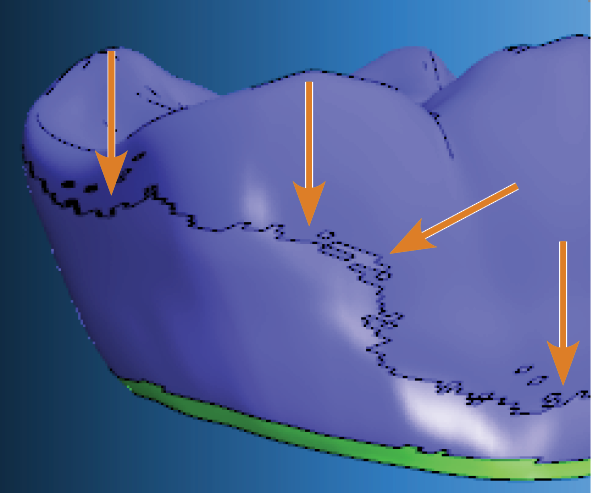
Equator marked with arrows
Equator marked with arrows
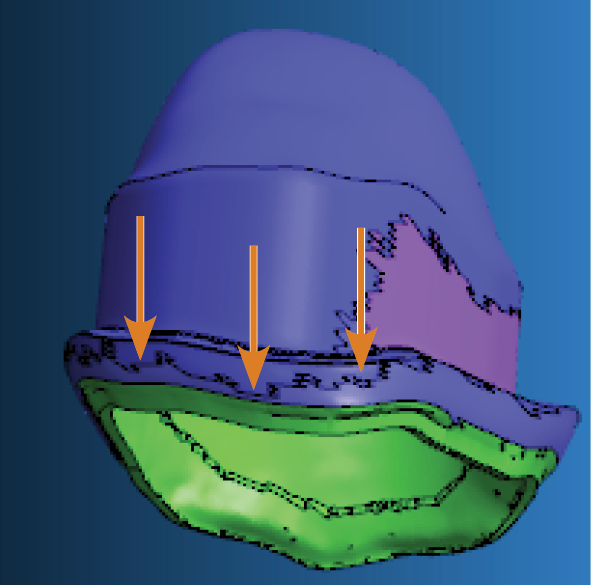
You need to position all bars completely on the object.
The bar in the figure below is positioned too high. Only a part of the bar is positioned on the object.
Incorrect positioning of a bar
The bar in the figure below is positioned too low. Only a part of the bar is positioned on the object. Additionally, the bar is positioned on the prepline.
Incorrect positioning of a bar
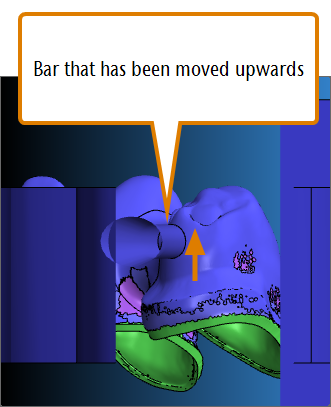
The bar in the figure below is correctly positioned on the equator.

Correct positioning of a bar
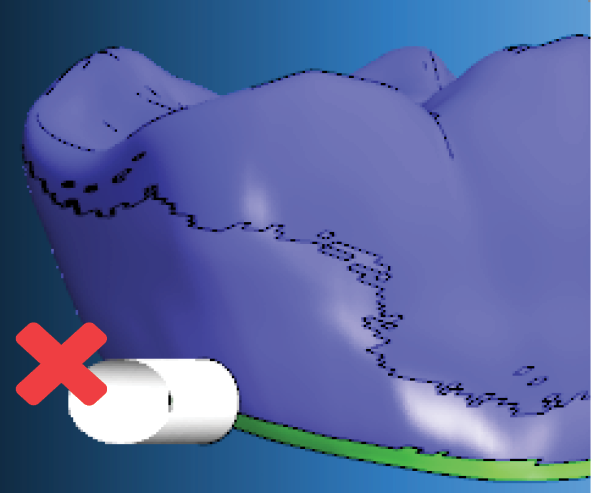
Placing bars on surfaces with sufficient material thickness
When setting bars, always place them on convex surfaces with a sufficient material thickness. Otherwise, the stability of the bars may be too low and you may need to do extra manual work after machining.
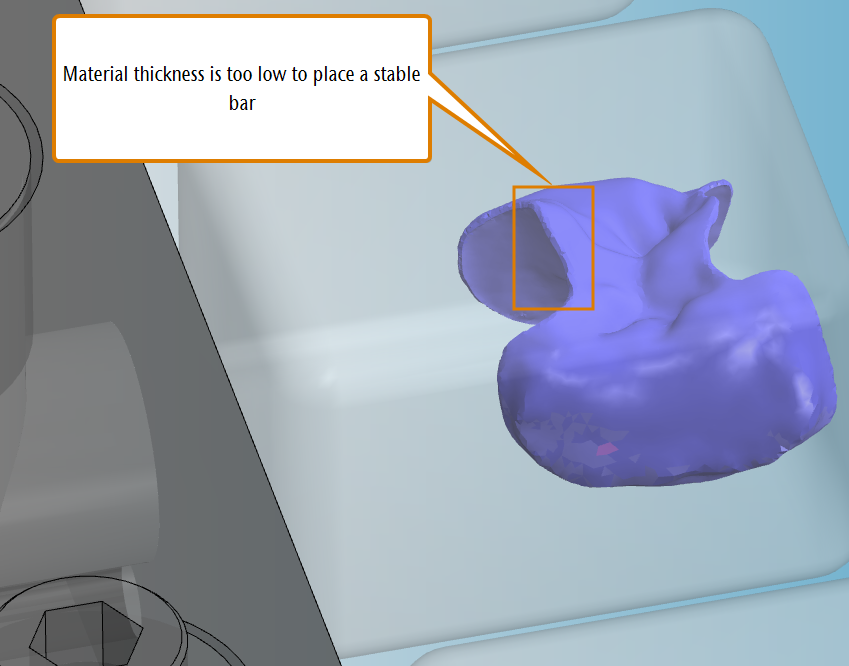
The following figure shows an inlay where the material thickness on the left side is not high enough to place a stable bar. The right side is suitable.
An inlay with 2 bars: The left bar is misplaced
Adjusting the original orientation of objects in blocks to set bars
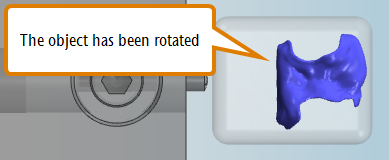
When importing objects into a job which uses blocks, the default orientation of the objects can be inappropriate for the bar that runs from the objects to the mandril.
Original orientation of an inlay in a block
In this case, you need to rotate the object about the Z-axis so that you can place the bar on an surface with sufficient material thickness.
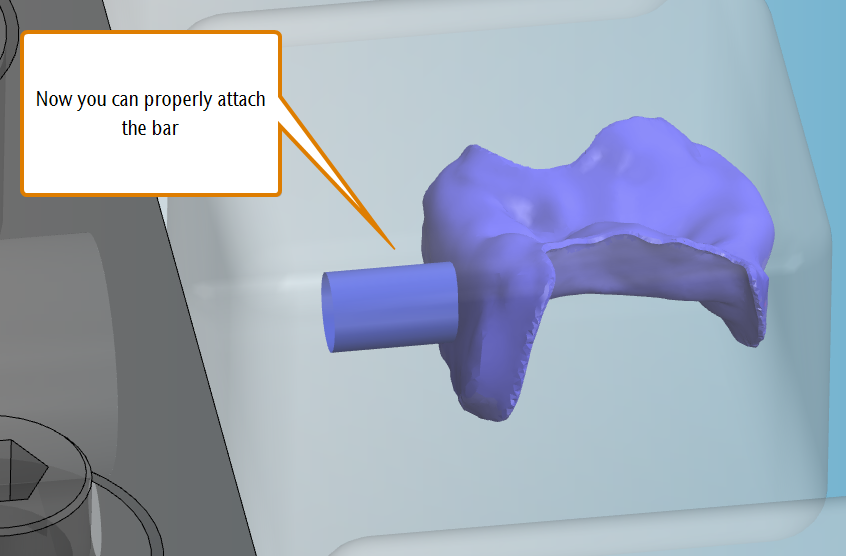
After rotating the inlay, you can place a bar on the appropriate side
Placing bars on convex surfaces and avoiding concave surfaces
You should always place bars on convex surfaces because these surfaces can sufficiently support bars. When placing bars on concave surfaces, their stability may be insufficient.
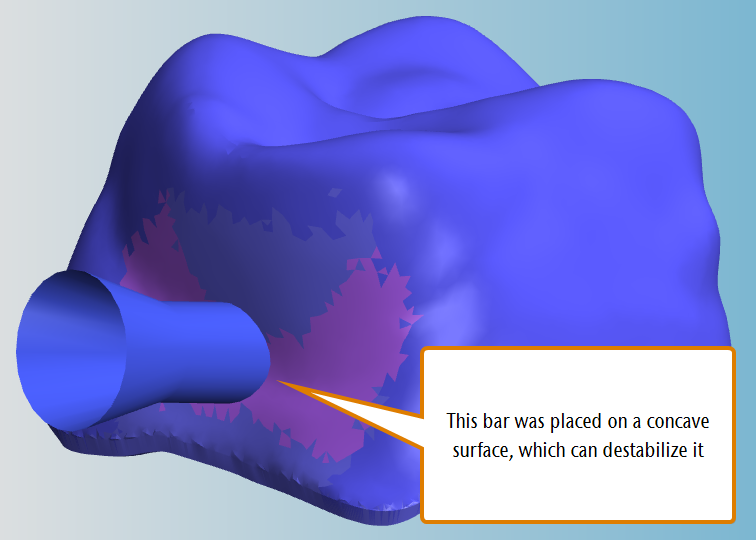
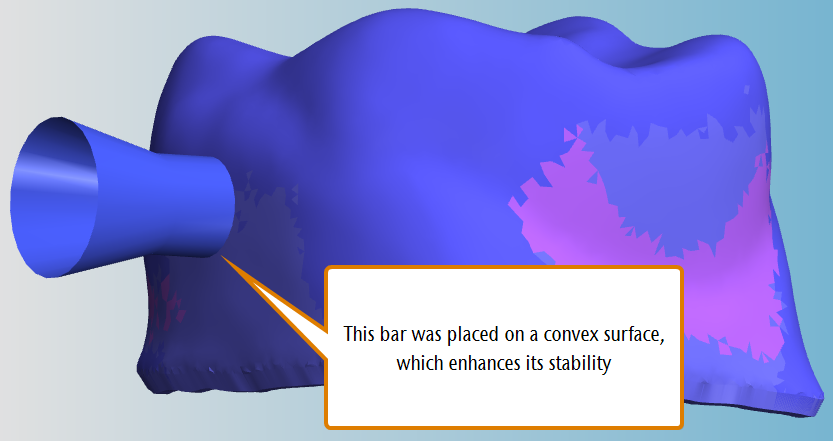
Bar on a concave surface (incorrect) and on a convex surface (correct)
What's next?
Finished nesting all your objects? Then it is time to calculate the job and send the calculated data to DentalCNC. Of course, you can also continue with a creating a new job and calculate the current one later.
Decided that you don't want to machine some of the nested objects? Change the status of the corresponding objects via the object list.