Creating sinter bars for bridges
How do I add a sinter bar to objects? What different types of sinter bars does DentalCAM support? How can I delete sinter bars?
This procedure does not belong to the simple nesting workflow.
This procedure belongs to steps of the simple nesting workflow.
If you require a sinter bar to prevent bridges from deforming during sintering, you can create one during nesting via the editing function for creating sinter bars.
You can edit the sinter bar via this function until you have set bars for the object.
- Open the Nesting view for adjusting objects with the following icon in the main toolbar:


Creating sinter bars in the nesting view for adjusting objects
Types of sinter bars
DentalCAM supports the following types of sinter bars:

Open sinter bar without a supporting bar
These kind of sinter bars are typically either sintered on sinter beads or with the aid of drops which support the object.

Closed sinter bar with a supporting bar and milled-out inner body
This is the most frequently used sinter bar type because the sinter bar can rest on a solid supporting bar and you can easily ensure that the volume of the sinter bar is roughly equal to the volume of the object. You can also place an object in the inner surface to make more efficient use of the blank.
Note that you need to place the bars against the inner body so that this does not fall into the working chamber during machining.
If the volume of the sinter bar is roughly equal to the volume of the object, faster heating and cooling is possible during sintering.

Closed sinter bar with supporting bar and filled inner body
This type of sinter bar saves machining time by eliminating the need to mill out the inner body.
However, if you use this sinter bar type, it is harder to ensure that the volume of the sinter bar is roughly equal to the volume of the object, which is an important rule for sinter bars.
You can adjust the height and therefore the volume of the inner body while editing the sinter bar.

Open sinter bar during and after editing

Closed sinter bar with supporting bar and milled out inner body during and after editing

Closed sinter bar with supporting bar and filled inner body during and after editing
Elements and adjustable dimensions of sinter bars
A sinter bar can consist of the following elements:

Elements of sinter bars
- Sinter bar
- Inner body
- Supporting bars
You can adjust the following dimensions of sinter bars:

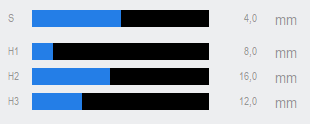
Adjustable dimensions of the elements of sinter bars
- S – Width of the sinter bar
- H1 – Height of the sinter bar
- H2 – Height of the supporting bar
- H3 – Height of the inner body
The dimensions used for the sinter bar in the figure above were chosen for illustration purposes. They are not an example of good nesting practice.
How to create and edit sinter bars
-
(Optional) Select the desired object in the blank display.
-
DentalCAM highlights the object in the object list with a colored border.
-
Open the editing functions for the required object by selecting the following icon in the left column:

-
The icon bar for the editing functions is displayed.
-
Open the editing function for creating sinter bars by selecting the following icon:

- DentalCAM displays the following:
-
In the left column: Icons for selecting the type of sinter bar and value bars for adjusting the sinter bar.
-
In the blank display: The object with an auto-generated sinter bar which you need to adjust.
- Icon for creating an open sinter bar
- Icon for creating a closed sinter bar with a filled inner body
- Icon for creating a closed sinter bar with a milled-out inner body
- Value bar for adjusting the height of the inner body
- Value bar for adjusting the height of the supporting bar
- Value bar for adjusting the height of the sinter bar
- Value bar for adjusting the width of the sinter bar
-
Select the sinter bar type:
-
If you require an open sinter bar without a supporting bar that the sinter bar will stand on in the sintering oven, select the following icon:
 .
. -
If you require a closed sinter bar with a supporting bar and with a filled inner body, select the following icon:
 .
. -
If you require a closed sinter bar with a supporting bar and with a milled out inner body, select the following icon:
 .
. -
Adjust the shape of the sinter barTo do this, drag the end points of the sinter bar to their desired location.
-
DentalCAM automatically adjusts the shape of the sinter bar by connecting the endpoints. The sinter bar follows the contour of the object.
-
The volume of the sinter bar must roughly be equal to the volume of the object.
Otherwise, the sintering process will be slowed down as heating and cooling will take longer.
-
If you add a supporting bar, it must always be as high or higher than the next highest element.
In other words: No element may be higher than the supporting bar. Because of this, DentalCAM may automatically adjust a value bar when you manually change another.
- If you want to position an object in the inner body of the sinter bar, make sure that the height is sufficient for this object.
-
(Optional) Increase or decrease the width of the sinter bar with the S value bar (adjusts width in X-/Y-direction).
-
(Optional) Increase or decrease the height of the sinter bar with the H1 value bar (adjusts height in Z-direction).
-
(Optional) Increase or decrease the height of the supporting bar with the H2 value bar (only for closed sinter bars).
-
(Optional) Increase or decrease the height of the inner body with the H3 value bar (only for closed sinter bars).
-
Save your changes with the lower arrow icon:

-
Close the area for the editing function with the upper arrow icon:


Opening the editing function for creatings sinter bars (icons marked orange)
All available control elements for machining a sinter bar (marked orange)

The auto-generated sinter bar

Dragging the end points (marked with colored lines for better distinguishability) of the auto-generated sinter bar

The correct sinter bar after the adjustment
Pay attention to the following rules when adjusting the elements of the sinter bar:
Values bars for adjusting the dimensions of sinter bars
Adjustable dimensions of the elements of sinter bars
The dimensions used for the sinter bar in the figure above were chosen for illustration purposes. They are not an example of good nesting practice.
Deleting sinter bars
-
(Optional) Select the desired object in the blank display.
-
DentalCAM highlights the object in the object list with a colored border.
-
Open the editing functions for the required object by selecting the following icon in the left column:
-
The icon bar for the editing functions is displayed.
-
Open the editing function for creating sinter bars by selecting the following icon:
- The object with the sinter bar displays in the blank display.
- Select the following icon:

-
Close the area for the editing function with the upper arrow icon:
Opening the editing function for creatings sinter bars (icons marked orange)
What's next?
Next editing function for objects:
If you are finished with adjusting objects:
If you are unsure whether you are finished nesting the current blank, see the simple and complete nesting workflow: