Machining a single job
This help article describes how to have 1 job machined via DentalCNC.

Diagram: 1 job, 1 blank
It applies to machines with and without a blank changer![]() Machine component which stores multiple blanks in a magazine and which can automatically load them into the working chamber.. When using the search, use a blank changer or a blank magazine instead.
Machine component which stores multiple blanks in a magazine and which can automatically load them into the working chamber.. When using the search, use a blank changer or a blank magazine instead.
Machines with a blank changer:![]() The R5 allows the blank or block holder to be loaded either from the blank magazine
The R5 allows the blank or block holder to be loaded either from the blank magazine![]() Part of the blank changer in which you store the blanks for automatic loading. or directly from the blank holder. With the S5, on the other hand, you always use the blank magazine
Part of the blank changer in which you store the blanks for automatic loading. or directly from the blank holder. With the S5, on the other hand, you always use the blank magazine![]() Part of the blank changer in which you store the blanks for automatic loading..
Part of the blank changer in which you store the blanks for automatic loading..
- Open the Machining view with the following icon in the main icon bar:

Step 1: Workflow overview
The following figure shows the workflow for machining a single job:
Workflow for machining a single job
Checking and adjusting the machining parameters
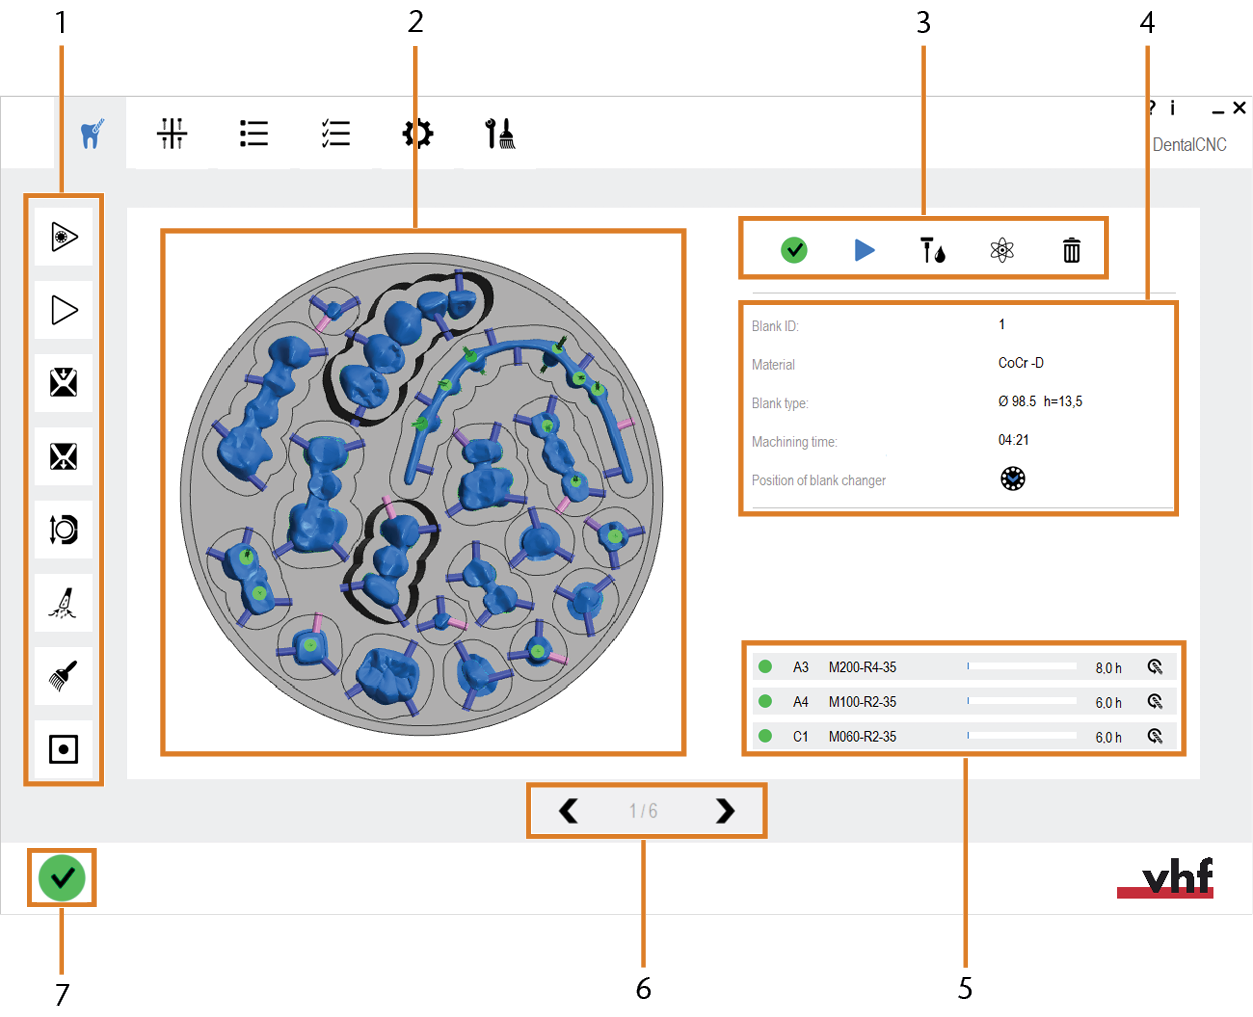
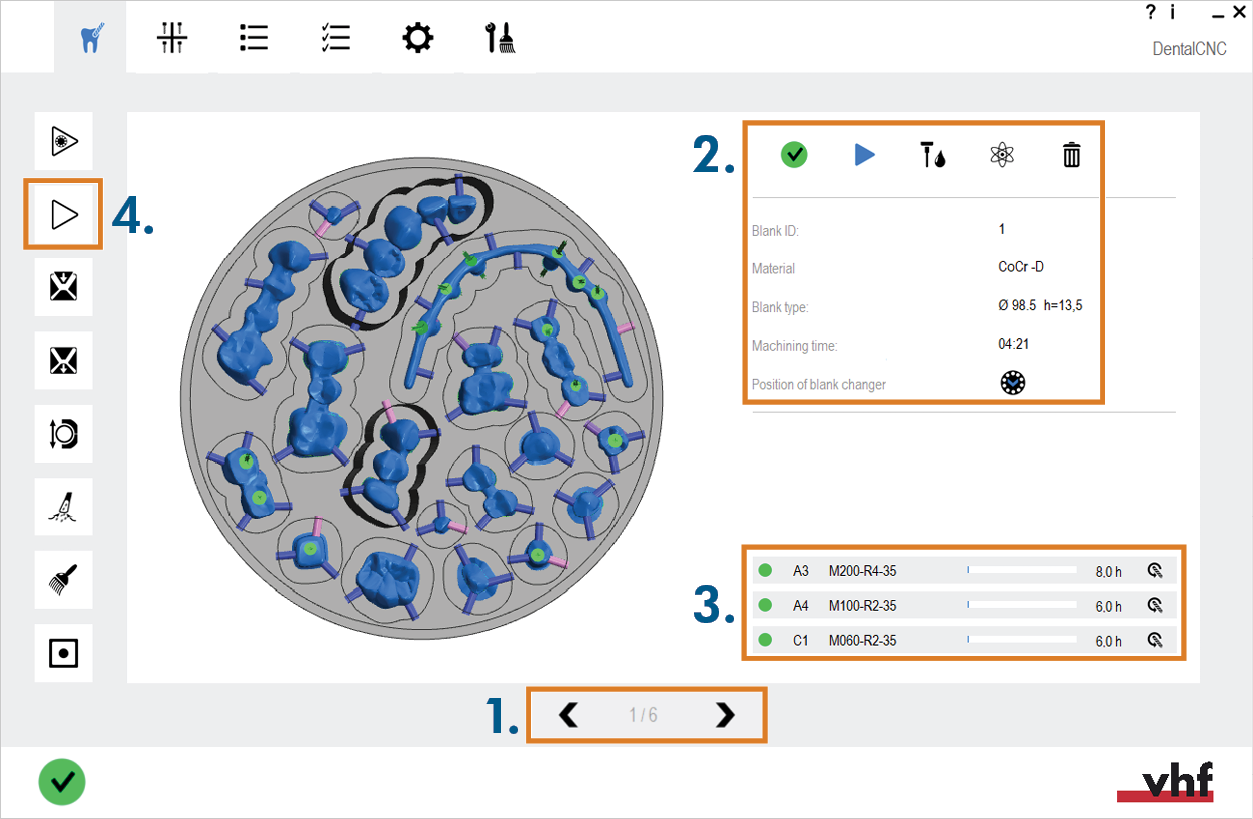
The sections of the machining view
- Local icon bar for direct machine control
- Blank preview for the current job
- Icon bar for adjusting machining parameters of the current job
- Details on the current job
- Tool list
- Control elements for selecting jobs
- Machine status icon
Step 2: Select job
- Open the Machining view with the following icon in the main icon bar:
-
Use the arrows [1] and [3] to select the desired job:
-
Go to previous job on the job list
-
Number of current job / number of last job on the job list
-
Go to next job on the job list
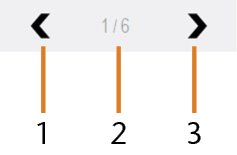
Control elements for selecting jobs
The jobs are ordered according to the job list.
Step 3: Checking and adjusting the machining parameters
- Activate the job.
-
The following icon also changes its state
-
To see whether the job is a dry or wet job, check the following icon:

The icon indicating the if wet machining is enabled for the job

Wet machining deactivated

Wet machining activated
-
To see whether the ionizer of corresponding machines will be used for the job, check the following icon.

The icon indicating if the ionizer is enabled for the job

Ionizer deactivated

Ionizer activated
-
Check whether the job can be machined.

The icon indicating if the job can be machined

Job can be machined

At least 1 required tool is not in the virtual tool magazine and / or its tool life is insufficient

Job is deactivated
-
Machines with a blank changer
 Machine component which stores multiple blanks in a magazine and which can automatically load them into the working chamber.. When using the search, use a blank changer or a blank magazine instead: If the blank should be loaded from the blank magazine Part of the blank changer in which you store the blanks for automatic loading., select the blank magazine Part of the blank changer in which you store the blanks for automatic loading. slot to which the physical blank is mounted:
Otherwise, you need to mount the blank directly to the blank holder.
-
Open the drop-down list with the corresponding icon.
-
Select the icon depicting the desired blank magazine
Part of the blank changer in which you store the blanks for automatic loading. slot.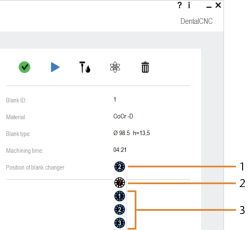
Selecting a blank magazine
Part of the blank changer in which you store the blanks for automatic loading. slot
- Icon to open the lists with blank magazine Part of the blank changer in which you store the blanks for automatic loading. slots
- Icon to unassign the job
- Icons to assign the job to the blank magazine Part of the blank changer in which you store the blanks for automatic loading. slot with the displayed number
- Icon to open the lists with blank magazine
The icon for activating/deactivating machining of a job
The icon indicates the current state:
Job deactivated
Job activated
The icon indicating if the job will and can be machined
You can activate and deactivate the ionizer for certain machine models. Ionizer activated
Never assign multiple jobs with different IDs to the same blank magazine![]() Part of the blank changer in which you store the blanks for automatic loading. slot. If you do, the machine will execute all assigned jobs using the same blank and destroy it in the process. In addition, tools may break.
Part of the blank changer in which you store the blanks for automatic loading. slot. If you do, the machine will execute all assigned jobs using the same blank and destroy it in the process. In addition, tools may break.
Whether the job contains a multi-layered blank is indicated in the Job list. Icon for multi-layered blanks
Step 4: Check the tools and reset the tool life values if required
DentalCNC lists all required tools for the job including the tool life values in the bottom right corner of the Machining view.
Backup tools are not shown in this list.
More information on backup tools: Adding backup tools
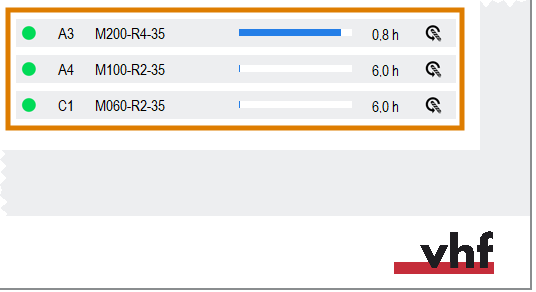
List of required tools (marked orange) in the Machining view
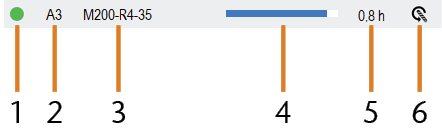
Each entry on the tool list shows the following information:
Entry in the tool list in the Machining view
-
Tool status indicator
-
Position in the tool magazine
-
Tool match code
-
Progress bar indicating the operating hours of the tool; a full bar indicates that the maximum tool life has been reached
(here: the tool has reached 90 % of its maximum operating hours)
-
Remaining tool life as a decimal value
(Here: 0.8 h = 0 hours and 48 minutes are remaining)
-
Icon for resetting the tool life to its maximum duration
Use the tool list as follows:
-
Make sure that the status indicator of all tools is green.

Tool is in the virtual tool magazine and tool life is sufficient

Tool life is insufficient

Tool is not in the virtual tool magazine
- Add all missing tools to the virtual tool magazine .
-
If you manually equip the machine’s tool magazine, replace all worn tools.
-
Reset the tool life values of all worn tools via the following icon:


Example of an entry of a worn tool; icon to reset the tool life marked orange
-
Confirm the current message.
-
If you activated the Load tools when resetting the tool life option in the DentalCNC application settings, the machine and DentalCNC will assist you with equipping the corresponding tool.
Step 5: Start machining
If all required tools are marked with a green indicator and if your machine is prepared according to its operating instructions, you can start machining.
-
Close the working chamber door.
-
Start machining via the following icon in the local icon bar:

-
The following happens:
-
The machine starts operating.
-
The estimated machining time displays in the bottom left corner of the application window. It will be updated throughout machining.

The estimated machining time (marked orange)
-
DentalCNC writes each machining step into a log. You can view the log in the DentalCNC application settings.
Step 6: Deleting jobs from DentalCNC
You can delete jobs in the Machining view and in the Job list view.
This cannot be undone.
Deleting jobs in the Machining view
-
Open the Machining view with the following icon in the main icon bar:
-
Use the arrows [1] and [3] to select the desired job:
-
Go to previous job on the job list
-
Number of current job / number of last job on the job list
-
Go to next job on the job list
-
In the icon bar for adjusting machining parameters, select the following icon:


Icon to delete a job
-
A window opens.
-
Confirm the message with the following icon:

-
DentalCNC deletes the job.
Control elements for selecting jobs
Deleting jobs in the Job list
-
Open the Job list with the following icon in the main icon bar:

-
Select the following icon in the corresponding line:

Icon to delete a job
-
A window opens.
-
Confirm the message with the following icon:
-
DentalCNC deletes the job.
What's next?
While machining usually works fully automatically, there are some tasks which require your interference.