Creating new jobs in the blank archive
A job contains all the data required to machine a blank: the 3D data of the tooth model, blank parameters, machining strategies and more. When creating a job, you start with specifying the material that you want to use, the blank size and other basic values.
- Open the Blank archive with the following icon in the main toolbar:

-
DentalCAM creates a separate blank archive for each machine type that you can select in the application settings. You will only see the desired blanks if you select the correct machine type.
-
You will very likely not use every blank type that DentalCAM supports. To tailor the blank type list to your needs and make selecting the correct blank type faster, you can activate or deactivate each individual blank type.
-
DentalCNC will automatically update the material database independently of the applications if DentalCNC can access the internet.
![]()
The blank archive: Overview
Watch the video

YouTube video – When viewing this video, personal data is sent to YouTube, LLC, USA. Privacy statement
How to create a new job
You can create new jobs (blanks) in the New blank section of the blank archive.
- From the Blank type drop-down list, select the blank type for of the disc or blocks that you want to create. The list contains generic materials (e.g., PMMA) as well as brand names (e.g., VITA ENAMIC®).
Meaning of the letter after the last dash:
- D stands for discs
- B stands for blocks
- CoCr stands for prefabricated abutments made of cobalt chrome
- Ti stands for prefabricated abutments made of titanium
More information on prefabricated abutments: Supported prefabricated abutment blanks in DentalCAM 8
- DentalCAM displays the following:
- Default values for the blank size next to the labels Dimensions and Height
- The tool type that will be used for manufacturing the job next to the Tool type label: Either Milling tools or Grinding tools
- The following icon if the job requires wet machining:

- For blocks, select the size from the Dimensions drop-down list. The drop-down list contains the different sizes as specified by the manufacturer.
- For discs, select the height from the Height drop-down list.
- Enter the material specific scaling factor into the Scaling input field. It is published by the manufacturer of the blank.
The scaling factor determines how DentalCAM compensates for the change in size during sintering for relevant materials. To do this, the program multiplies the size of each object by the scaling factor.
- Enter the required scaling factors for the X-, Y- and Z-direction into the 3 input fields (from left to right).
- DentalCAM scales the objects using the separate scaling factors for the 3 directions.
- DentalCAM increases or decreases the size of all objects in the blank by the entered scaling factor. When you nest objects in the blank, DentalCAM will adjust the visual representation of the objects accordingly.
- If you need to assign a lot number to the blank, enter the lot number into the Lot number input field.
- (Optional) Enter a comment into the Comment input field.
- If you want to use a blank with colored layers, select the number of layers next to the Number of colored layers label:
-
To decrease the number of layers, select the following icon:

-
To increase the number of layers, select the following icon:

-
The current number of layers displays next to the icons. The default number is 1.
- Select the following icon:

-
For some blank types DentalCNC requires confirmation or correction of the scaling factor. The value in the Scaling input field is pre-selected.
If you have checked the Different scaling in X, Y, Z option, 3 windows for the X, Y, Z axes are displayed one after the other.
-
Enter the correct scaling factors if necessary. Select the following icon:

-
The following happens:
-
DentalCAM assigns a unique ID number to the blank and adds it to the archive.
You can change the blank ID from a global sequential number to be based on the creation date of the blank in the general application settings. Base job ID on creation date
-
A blank card with the blank data displays at the first position in the archive.
-
-
If desired, edit the blank by selecting the following icon on the blank card:

-
The STL import view opens where you can import objects into your job.
If you work with blocks, the selected block type applies to all blocks that are part of the job. Therefore, you can only use blocks of the same type for 1 job.
For discs, the drop-down list only contains the default diameter of 98.5 mm. You cannot change this value.
For blocks, the height is determined by the block dimensions which you selected from the Dimensions drop-down list. Therefore, you cannot change the Height value for blocks.
Example: A scaling factor of 1.200 multiplies the size of all objects by 1.2. This enlarges each object by 20%.
Converting the shrinkage factor, scaling value or shrinkage value in percent to the scaling factor
Some manufacturers provide values such as the shrink factor instead of the scaling factor. Use the following widgets to convert these numbers to the scaling factor:
Example:
| Scaling factor |
Scaling [%] |
Shrink factor |
Shrinking [%] |
|---|---|---|---|
|
1,250 |
125.0 |
0,200 |
20.0 |
By default, you can only enter one value for all directions (X, Y, Z) into the Scaling input field. If the option Different scaling in X, Y, Z is activated in the application settings, the following 3 input fields display for the 3 different directions:
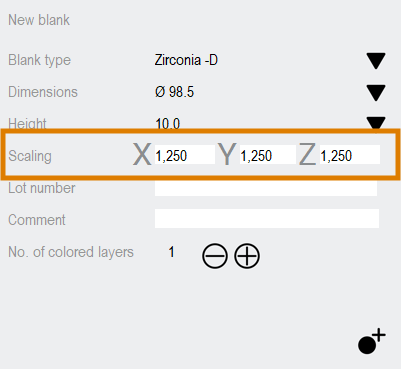
Scaling factors for all 3 directions


Blank cards
Blank cards are used in the blank archive of DentalCAM. They show basic data and a thumbnail of blanks which are currently stored on the CAM computer![]() The computer that is connected to your machine and which runs DentalCAM and DentalCNC..
The computer that is connected to your machine and which runs DentalCAM and DentalCNC..
If not all blank cards display in the blank archive, they are probably filtered out. If you cannot find some of your jobs, check the filter in the archive and remove all unwanted filter criteria.
The thumbnail only displays if at least 1 object has been added to the blank.
Job status indicator
The job status indicator in the top left corner of every blank card indicates whether the job is suitable for calculating. See this figure

Job can be calculated.

Job cannot be calculated.
Reasons why jobs cannot be calculated:
- Not enough bars set
- Object too high for the blank
Icons on blank cards
Blank cards contain the following icons:
![]()
Select the blank for editing.
![]()
Restore an older versions of the blank.
![]()
Delete the job from the blank archive.
Data on blank cards
The blank data from top to bottom:
- ID
- Blank type
- Dimensions
- Height
- Lot number
- Comment
- Scaling