Setting up CAD/CAM integration
If you use the following machine models, DentalCAM & DentalCNC can be integrated with certain CAD applications:
- E4
-
N4+
-
Z4
If you use CAD/CAM integration, you will design and nest objects completely in the CAD application. When exporting, DentalCAM automatically calculates the machining strategy in the background and sends it to DentalCNC.
On Z4 machines, the touchscreen immediately displays the job for further processing.
The supported CAD applications depend on the machine model.
|
|
E4 | N4+ | Z4 |
|---|---|---|---|
|
TRIOS Design Studio |
No* |
No |
Yes* |
|
exocad ChairsideCAD |
Yes |
Yes |
Yes |
E4 / N4+
Minimum required exocad ChairsideCAD version:
| E4 | N4+ |
|---|---|
|
3.1 |
3.0 |
Activating the CAD/CAM integration
There are 2 ways to set up CAD/CAM integration with exocad ChairsideCAD:
-
exocad ChairsideCAD is installed on the CAM computer
 The computer that is connected to your machine and which runs DentalCAM and DentalCNC.. This is recommended as it will simplify the configuration process.
If you use this configuration, only perform the basic configuration.
-
exocad ChairsideCAD is installed on a separate computer (“CAD computer”), which is connected to the CAM computer
The computer that is connected to your machine and which runs DentalCAM and DentalCNC. via network.If you use this configuration, perform the basic configuration and the exocad network configuration.
Basic configuration
-
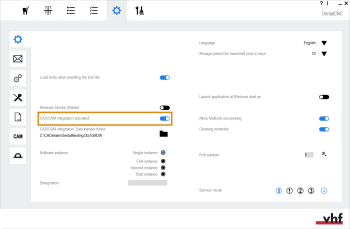
Open the DentalCNC Application settings with the following icon in the main icon bar:

-
Open the General settings with the following icon in the local icon bar:

-
Activate the CAD/CAM integration and 3Shape Produce enabled option.
-
If you have installed exocad ChairsideCAD on your CAM computer
The computer that is connected to your machine and which runs DentalCAM and DentalCNC., you are done. -
If exocad ChairsideCAD is installed on a separate CAD computer, continue with the exocad network configuration.

exocad network configuration
Only perform the following procedure if exocad ChairsideCAD is installed on a different computer than DentalCAM & DentalCNC.
Configuring the CAM computer
-
Access the CAM computer
The computer that is connected to your machine and which runs DentalCAM and DentalCNC.. -
Create the following folder:
C:\CADshare\DentalNestingObjToMDW
-
Share this folder in your network. The CAD computer requires read and write access to it.
Checking the data transfer folder setting
-
Open the DentalCNC Application settings with the following icon in the main icon bar:
-
Open the General settings with the following icon in the local icon bar:
-
Check if the following folder path displays under the CAD/CAM integration: Data transfer folder label:
 To store the data transfer folder in DentalCNC, select the depicted icon to the right of the CAD/CAM integration: Data transfer folder label.
-
A window for selecting the folder opens.
- From the drop-down list, select the drive letter c:.
- Select the following folder:
CADshare\DentalNestingObjToMDW
 Select the depicted icon.
- The selected folder displays below the CAD/CAM integration: Data transfer folder label.
C:\CADshare\DentalNestingObjToMDW
![]()
If it doesn’t, do the following:
Configuring the CAD computer
-
Access the CAD computer.
-
Install exocad ChairsideCAD.
-
Map a network drive to the C:\CADshare\DentalNestingObjToMDW folder that you created on the CAM computer.
-
Record the drive letter.
-
Enter the exact folder path including the leading backslashes \\.
-
Enter the login credentials for your CAM computer.
Store these login credentials on the CAD computer.
-
Activate the Reconnect at sign-in option.
-
Setting up exocad ChairsideCAD
-
In Windows® Explorer, open the exocad ChairsideCAD folder.
-
Change into the config folder.
-
Open the following file with a text editor:
-
Inside the file, find the following expression (“tag”):
-
Replace the output path with the letter of the network drive that you recorded followed by a colon (:).
-
Save and close the XML file.
settings-chairside.xml
<NestingInterop2TemporaryFolder>
Directly behind the expression, you will find the exocad output path.
Example: You recorded the drive letter Z. The expression in the XML file must be:
<NestingInterop2TemporaryFolder>Z:</NestingInterop2TemporaryFolder>
Z4
The machine’s operating instructions contain all details.
What's next?
If you want to use our multi-machine control feature:
Using 1 CAM computer with multiple machines
If you want to integrate the applications into your network: