Using 1 CAM computer with multiple machines
If you want to control multiple machines with 1 CAM computer![]() The computer that is connected to your machine and which runs DentalCAM and DentalCNC., use our multi-machine control feature.
The computer that is connected to your machine and which runs DentalCAM and DentalCNC., use our multi-machine control feature.
With this feature, you can use up to 3 machines with 1 CAM computer![]() The computer that is connected to your machine and which runs DentalCAM and DentalCNC.. For this, you need to install multiple copies of the manufacturing software
The computer that is connected to your machine and which runs DentalCAM and DentalCNC.. For this, you need to install multiple copies of the manufacturing software![]() Term for the software package consisting of DentalCAM and DentalCNC. on the computer which will be started via different colored icons.
Term for the software package consisting of DentalCAM and DentalCNC. on the computer which will be started via different colored icons.
- The multi-machine control cannot be used together with the 3Shape Produce workflow.
- You need to obtain a separate DentalCAM license for every machine.
- The multi-machine control feature significantly increases the system requirements of the CAM computer
 The computer that is connected to your machine and which runs DentalCAM and DentalCNC..
 - You can even use the different copies of DentalCAM and DentalCNC simultaneously if your computer has enough processing power and working memory.
- We recommend using this function to control one 5-axis machine and one 4-axis machine with the CAM computer The computer that is connected to your machine and which runs DentalCAM and DentalCNC..
This Help Article requires you to be able to configure a connection between DentalCNC and the machines.
Establishing the connection between DentalCNC and your machine
Set up first machine
- Connect the CAM computer The computer that is connected to your machine and which runs DentalCAM and DentalCNC. to your first machine.
- Install DentalCAM and DentalCNC.
- Configure DentalCNC so that it can connect to the machine. This is the first copy of the manufacturing software Term for the software package consisting of DentalCAM and DentalCNC..
-
The machine references.
The first copy is now linked to the first machine. To work with the first machine, you need to start DentalCAM or DentalCNC via the red icons.
- Configure the first copy (instance) of the software:
-
Open the DentalCNC Application settings with the following icon in the main icon bar:

-
Open the General settings with the following icon in the local icon bar:

-
Locate the Software instance options.
-
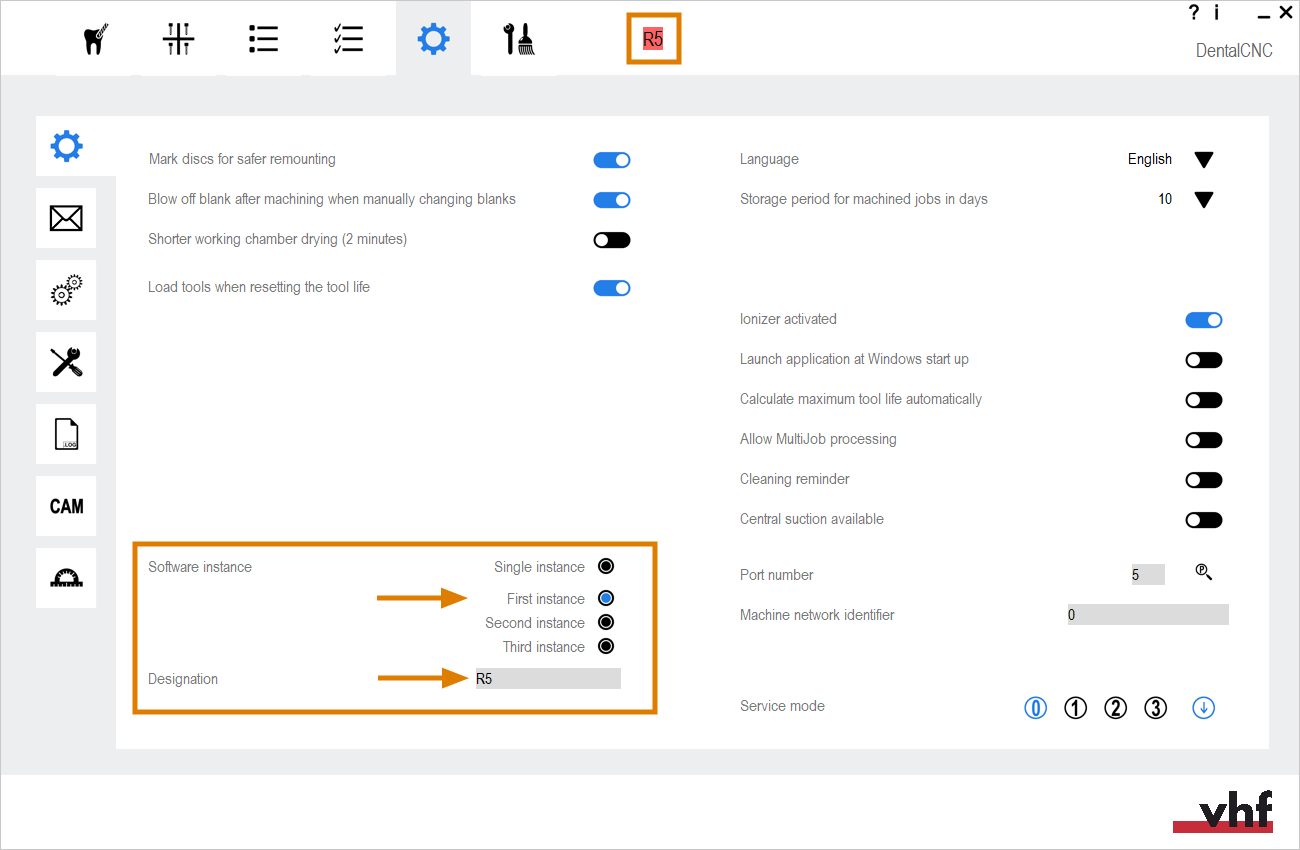
Activate the First instance option.
-
Enter the machine name in the Designation input field.
-
The machine name displays in the title bar. The red background color indicates that this is the first instance.

Activate the first software instance and enter the machine name
- Close DentalCAM and DentalCNC.
- Switch off the first machine.
If you don't switch off the first machine at this point, the multi-machine setup will fail.
Set up second machine
- Connect the CAM computer The computer that is connected to your machine and which runs DentalCAM and DentalCNC. to the second machine. Switch on the second machine.
- Install the manufacturing software Term for the software package consisting of DentalCAM and DentalCNC. again into a different folder.
-
Machines that use the SX Virtual Link to establish a connection:
Manually establish the connection via SX Virtual Link, as described in the operating instructions.
- Open Windows® Explorer.
- Navigate to the installation folder The folder on your hard drive that you installed DentalCAM and DentalCNC in. of the second copy of the manufacturing software Term for the software package consisting of DentalCAM and DentalCNC..
- Open the USB folder. Open the Multi-Machine Control folder.
- Double-click the Blue_CAM.bat file.
-
Machines that use the SX Virtual Link to establish a connection:
Manually disconnect the connection to the machine via the SX Virtual Link.
- Start the second copy of DentalCNC. Configure DentalCNC so that it can connect to the second machine.
- The following happens:
- The machine references.
- The second copy of the software is now linked to the second machine.
- To work with the second machine, you need to start DentalCAM or DentalCNC via the blue icons.
- Configure the second copy (instance) of the software:
-
Open the DentalCNC Application settings with the following icon in the main icon bar:
-
Open the General settings with the following icon in the local icon bar:
-
Locate the Software instance options.
-
Activate the Second instance option.
-
Enter the machine name in the Designation input field.
-
The machine name displays in the title bar. The blue background color indicates that this is the second instance.
Activate the second software instance and enter the machine name

Set up third machine
- Switch off the first and second machine.
- Connect the third machine to your CAM computer The computer that is connected to your machine and which runs DentalCAM and DentalCNC. and switch it on.
-
Install the manufacturing software
Term for the software package consisting of DentalCAM and DentalCNC. again into a different folder. -
Machines that use the SX Virtual Link to establish a connection:
Manually establish the connection via SX Virtual Link, as described in the operating instructions.
- Open Windows® Explorer.
- Navigate to the USB\Multi-Machine Control folder in the third installation folder The folder on your hard drive that you installed DentalCAM and DentalCNC in. and double-click the Green_CAM.bat file.
-
Machines that use the SX Virtual Link to establish a connection:
Manually disconnect the connection to the machine via the SX Virtual Link.
- Start the third copy of DentalCNC. Configure DentalCNC so that it can connect to the third machine.
- The following happens:
- The machine references.
- The third copy is now linked to the third machine.
- To work with the third machine, you need to start DentalCAM or DentalCNC via the green icons
- Configure the third copy (instance) of the software:
-
Open the DentalCNC Application settings with the following icon in the main icon bar:
-
Open the General settings with the following icon in the local icon bar:
-
Locate the Software instance options.
-
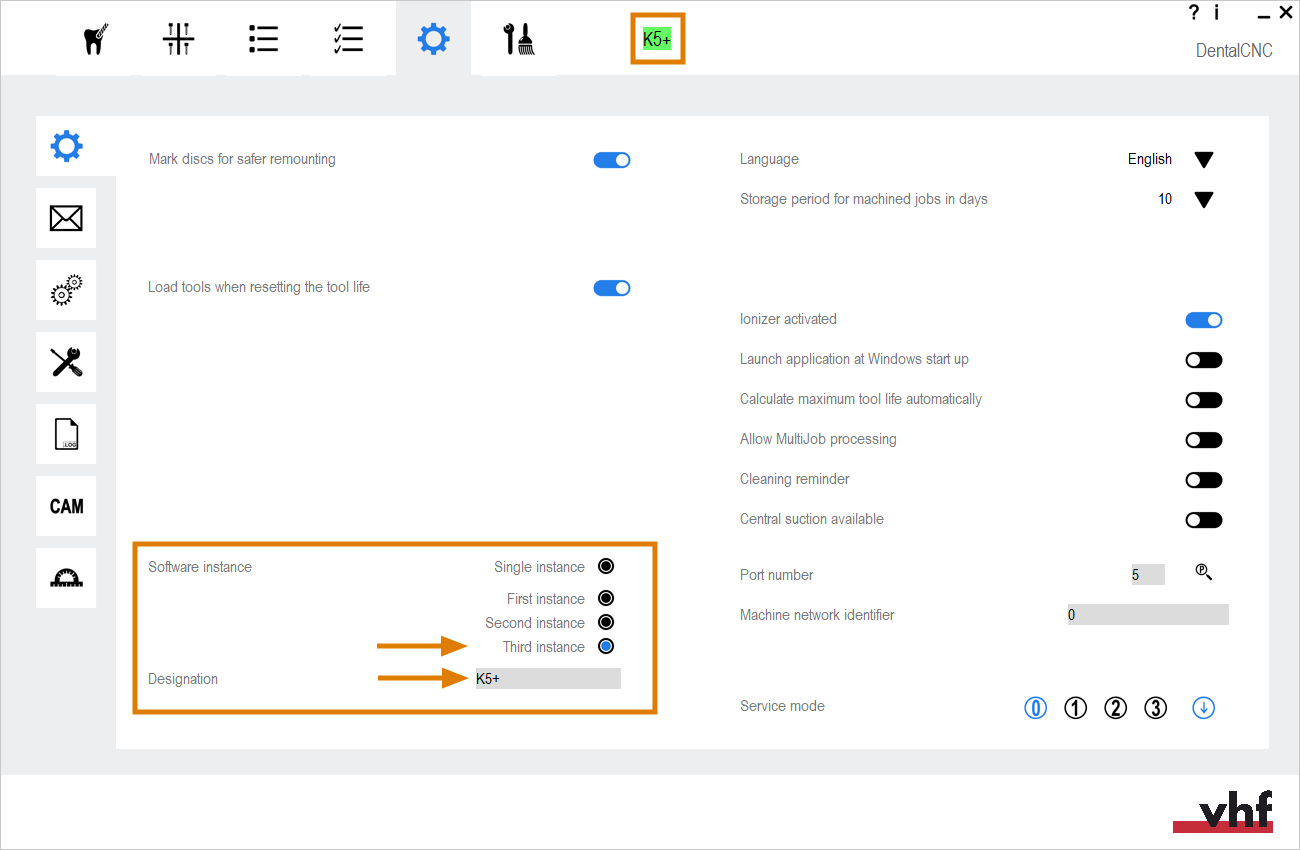
Activate the Third instance option.
-
Enter the machine name in the Designation input field.
-
The machine name displays in the title bar. The green background color indicates that this is the third instance.
Activate the third software instance and enter the machine name