Installing DentalCAM & DentalCNC
System requirements
Recommendation:
- CPU:
Single machine control: 64-bit Intel Core i CPU of the 10th generation with 4 cores and hyperthreading (e.g., Intel Core i5-10500)
Alternative: 64-bit AMD Ryzen CPU with at least 4 cores (e.g., AMD Ryzen 5 3600)
Multi-machine control: 64-bit Intel Core i CPU of the 10th generation 6 cores and hyperthreading (e.g., Intel Core i7-10700)
Alternative: 64-bit AMD Ryzen CPU with at least 6 cores and 12 threads (e.g., AMD Ryzen 5 3600)
- Operating system: 64-bit version of Windows® 10, 11
- Storage device: SSD with 512 GiB
- Random access memory:
Single machine control: 8 GiB
Multi-machine control: 16 GiB
-
Display resolution: 1920 x 1080 (Full HD)
-
A permanent Internet connection during installation and use
Supported machines
DentalCAM & DentalCNC support the following machines:
- E3 (only DentalCNC – use as CAM program TrimCAM)
- E4
- E5
-
K4 edition
-
K5
-
K5+
-
N4
-
N4+
-
R5
-
S1
-
S2
-
S5
-
Z4 with external CAM computer
 The computer that is connected to your machine and which runs DentalCAM and DentalCNC.
 -
Wet grinding module NO-1
Preparing the installation
-
Install all Windows updates onto the CAM computer
The computer that is connected to your machine and which runs DentalCAM and DentalCNC.. -
Update all hardware drivers.
-
If the Windows system language is neither English nor German, change the unicode and non-unicode settings to English.
-
If the screen resolution of the CAM computer
The computer that is connected to your machine and which runs DentalCAM and DentalCNC. is 1920 x 1080 (Full HD) or similar, set the text and app scaling to 100 %.Otherwise, the application windows might not fit onto the screen.
-
If you want to use 1 designated computer for DentalCAM which will send job data to computers which are connected to the machines over your network, you may want to read the following information first:
Installing DentalCAM and DentalCNC
Incorrect job execution and damaging of the CNC machine if the program version is outdated and/or incompatible
If you use DentalCAM and/or DentalCNC versions that are outdated or incompatible with your CNC machine, jobs may be calculated or machined incorrectly or the machine may get damaged.
- Only install the latest DentalCAM and DentalCNC version that is available for your CNC machine.
- Always update DentalCAM and DentalCNC to the latest version that is available for your CNC machine.
| Component | Description | When will it be installed? | Required when installing? |
|---|---|---|---|
|
DentalCAM/DentalCNC core applications |
The main applications that you will work with. |
Automatically |
Yes |
|
C++ Runtime Environment |
Technical basis for the applications. It does not have any function visible to the user |
Automatically |
Yes |
|
USB/Ethernet driver |
Establishes a connection to the machine. |
|
Yes |
|
STL viewer |
A third party tool for viewing STL files. Use it to check things such as wall thickness, drilling diameters, fittings, etc. |
Only if selected in the setup program |
No |
|
Material database |
Contains data of the supported blank types including adapted machining strategies. |
Automatically |
Yes |
-
Make sure that the necessary .NET Framework versions are activated:
-
Navigate to Control Panel > Programs & Features.
-
Select Turn Windows Features on or off.
-
Activate .NET Framework 3.5 and .NET Framework 4.7.
-
Select OK.
-
-
Deactivate all energy saver settings on your computer. Keep all energy saver settings disabled while working with DentalCAM and DentalCNC because otherwise the job calculation and/or machining can be aborted.
-
Disable the USB settings for selective power saving. USB selective suspend setting
-
When using a laptop computer, make sure that a permanent electrical source is always available.
-
If you received the installation data as a ZIP file
A compressed file which contains multiple other files. Has the .ZIP file extension. ZIP files must be unzipped before use., unpack it onto the hard drive of your CAM computer The computer that is connected to your machine and which runs DentalCAM and DentalCNC.. -
Deactivate all anti-malware applications and firewalls
Security software which monitors the network data to block harmful data. for the duration of the installation to avoid interference with the update. -
Right-click on Setup.exe in the unzipped folder. From the context-menu, select Run as Administrator.
-
If required, enter the login credentials of the administrator account.
- The setup window opens.
-
Activate the New option.
- At the bottom of the setup window, 2 lists are shown with available languages and supported machines.
-
If you only need DentalCNC on the computer, deactivate the DentalCAM option.
-
Activate the Create Desktop Icon option. Otherwise, you will only be able to start the applications through the executable files (.exe files) in the installation folder
The folder on your hard drive that you installed DentalCAM and DentalCNC in.. -
Activate the Install USB/Ethernet driver option. Without this driver, the connection to your machine will not work.
-
(Optional) If you want to view STL files on your CAM computer
The computer that is connected to your machine and which runs DentalCAM and DentalCNC., activate the Install STL viewer option. -
(Optional) If you want to change the standard installation folder
The folder on your hard drive that you installed DentalCAM and DentalCNC in., enter the desired folder name in the Destination folder input field. -
In the Language list, select your desired user interface language. You can change this setting in the application settings at any time.
-
In the Install for the following machine type list, select the machine type that you want to use the applications with.
-
To start the installation, select the following icon:

- The setup program A separate program called "Setup.exe" which installs the applications on your hard drive. installs the core applications and the setup window closes. Depending on the selected components, multiple installation wizards Application which installs software on your hard drive and leads you through every single step. open.
-
Install all components with the help of the installation wizards
Application which installs software on your hard drive and leads you through every single step.:-
Select Next and Finish until the relevant wizard closes.
-
The wizard for the Runtime Environment for C++ may display a message that a newer version is already installed and abort the installation. Ignore this behavior, DentalCAM and DentalCNC should run just fine.
-
-
If you install the applications for a machine with an Ethernet port, additional steps are necessary.
- When all installation wizards Application which installs software on your hard drive and leads you through every single step. have completed successfully, the installation of DentalCAM and DentalCNC is complete.
-
If there was a problem with installing the USB driver, you need to manually install it. If the USB driver didn't install properly
-
Activate all your anti malware applications.
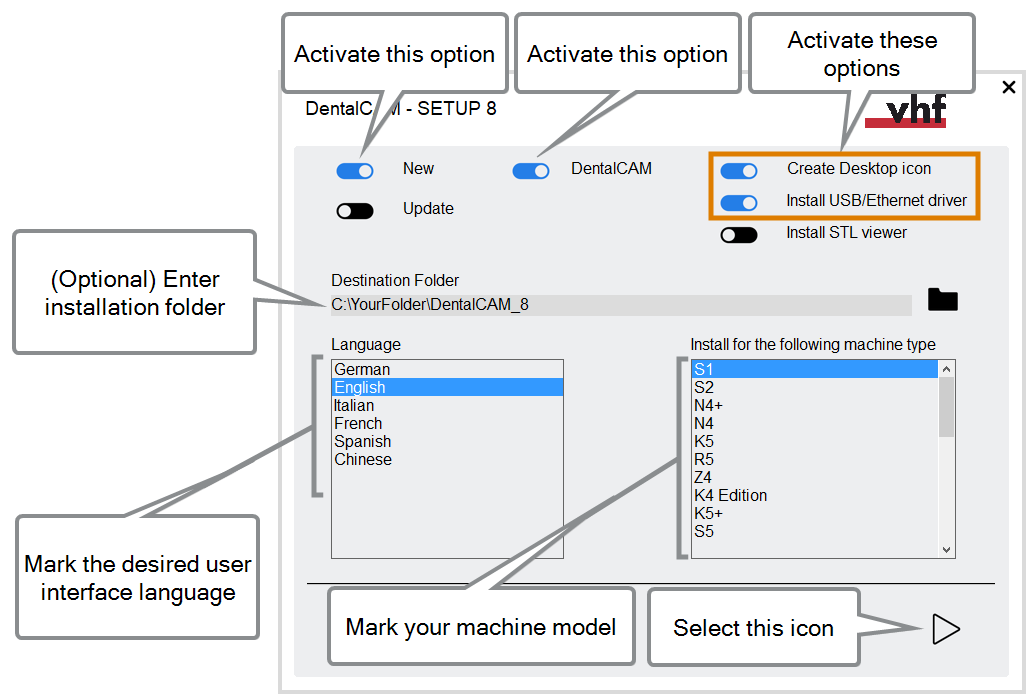
The setup window: Configure a new installation
Select a folder outside of the Program files or Program files(x86) folder or otherwise the applications will not work properly.
Optional installation tasks
In some rare cases, Windows® doesn't properly install the USB driver. In these cases, install the driver manually:
- Open the DentalCAM/DentalCNC installation folder The folder on your hard drive that you installed DentalCAM and DentalCNC in..
- Open the USB folder.
- Start the respective Setup.exe file. If Windows® asks you whether Setup.exe may make changes to your computer, select Yes.
- The installation wizard Application which installs software on your hard drive and leads you through every single step. for the FTDIChip CDM Drivers opens.
- Follow the steps of the setup wizard until the installation is finished.
This file may be labeled differently, depending on your setup, for example CDM20830_Setup.exe.
One common setting that can effect milling is the USB selective suspend setting. We recommend that you disable this to avoid any connection interruptions.
- Open Windows Settings.
- Select System.
- The System sub-settings display in the left column.
- Select Power & sleep.
- The Additional power settings link displays in the right column.
- Select Additional power settings.
- The related sub-settings display in the left column.
- Select Change when the computer sleeps.
- The related settings display in the middle of the window.
- Select Never from the Energy-saving mode after drop-down list.
- Select Change advanced power settings.
- Select USB settings [1].
- Select USB selective suspend setting and select Deactivated [2].

System selecting in the Windows Settings
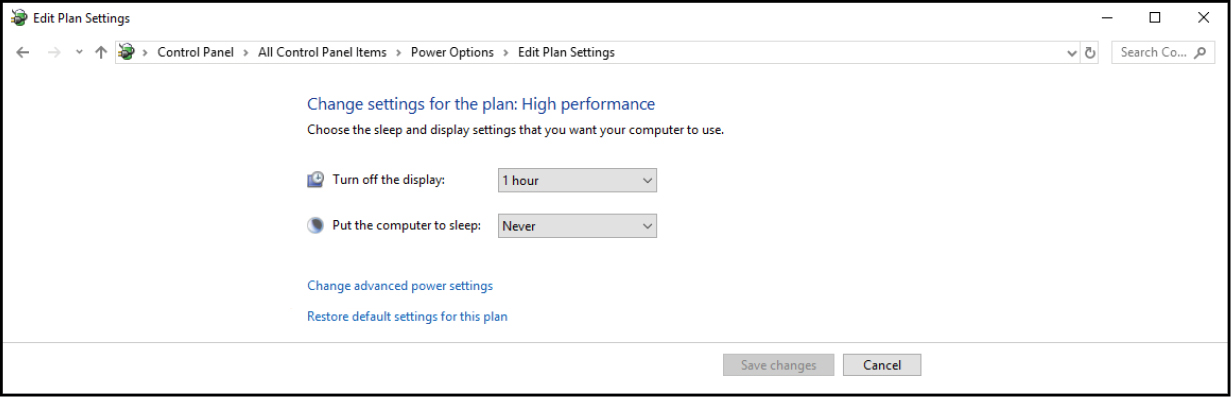
Selecting Change advanced power settings
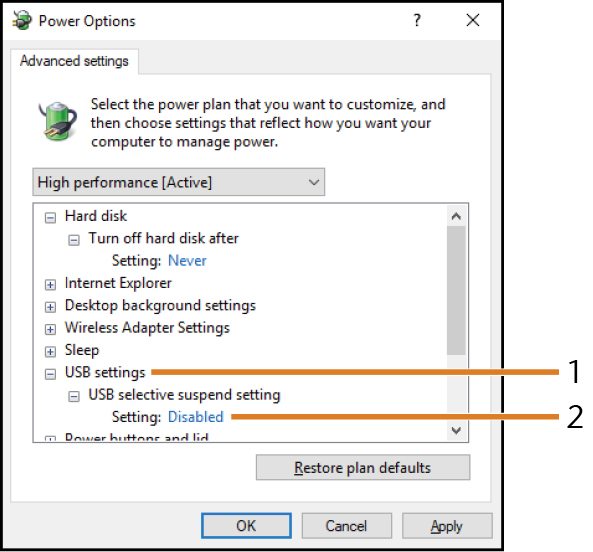
USB settings Selecting [1] and changing USB selective suspend setting to Deactivated [2]
What's next?
Establishing the connection between DentalCNC and your machine