Preparing the calibration
Workflow Calibrating the machine.
-
Have the calibration set readily available
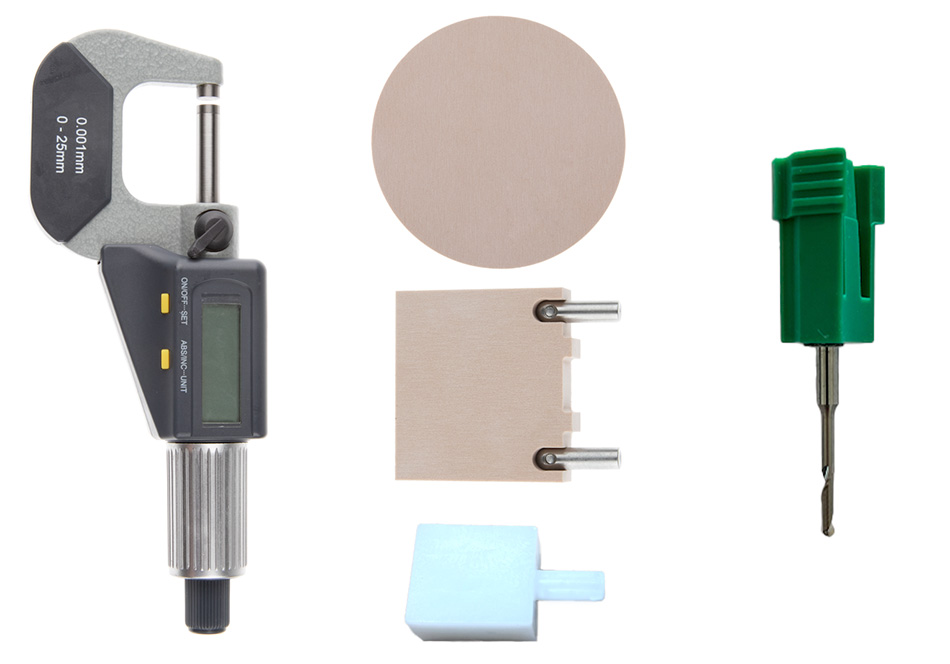
Your machine came with a calibration kit containing the following components:
- Calibration blanks
- A tool for manufacturing calibration and test specimens
- A micrometer for measuring calibration and test specimens

Example: Components of the machine-specific calibration set; the components included may vary
-
Insert the calibration tool into the tool magazine of your machine and into the virtual tool magazine in dentalcnc.
- E3
- E4
- E5
- K5, K5+, S5m
- N4+
- R5
- S5, S5m
-
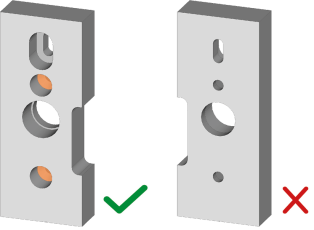
Align the calibration blank such that the fastening holes (marked orange) point upwards with the flattened side.
-
Place the elongated hole of the calibration blank on the positioning pin (marked blue) of the blank holder and guide the middle hole onto the pressure piece (marked orange) of the blank holder.
-
Screw the calibration blank tight with 2 of the supplied countersunk screws.
-
Insert the shaft of the block into the blank holder as far as it will go.
-
Turn the calibration blank so that the positioning pin at the blank holder lies in the groove in the calibration blank.
-
Carefully turn the screw with the screwdriver until you feel a slight resistance.
-
Then turn the screw another 1/4 turn.
-
Check the machine serial number.
Per identification plate: Identification plate and serial number
Per dentalcnc: Machine serial number, product key and control unit serial number
-
Serial number ≤ E5ID5…:
-
Switch off the machine for at least 2 hours.
-
For best results, ensure an ambient temperature of 18 – 25 °C.
-
-
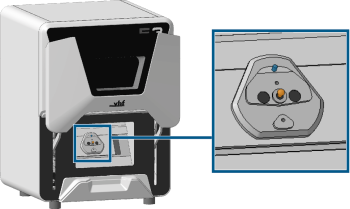
Mount the calibration blank in the working chamber just as for any other disc.
-
Mount the calibration blank in the working chamber just as for any other disc.
-
Screw the fixing pins securely into the calibration blank:
-
Insert the fixing pins into the screw holes in the calibration blank. Align the screw holes of the fixing pins and the blank.
-
Screw down the fixing pins with the screws.
-
-
Mount the calibration blank into the blank holder using the fixing pins.
-
Mount the calibration blank in the working chamber just as for any other disc.
-
Do not remove the blank from the blank magazine
 Part of the blank changer in which you store the blanks for automatic loading..
 -
Assign the job to the working chamber via the Blank magazine
Part of the blank changer in which you store the blanks for automatic loading. view. For instructions, see Loading blanks manually into the working chamber. -
Mount the calibration blank into the blank magazine
Part of the blank changer in which you store the blanks for automatic loading. just as for any other disc and load it into the working chamber.
| Machine | Tool |
|---|---|
|
E3 |
P300-R2-60 |
|
E4 |
P250-F1-40-T P200-R1-40 |
|
E5 |
P250-F1-40-T P200-R1-40 |
|
K5, K5+ R5 S5, S5m |
P200-R1-40 |
|
N4+ |
P200-R1-35 |
|
1 |
Screw hole |
|
2 |
Fixing pin |
|
3 |
Screw hole |
|
4 |
Recess |