Changing the status of objects / deleting objects
This procedure does not belong to the simple nesting workflow.
This procedure belongs to step 2 of the complete nesting workflow.
In the nesting view for customizing objects, DentalCAM displays a list of all the objects contained in the job. You can use it for the following:
- Change the machining status of objects.
- Delete objects.
- Open the Nesting view for adjusting objects with the following icon in the main toolbar:

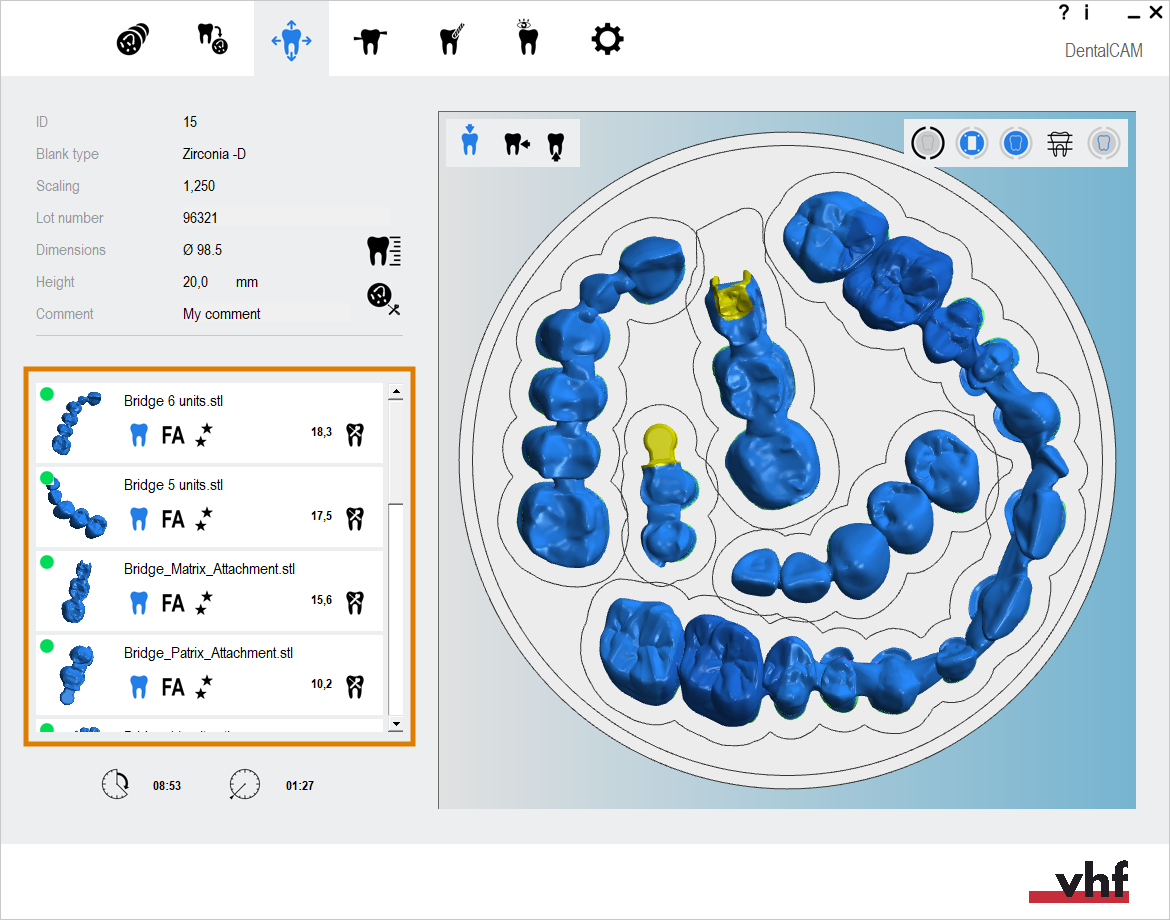
The object list in the nesting view for adjusting objects (marked orange)
Information on objects


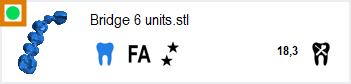
The elements of the object list
- Height indicator
- Object preview
- Machining status for object
- Indication
- Machining quality
- File name
- Object height in mm
-
Icon to open the editing functions for this object
Details
This indicator tells you whether the blank that you are currently editing is of sufficient height for the object.
![]()
Green: The blank is high enough and all data is available
Yellow: All data are available, but the blank is just high enough.
Some parts of the objects may lay outside of the boundaries of the blank. In this case, postpone the work.
![]()
Red: The blank is not high enough.
![]()
Abutment
![]()
Bite splint
![]()
Crown/bridge (less detailed)
![]()
Denture
![]()
Fully anatomical crown/bridge
![]()
Occlusal screw-retained bridge
![]()
Implant bar
![]()
Inlay/Onlay
![]()
Model plate
![]()
Model plug-in tooth
![]()
Partial frame
![]()
Secondary crown
![]()
Surgical guide
![]()
Protrusion splint
![]()
Telescope crown
![]()
Veneer
![]()
Fast – coarse surfaces
![]()
Standard – slightly coarse surfaces
![]()
Optimal – very smooth surfaces
Changing the status of objects and deleting objects
Every object in a job has a machining status. This status determines how the objects behave in the nesting view and whether they will be machined when you send the job to DentalCNC. In the nesting view, you can easily distinguish the different status by color .
| Icon | Machining status | Example |
|---|---|---|
|
|
|
|
|
|
|
|
|
|
|
|
|
|
|

|
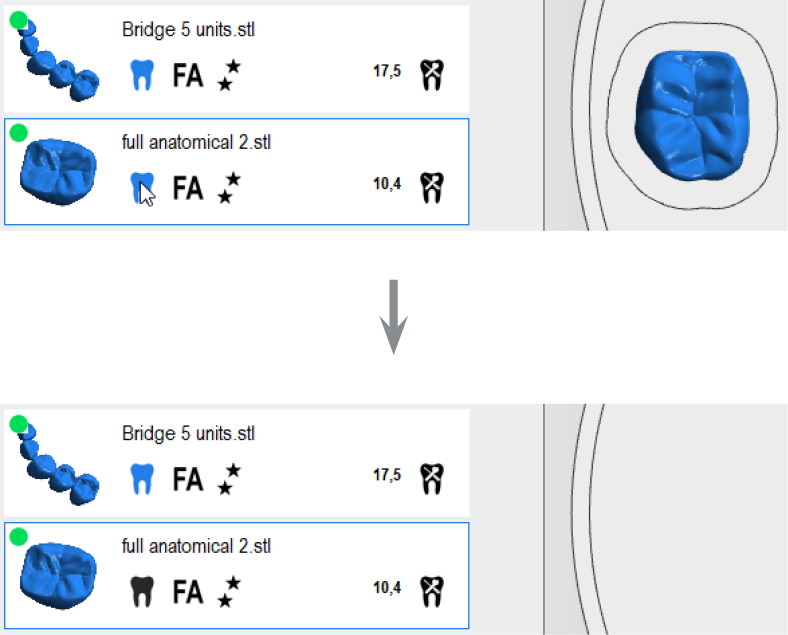
Changing the machining status
You can change the machining status of objects in the object list:
- To cycle through the status in the order shown in the table above, left-click on the machining status icon for the desired object.
- To cycle through the status in reverse order, right-click on the machining status icon for the desired object.
- DentalCAM immediately updates the icon and the object in the blank display. The application also shows the selected machining status in the info area.
Deleting objects
You can delete objects by assigning the corresponding machining status to it.
-
(Optional) Select the desired object in the blank display.
-
DentalCAM highlights the object in the object list with a colored border.
- Select the machining status icon until the following icon displays:

- DentalCAM updates the blank display accordingly. The object is not yet deleted from the blank.
- To undo the deletion, assign a different machining status by selecting the machine status icon.
- To confirm the deletion, open the blank archive by selecting the following icon in the main icon bar:


Deleting an object from a blank
What's next?
Next general step for adjusting objects: