Using the automatic STL import method
Can DentalCAM automatically import STL files?
Beside the manual import method, DentalCAM features an automatic import method.
When using the automatic STL import function, DentalCAM automatically imports files from an STL import folder and adds them to the import list in the STL import view.
For this, DentalCAM periodically checks if new files have been added to the STL import folder and automatically imports any new STL files it can find. This is useful if you want to automate your STL import workflow.
- Open the STL import view with the following icon in the main toolbar:


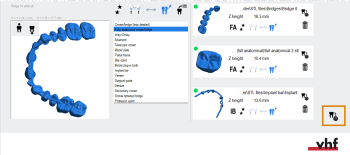
The STL import view when only the automatic import method ist activated
- If you exclusively use the automatic import method, all control elements for the manual import method in the STL import view are hidden and only the import list displays.
- If the manual import method is activated as well, the standard control elements display. DentalCAM will still automatically add STL files in the import folder to the import list.
The entries on the import list stay there until you add them to a blank or manually delete them. Therefore, you can always open the blank archive, select a different blank and switch back to the STL import view without losing the entries on the import list.
Changing the default calculation option
When DentalCAM automatically imports objects, the application assigns default calculation options to them.
![]()
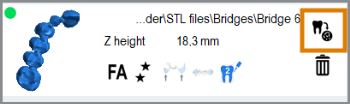
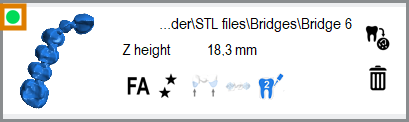
The icons on the import list showing the current calculation options of an object (marked orange)
You need to change these default calculation options as required in the import list:
-
Check whether the object can be imported into the current blank. You can find the corresponding indicator in the import list.
- The blank is not high enough.
- XML data for prefabricated abutments is missing.
- You didn’t select a blank in the blank archive.
-
Select the indication of the object by cycling through the following icons.
DentalCAM must know the right type in order to choose the right machining strategy.
 Show icons

Abutment

Bite splint

Crown/bridge (less detailed)

Denture

Fully anatomical crown/bridge

Occlusal screw-retained bridge

Implant bar

Inlay/Onlay

Model plate

Model plug-in tooth

Partial frame

Secondary crown

Surgical guide

Protrusion splint

Telescope crown

Veneer
-
Select the machining quality by cycling through the following icons:

Fast – coarse surfaces

Standard – slightly coarse surfaces

Optimal – very smooth surfaces
The machining quality affects the path distance when processing outer surfaces. Fits, drillings and cavities are always machined with the highest quality. A higher machining quality results in finer outer surfaces, but also in higher machining time.
- Use Fast if rough outer surfaces are sufficient. This may apply to objects which will be coated or veneered, or require much manual work.
- Use Optimal for very smooth exterior surfaces. You can use this setting, for example, for fully anatomical objects on which you do not want to do much manual work.
- Use Standard for slightly rough exterior surfaces.
-
Activate or deactivate the automatic detection of cavities by cycling through the following icons:

Enabled
If the current object has at least 1 cavity.

Disabled
If the current object does not have cavities, you save time on the import.
-
Activate or deactivate the automatic detection of drillings by cycling through the following icons:

Enabled
If the current object has at least 1 drilling.

Disabled
To save time when importing the object:
- If the current object has no drillings.
- If the object is an abutment with an angled drilling.
- Add all or 1 object to the current blank:
Adding all jobs in the import list to the current blank Select the following icon in the lower right corner of the STL import view:
 .
.If the icon is not visible, you didn't select a blank in the blank archive.
The icon for adding all objects on the import list to the job (marked orange)
- Add a single object on the import list to the current blankSelect the following icon for the desired object on the import list:
The icon for adding all objects on the import list to the job (marked orange)
-
Activate or deactivate the label that will be milled on the object by cycling through the following icons:

Activated
A label will be added to the object. By default, DentalCAM assigns continuous numbers as label texts to objects.
You can specify the label text during nesting. Moving, editing and deleting label texts milled on objects

Deactivated
No label will be added to the object.
- DentalCAM adds the object(s) to the blank. The nesting view automatically opens.
This indicator tells you whether the blank that you are currently editing is of sufficient height for the object and whether all data is available.
![]()
Green: The blank is high enough and all data is available
Yellow: All data are available, but the blank is just high enough.
In the case of a disc, the blank is between 0.3 and 0.5 mm higher than the object.
Some parts of the objects may lay outside of the boundaries of the blank. In this case, postpone the work.
![]()
Red: The object cannot be nested in the current blank. This may be caused by the following reasons:
What's next?
Nest the imported objects in the nesting view.