Marking cavities and deleting markings
Cavities must be marked to ensure optimal manufacturing of the object. Incorrectly marked and unmarked cavities must be marked manually with the Mark cavities editing function.
Requirement You are editing a blank in the Nesting view using appropriate objects.
-
Activate the top view with
 .
-
Select the desired object in the blank display.
-
Open the
 Mark interior surfaces editing function.
-
-
Use and to switch between the individual editing steps.
-
You can discard all changes with
 any time and close the editing function.
-
-
Select a marked or unmarked interior surface.
-
dentalcam attempts to identify the preparation margin and mark it with points.
Some points may lie outside the preparation margin. You will correct these errors in the following steps.
-
Click here to proceed to the next editing step.
-
Hold down the left mouse button and trace the preparation margin.
-
The outer points jump to the preparation margin.
-
Continue to drag the outer points one by one onto the preparation margin.
-
If you were unable to move some points:
-
Switch off the positioning aid via the Positioning aid check box.
-
Hold down the left mouse button and trace the preparation margin.
-
-
Click here to proceed to the next editing step.
-
(Optional) 5-axis machines only: Correct the machining angle in the following cases:
-
Some of the walls of the cavity are not visible, or barely visible.
-
The cavity has undercuts, which are displayed by violet surfaces. To check the entire cavity for undercuts, you need to rotate the view accordingly.
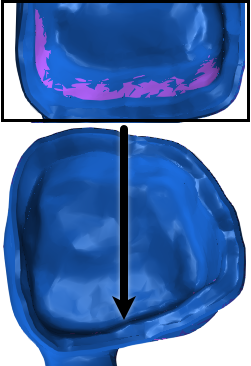
Cavity with undercuts (marked by violet surface)
Adjust the angle of attack using the following values until all walls of the cavity are as visible as possible:
- RX: X-axis
- RY: Y-axis
dentalcam Although this adjusts the orientation of the entire object, it only corrects the angle of attack for the current cavity. You therefore do not to worry about the orientation of other cavities in this step.
Example: The cavity shown above after the angle of attack has been corrected.
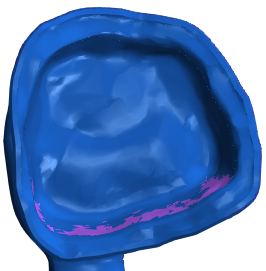
Cavity with undercuts (marked by the purple surface)
-
-
Save the marking with OK.
-
Mark any other unmarked cavities as described.
-
Save all changes with
.Do not use
. -
dentalcam closes the editing function.
Delete interior surface marking
If you want to delete a marking:
-
Select the cavity in the blank display.
Alternative: Select the desired entry from the list of marked cavities.
-
dentalcam highlights the entry in the list with a blue border.
-
Delete the marking with
 .
What's next?
If the object has unidentified or incorrectly labeled drill holes, mark them:
Marking drill holes and deleting markings
To complete the nesting for the object, set the bars:
All nesting information and activities:


