Applies to: N4+, S5, R5, Z4
Installing and using the Elos Accurate Pre-Milled abutment holder
Intended use
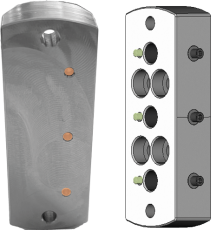
The Elos Accurate Pre-Milledabutment holders are used as adapters to mount prefabricated Elos Accurate Pre-Milled abutment blanks in vhf dental machines.
Elos Accurate Pre-Milled abutment holders may only be used with the following products:
-
The vhf machine type for which the respective holder is designed.
-
dentalcam & dentalcnc 8.06 or higher from material database 21.0
-
Abutment blanks that are designed for the abutment holders and that are machined wet.
NOTICE
Damage to tools, abutment holders and blanks as well as faulty machining results due to incorrect fixing
If blanks move or vibrate during machining, the result may become unusable. Screws that are tightened too much can damage blanks and abutment holders.
-
Use only screws and screwdrivers supplied with the abutment holders unless otherwise specified.
-
Use only spare parts from Elos Medtech Pinol and / or vhf.
Scope of delivery

-
1 x Elos Accurate Pre-Milled abutment holder
-
2 x Cylinder screw M4 x 20
-
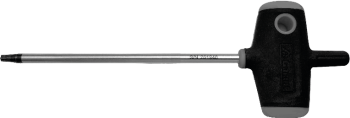
1 x TX20 screwdriver

-
1 x Elos Accurate Pre-Milled abutment holder
-
4 x TX20 screw
-
2 x Abutment grip
-
1 x TX20 bit
-
1.8 Nm Torque screwdriver

-
Elos Accurate Pre-Milled abutment holder
-
4 x TX20 screw
-
2 x Abutment grip
-
1 x TX20 bit
-
1.8 Nm Torque screwdriver

-
1 x Elos Accurate Pre-Milled abutment holder
-
1 x TX20 screwdriver
Mounting the abutment blanks
You can also mount abutment blanks in the abutment holder already installed in the machine.
| Maximum number of abutment blanks that can be mounted simultaneously |
|---|
|
3 |
-
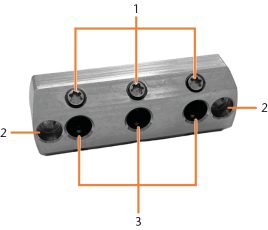
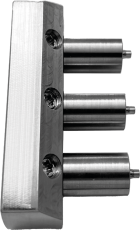
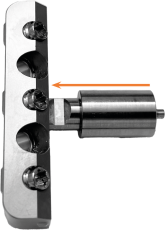
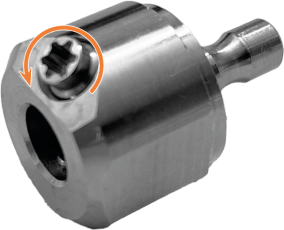
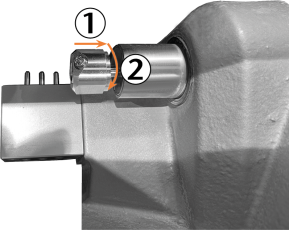
Loosen the fixing screw at the required position of the abutment holder without unscrewing the screw.
-
Fixing screws for abutment blanks
-
Openings for screwing the abutment holder to the blank holder
-
Openings for shafts of the abutment blanks
-
-
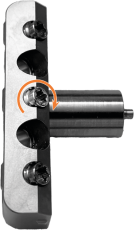
Align the abutment blank so that the beveled notch (marked orange) points in the direction of the fixing screw.

Schematic side view of the Elos Accurate Pre-Milled abutment blank
-
Slide the abutment blank into the opening at the required position.
-
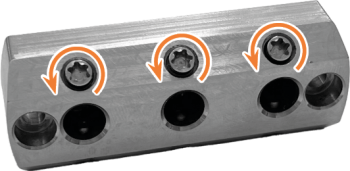
Fix the abutment blank with the fixing screw.
-
The abutment blank is tightened in the direction of the holder and rests on it.
NOTICE! Defective machining results and broken tools if abutment positions do not match the job in dentalcam


The illustrations in this section show the R5 abutment holder. The procedure for the S5 abutment holder is identical.
| Maximum number of abutment blanks that can be mounted simultaneously |
|---|
|
6 (3 each in 2 abutment grips) |
-
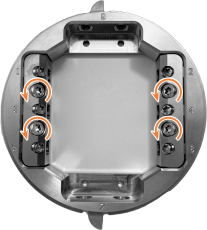
If the abutment grips are installed in the abutment holder:
-
Loosen and remove the 2 screws per abutment grip.
-
Pull the abutment grip straight up out of the abutment holder.
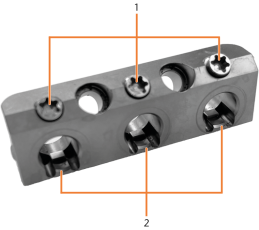
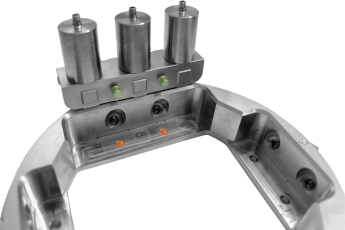
Abutment grip R5 / S5
-
Fixing screws for abutment blanks
-
Openings for shafts of the abutment blanks
-
-
Unscrew the fixing screws in the abutment grip at the required positions as far as possible.
-
The thread locking device prevents the fixing screw from falling out.
-
Align the abutment blank so that the beveled notch (marked orange) points in the direction of the fixing screw.
Schematic side view of the Elos Accurate Pre-Milled abutment blank
-
Slide the abutment blank into the opening at the required position.
-
Fix the abutment blank with the fixing screw.
-
The abutment blank is tightened in the direction of the holder and rests on it.
-
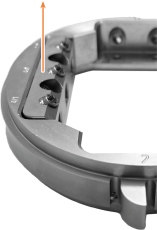
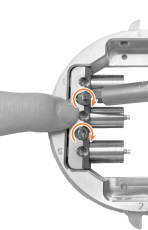
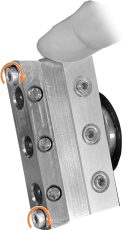
Insert the abutment grip straight into the abutment holder from above.
The positioning pins on the underside of the abutment grip (marked green) must fit into the openings in the abutment holder (marked orange).
-
The abutment grip sits at an angle in the abutment holder.
-
Fixing the abutment grip:
-
Press the outer edge of the abutment grip down and hold the abutment grip in this position.
-
Insert the 2 screws into the abutment grip and screw them in tightly.
-
NOTICE! Defective machining results and broken tools if abutment positions do not match the job in dentalcam


| Maximum number of abutment blanks that can be mounted simultaneously |
|---|
|
1 |
-
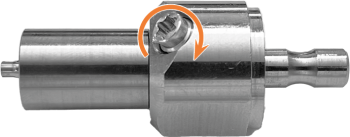
Loosen the fixing screw of the abutment holder without unscrewing the screw.

-
Fixing screw for the abutment blank
-
Shaft for mounting the blank holder
-
Opening for the shaft of the abutment blank
-
-
Align the abutment blank so that the beveled notch (marked orange) points in the direction of the fixing screw.
Schematic side view of the Elos Accurate Pre-Milled abutment blank
-
Slide the abutment blank into the opening.
-
Fix the abutment blank with the fixing screw.
-
The abutment blank is tightened in the direction of the holder and rests on it.


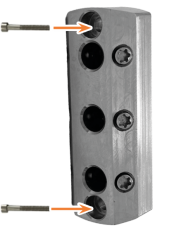
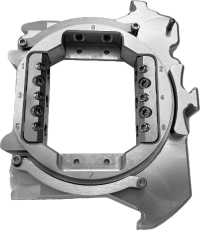
Mounting the abutment holder
-
Remove the tool magazine from the working chamber.
-
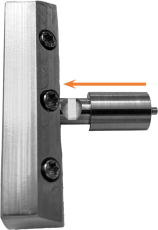
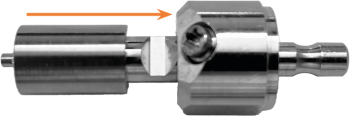
Place the abutment holder on the blank holder:
-
The positioning pins (marked green) on the blank holder must fit into the openings (marked orange) on the back of the abutment holder.
-
Hold the abutment holder until it is fixed.
-
-
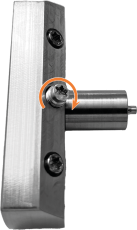
Insert the 2 screws as far as possible into the top and bottom openings in the abutment holder.
-
Tighten the 2 screws.
-
The abutment holder is fixed.


-
Observe the information on operating the blank changer
 Machine component which stores multiple blanks in a magazine and which can automatically load them into the working chamber.. When using the search, use a blank changer or a blank magazine instead:
R5: Operating the blank changer
Machine component which stores multiple blanks in a magazine and which can automatically load them into the working chamber.. When using the search, use a blank changer or a blank magazine insteaddentalcnc: Operating the blank changer with dentalcnc
-
Insert the abutment holder into the change position of the blank magazine
Part of the blank changer in which you store the blanks for automatic loading. or into the blank holder.The alignment corresponds to the block holder.
Mounting the block holder in the working chamber
Mounting blanks and block holders in the blank magazine
Part of the blank changer in which you store the blanks for automatic loading.
-
Observe the information on operating the blank changer
Machine component which stores multiple blanks in a magazine and which can automatically load them into the working chamber.. When using the search, use a blank changer or a blank magazine instead:S5: [%=GLB_Products.ProdS5Short">:
dentalcnc: Operating the blank changer with dentalcnc
-
Mount the abutment holder in a blank frame with the position numbers facing upwards.
-
Insert the blank frame into the change position of the blank magazine
Part of the blank changer in which you store the blanks for automatic loading..
-
Insert the abutment holder into the blank holder like a block.
Mounting and removing blanks

Machining abutment blanks
-
Wipe off the bellows so that no liquid drips onto the abutments.
-
Clean the prefabricated abutments with a dry, lint-free cloth.
-
Prepare the machine and start the job.
NOTICE! Poor machining results due to defective probing of moist or contaminated abutments
Exchanging fixing screws in abutment grips
-
Have ready:
TX20 screwdriver with max. 3 mm blade diameter (not supplied)
Not depicted:
Spare screw
-
Pull the abutment blank out of the corresponding opening.
-
Screw in the fixing screw clockwise until it falls out of the abutment grip.
-
Guide the screwdriver through the opening for the fixing screw in the opposite direction to the direction you are screwing in.
-
Place the spare screw on the tip of the blade.
-
Insert the head of the spare screw into the opening.
-
Screw in the spare screw counterclockwise. Guide the screw thread with one finger so that the screw does not jam.
