Drilling tool positions (holes) into new tool magazine inserts
When the tool magazine inserts are worn, they should be exchanged. Afterward, you must drill the tool positions (holes) into the inserts with the machine.
- Your machine comes with spare tool magazine inserts and the drilling tool.
- Additional inserts and drill tools are available from customer service.
ATTENTION! Machine damage caused by tools in the working chamber
-
Before drilling the tool magazine positions, remove all tools from the working chamber.
-
If your machine uses 2 inserts, always replace both inserts together even if only 1 of them is worn down.
-
Have the tool magazine inserts and drill bit readily available.
")
Drill bit for tool positions (2.8 mm)
- Exchange the tool magazine insert(s) as described in the machine’s operating instructions.
-
Open machine management with the following icon in the Main icon bar:

-
Select the Service functions tab.
-
For the Tool magazine positions function, select the Start button.
-
A window opens.
-
For machines with replaceable tool magazines: Select the positions to be drilled from the Areas drop-down list.
-
Close the working chamber door.
-
Start the process with the following icon:
- The spindle moves to the tool change position.
-
Open the working chamber door.
-
CAUTION!Wear gloves.
- Insert the tool into the collet chuck and hold it in place. Be sure to insert the tool until the tool ring reaches the tip of the collet chuck.
- Confirm the current message.
-
The collet chuck closes. You can release the tool.
- Close the working chamber door.
- Confirm the current message.
-
The machine drills the tool positions into the insert(s).
-
Wait until the process is finished.
-
The spindle moves to the tool change position.
-
CAUTION!Wear gloves.
- Open the working chamber door.
-
Hold the tool in the collet chuck in place.
- Confirm the current message.
- The collet chuck opens.
- Remove the tool from the collet chuck.
-
Close the working chamber door.
- The spindle moves to its default position.
-
(Optional) Save the operation log:
-
To save the data as a text file, select the Save log button and select a storage location.
-
To copy the data to the clipboard, select the Copy log" button.

-
-
Close the function with the icon.
On machines with automatically operated doors and flaps, dentalcnc opens and closes these in accordance with the respective step in the process. To keep the instructions concise, these automatic processes are not mentioned separately in the instructions.
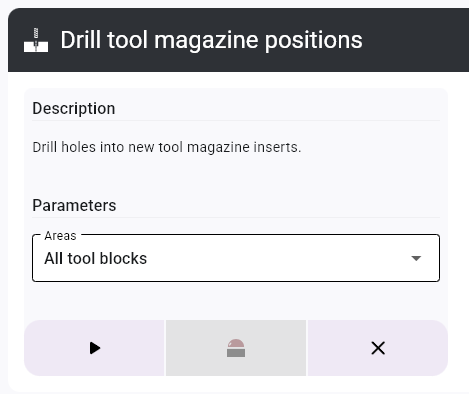
To cancel the process, select the ![]() icon.
icon.