Creating or loading blanks during the main workflow
After importing, add the objects to virtual blanks, which you can either create or load. The activities in this step depend on the material shape you selected during import.
|
Material shape |
Activities |
|---|---|
|
Discs |
You are creating or loading 1 disc for all selected objects. |
|
Blocks |
Create 1 block for each object and assign the blocks to the objects. Loading blocks is not supported. |
|
Prefabricated abutments |
dentalcam automatically creates the required blank for each prefabricated abutment based on the metadata. You receive an overview of this. |
You can import additional objects via the Object import icon in the workflow bar.
Prerequisites
-
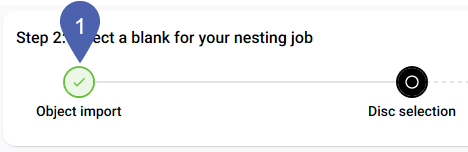
You are currently at the Blank selection workflow step.
-
If you want to load an existing disc: The disc is not currently loaded.
The steps depend on the type of blank you want to create or load.
- Create a disc
- Create blocks
- Create abutment blanks
- Load existing disc
-
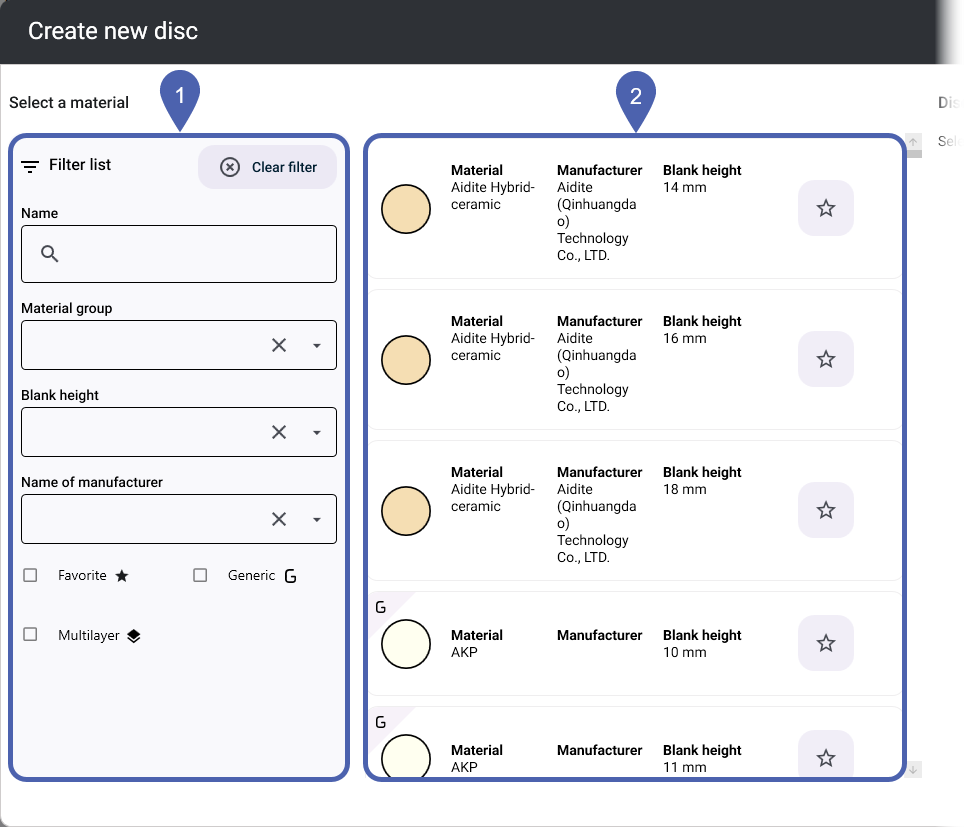
Select the Create new disc button in the upper-right corner.
-
dentalcam displays the Create new disc window.
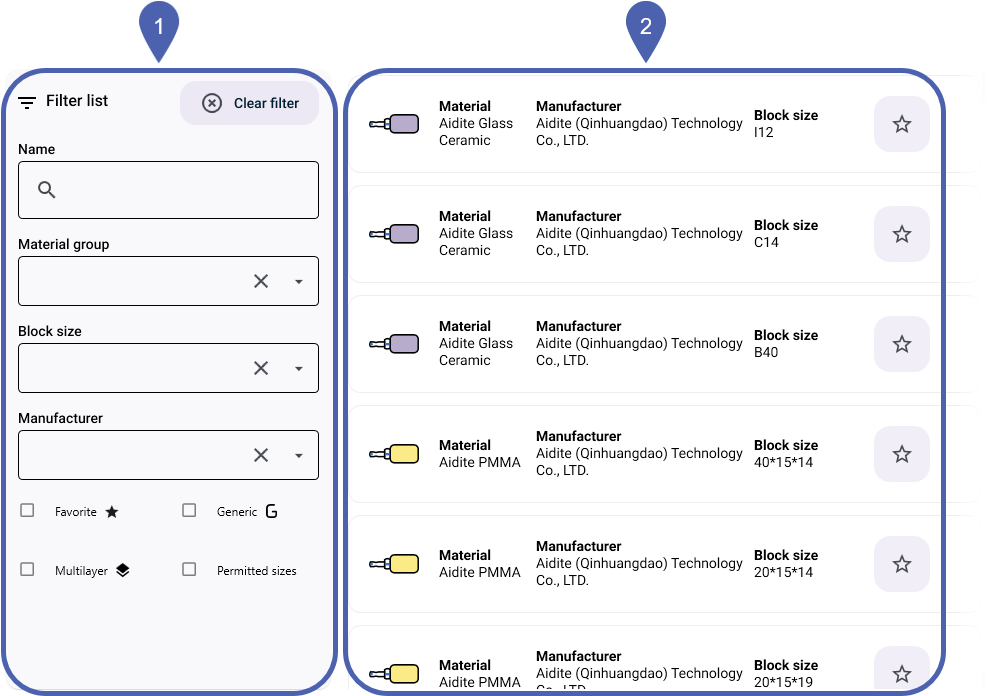
When importing with metadata, the filter is dentalcam pre-populated with values from the metadata, such as the material.

1
Filter for material list
2
Material list
-
(Optional) In the Filter list area, select the desired filter criteria for the material list. This makes it easier to select the material.
Notes on filter criteria
Favorites

Displays only the materials you have marked as favorites.
Generic

Displays only generic materials (e.g., zirconia, PMMA), but not branded materials.
Multilayer

Displays only materials with multiple layers of color.
You can remove existing filter criteria with Clear filters.

-
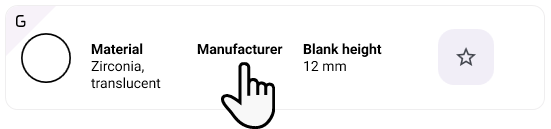
Select the desired material from the material list.
Make sure the disc height is sufficient.
-
Recommendation: If you use this material regularly, mark it as a favorite using the icon at the end of the line:

This means it will be captured using the corresponding filter criterion.
-
In the Disc parameters column, specify the parameters for the disc.
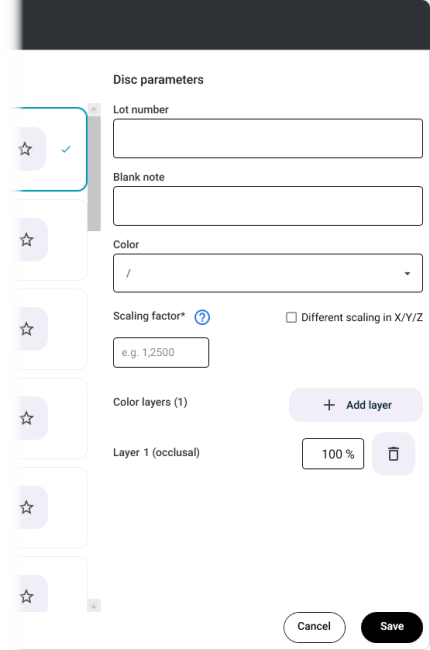
Notes on parameters
Lot number
Enter the lot number of the material for traceability.
Color
For branded materials that are available in different color layers and colors, select the color specification provided by the manufacturer.
Different scaling in X/Y/Z
For some materials, manufacturers specify different scaling factors for the X, Y, and Z directions. If you are using this type of material, activate the check box.
Scaling factor
The scaling factor determines how dentalcam compensates for the change in size during sintering for relevant materials. To do this, the program multiplies the size of each object by the scaling factor.
Example: A scaling factor of 1.200 multiplies the size of all objects by 1.2. This enlarges each object while nesting by 20%.
If a material manufacturer specifies a value other than the scaling factor, convert it. For this see Converting the shrink factor, scaling factor, or shrinkage value.
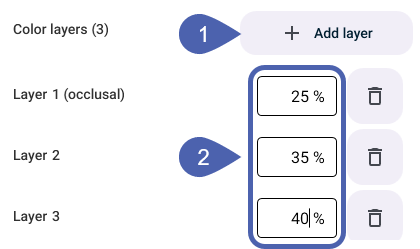
Color layers
Number and opacity of the color layers as a percentage. This information determines how the blank is displayed during nesting, allowing you to position objects correctly.
For multi-layer branded materials, the values are predefined and cannot be changed.
For other materials, add color layers via the Add layer button and set the opacity of the color layers as a percentage. The opacity of all layers must equal 100%.
-
Select the Save button.
-
dentalcam switches to the blank overview and adds the empty blank to the top of the list.
-
Select the blank from the list.
-
To continue nesting, select the Continue nesting button in the lower right corner.
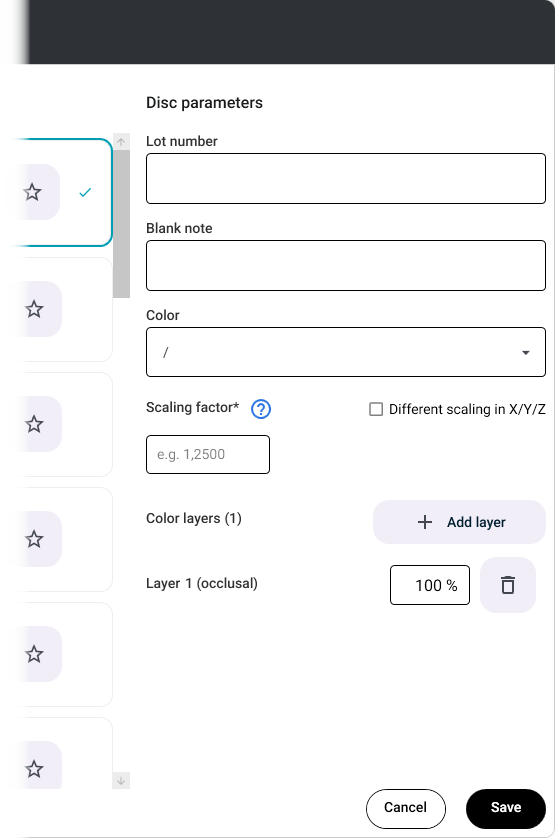

Example: Add and mark as the favorite: 1 generic zirconia disc with a height of 20 mm, 3 color layers, and a scaling factor of 1.136.
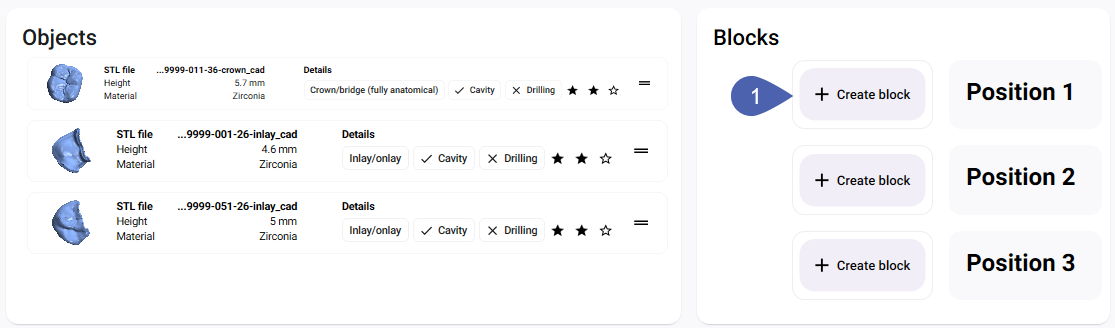
For blocks, dentalcam displays the view for creating new blocks directly. Reusing old blocks is not supported. You can select a different block type for each object.
-
In the Blocks section, select the Create block button for the desired block position.
-
dentalcam displays the Create new block window.
When importing with metadata, the filter is dentalcam pre-populated with values from the metadata, such as the material.
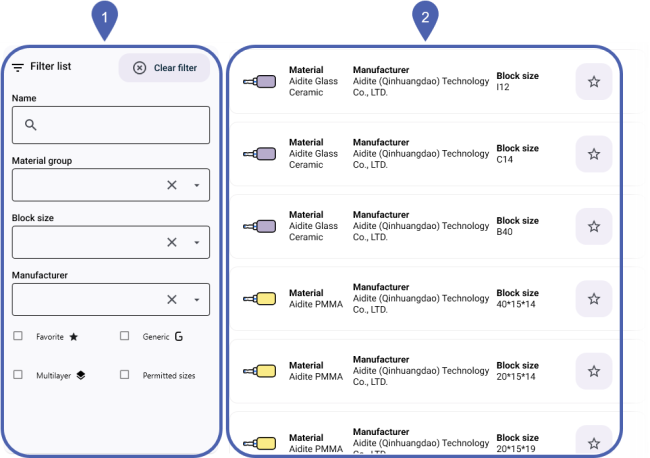
1
Filter for material list
2
Material list
-
(Optional) In the Filter list area, select the desired filter criteria for the material list. This makes it easier to select the material.
Notes on filter criteria
Favorites
Displays only the materials you have marked as favorites.
Generic

Displays only generic materials (e.g., zirconia, PMMA), but not branded materials.
Multilayer

Displays only materials with multiple layers of color.
Permitted
–
Displays only materials that can be mounted at the selected position.
Restrictions apply due to
-
the size of the adjacent blocks,
-
the shape of a pin. Only blocks with the same pin shape are compatible.
You can remove existing filter criteria with Clear filters.
-
-
Select the desired material from the material list.
Make sure the block size is large enough for the object.

-
Recommendation: If you use this material regularly, mark it as a favorite using the icon at the end of the line:
This means it will be captured using the corresponding filter criterion.
-
In the Block parameters column, specify the parameters for the block.
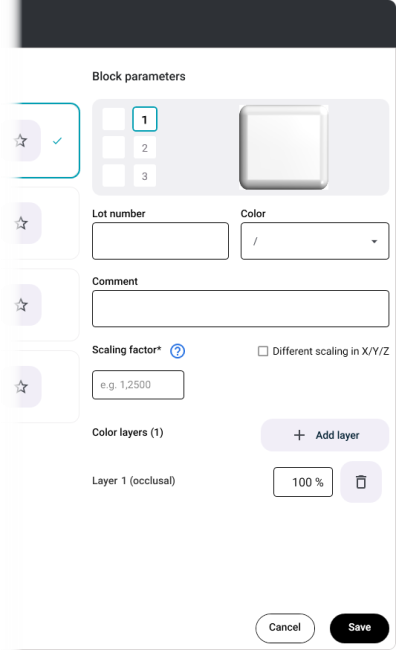
Notes on parameters
Lot number
Enter the lot number of the material for traceability.
When using blocks, please note dentalcam saves only 1 lot information for all blocks in a job. Therefore, enter different lot numbers together in the Lot number input field. Make sure that each item can be clearly assigned to a specific block position.
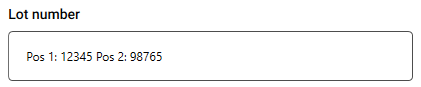
Example: 2 lot numbers in the input field, along with the block item numbers
Color
For branded materials that are available in different color layers and colors, select the color specification provided by the manufacturer.
Different scaling in X/Y/Z
For some materials, manufacturers specify different scaling factors for the X, Y, and Z directions. If you are using this type of material, activate the check box.
Scaling factor
The scaling factor determines how dentalcam compensates for the change in size during sintering for relevant materials. To do this, the program multiplies the size of each object by the scaling factor.
Example: A scaling factor of 1.200 multiplies the size of all objects by 1.2. This enlarges each object while nesting by 20%.
If a material manufacturer specifies a value other than the scaling factor, convert it. For this see Converting the shrink factor, scaling factor, or shrinkage value.
Color layers
Number and opacity of the color layers as a percentage. This information determines how the blank is displayed during nesting, allowing you to position objects correctly.
For multi-layer branded materials, the values are predefined and cannot be changed.
For other materials, add color layers via the Add layer button and set the opacity of the color layers as a percentage. The opacity of all layers must equal 100%.
-
Select Save.
-
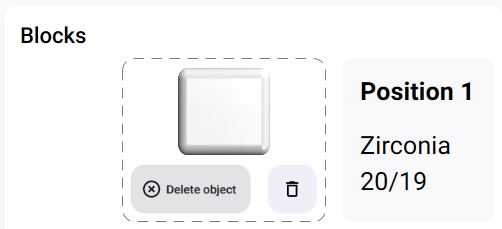
dentalcam displays the selected block in the Blocks column at the selected position.
-
If the parameters or position of the block were selected incorrectly, delete the block via the
 icon and create a new one.
 -
Assign 1 object to the block Drag the desired object from the Objects column onto the block.
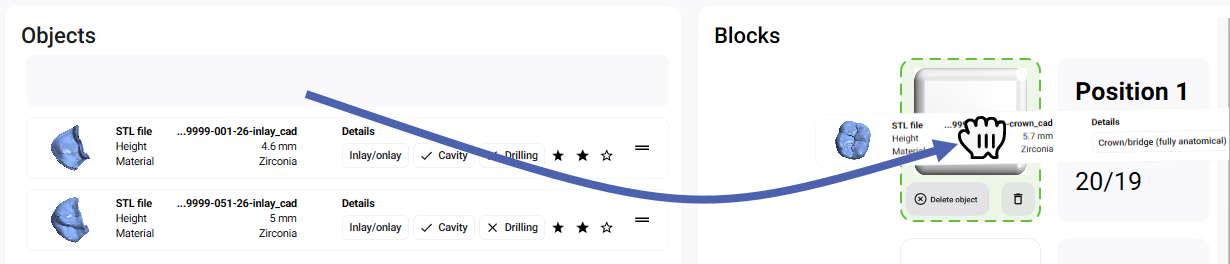
-
dentalcam positions the object in the block. Ignore any unwanted orientation of the object. You adjust the orientation and position during nesting.
-
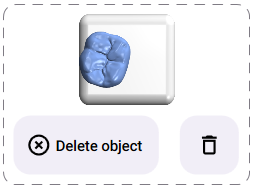
If you assigned the object to the incorrect block, remove the object via the Delete object button and repeat the last step.
-
Create 1 block for each additional object and assign the corresponding object to it.
For larger blocks, you may not be able to use all the slots in the machine. dentalcam prevents you from assembling combinations of blocks that you cannot mount.
-
Each object is assigned 1 block.
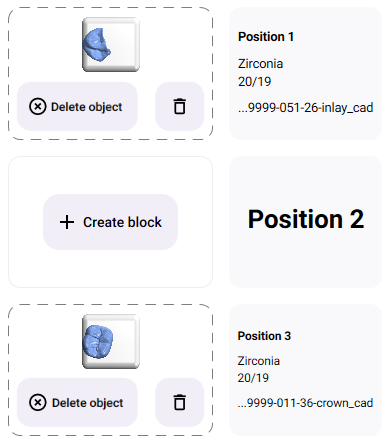
Example: 2 objects were assigned to 2 blocks; position 2 remains empty due to space constraints
-
To continue nesting, select the Continue nesting button in the lower right corner.


Example: Create and assign 2 generic zirconia blocks.
For prefabricated abutments, dentalcam reads all parameters from the metadata. The program therefore uses auto-nesting to switch directly to the Nesting view.
dentalcam displays the list of saved blanks.
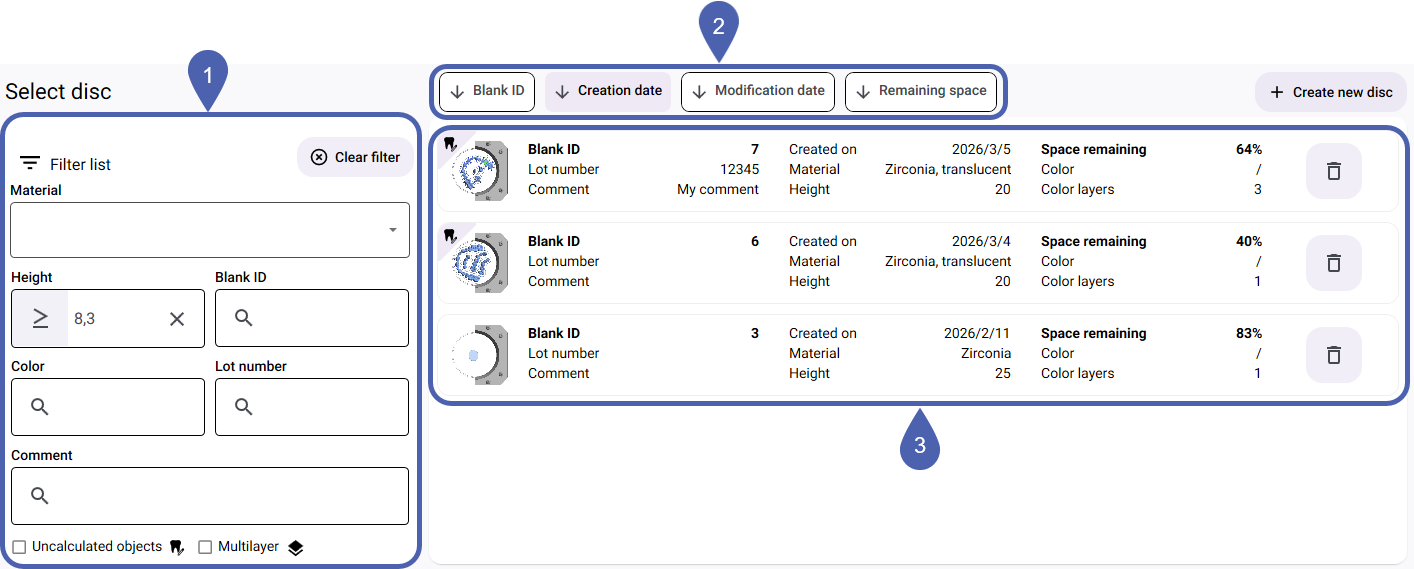
|
1 |
Filter by material properties |
|
2 |
Sorting functions |
|
3 |
Saved blanks |
-
(Optional) Use the filter settings in the left column to filter the blank list.
Based on your selection of objects, the Height criterion is predefined so that only discs with sufficient height are displayed.
Any scaling factor for sintering is not taken into account when predefining the height. In that case, select an appropriately higher blank.
-
(Optional) Use the sorting functions to change the order of the saved blanks.
-
Select the Details button for the desired blank.
-
The Blank details view opens.
-
Select Nesting in the lower-right corner.
Converting the shrink factor, scaling factor, or shrinkage value
Some manufacturers specify other values instead of the scaling factor. Use the following widgets to convert these numbers to the scaling factor: