Applies to: Dental machines
Mounting the calibration blanks
By calibrating the machine with test and calibration specimens, it may be possible to improve the machining results.
The documentation for the manufacturing software![]() Term for the software package consisting of dentalcam and dentalcnc. contains all information for the calibration of the machine. In this document, you will only find machine-specific information.
Term for the software package consisting of dentalcam and dentalcnc. contains all information for the calibration of the machine. In this document, you will only find machine-specific information.
Your machine is delivered with a calibration set. It contains the following parts:
- Calibration blanks which are used to mill calibration and test specimens
- A tool for milling the calibration or test specimens
- A micrometer for measuring the machining precision
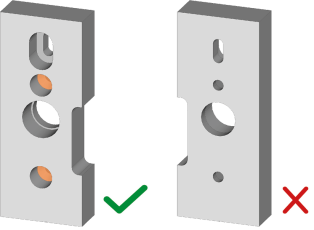
E3
-
Align the calibration blank such that the fastening holes (marked orange) point upwards with the flattened side.
-
Place the elongated hole of the calibration blank on the positioning pin (marked blue) of the blank holder and guide the middle hole onto the pressure piece (marked orange) of the blank holder.
-
Screw the calibration blank tight with 2 of the supplied countersunk screws.
N4+
To be able to mount the calibration blanks in the working chamber, you must prepare them.
- Blank
- Recess for shaft
-
Shaft for fastening the blank in the blank holder
-
Opening for the screw used to fasten the shaft
Tool breakage or incorrect results caused by loose screws
If the blank is not properly seated in the blank holder, the measurement results may be incorrect or the tool may break when calibrating.
- Screw the shafts tightly into the blank.
- Screw the blanks tightly into the blank holder.
- Insert the shafts into the recesses in the blank and align the openings for the screws with the corresponding openings in the blank.
- Place the screws in the openings of the blank and screw down the shafts tightly.
E4
Mounting the calibration blank in the blank holder
-
Insert the shaft of the block into the blank holder as far as it will go.
-
Turn the calibration blank so that the positioning pin at the blank holder lies in the groove in the calibration blank.
-
Carefully turn the fixing screw with the screwdriver until you feel a slight resistance.
-
Then turn the fixing screw another 1⁄4 turn.